Ready to master how to cut fabric strips for quilting? You just need the right tools and a little practice. Precision matters in quilting, so every cut counts. Reliable materials make a huge difference, too.
F&A brings you quality fabrics and trusted tools, so you can focus on your creativity. Whether you’re just starting out or looking to sharpen your skills, you’ve got this!
Key Takeaways
- Use the right tools like a rotary cutter, a long, clear ruler, and a self-healing cutting mat to make cutting fabric strips easier and more accurate.
- Prepare your fabric by pressing it flat and squaring the edges to ensure straight, even strips that fit well in your quilt.
- Fold your fabric carefully along the grain and align it on the cutting mat using the grid lines to keep your cuts straight and consistent.
- Cut the Width of Fabric (WOF) strips using a ruler with cut-out windows to save time and improve accuracy when cutting multiple strips at once.
- Always measure twice and cut once, keep your blades sharp, and practice patience to avoid mistakes and create beautiful, precise quilt pieces.
Tools and Materials
Before you start cutting quilt fabric, you need the right tools. Having the proper equipment makes your work easier, safer, and more accurate. Here’s what you’ll want on your quilting table:
Rotary Cutter and Ruler

A rotary cutter is a must-have for quilters. It lets you slice through fabric smoothly and quickly. Many rotary cutters have ergonomic handles, so your hands stay comfortable, even during long cutting sessions.
Some models, like the Fiskars No Touch Blade Change Tool, make swapping blades safe and simple. Titanium-coated blades stay sharp longer, which means you get clean, precise cuts every time.
Pair your rotary cutter with a long, clear quilting ruler—ideally 24 inches. This ruler helps you measure and cut straight lines with confidence. Non-slip rulers and suction handles keep everything steady, so your strips come out even.
If you want to boost your accuracy, try a specialized ruler like the Stripology ruler. It’s designed for cutting multiple strips at once, saving you time and reducing mistakes.
Tip: Always align your ruler with the grid lines on your cutting mat for the straightest cuts.
Cutting Mat
A self-healing cutting mat is essential for every quilter. It protects your table and keeps your rotary cutter blade sharp. The mat’s grid lines and angle markings help you line up your fabric and ruler, making it easier to cut straight strips.
The non-slip surface keeps your fabric in place, so you don’t have to worry about shifting or bunching. Self-healing mats also stay smooth after many cuts, so your fabric won’t snag.
Quality Fabric Selection
Great quilts start with great fabric. F&A offers high-quality, durable, and eco-friendly fabrics that make cutting quilt fabric a breeze. Their fabrics are soft, consistent, and easy to handle.
You’ll notice the difference when you press, cut, and sew. F&A’s commitment to quality means you can focus on your creativity, knowing your materials will perform beautifully.
Note: Pins, fabric scissors, and fabric markers are also handy for marking and securing your fabric before you cut.
Fabric Preparation
Getting your fabric ready is the secret to smooth, accurate cuts. If you want to know how to cut fabrics like a pro, start with careful preparation. Let’s break it down step by step.
Press and Square Fabric
First, grab your iron and press your fabric. Smooth out all the wrinkles. This makes measuring and cutting quilt fabric much easier. Flat fabric means your ruler sits evenly, so you avoid wavy or crooked strips.
Next, you need to square your fabric. This step helps you with cutting straight pieces every time. Here’s a simple way to do it:
- Place your pressed fabric on the cutting mat with the selvage edge near the bottom.
- Align your ruler along one edge and trim off any uneven bits to create a straight edge.
- Make sure a horizontal line on your ruler matches the fabric fold. This keeps everything square.
- Trim along the ruler’s edge to finish squaring your fabric.
- When you cut strips, measure a little wider than you need, cut, then flip and trim the other edge for perfect, square strips.
Tip: Squaring your fabric keeps your strips from stretching or sagging. It also helps your quilt pieces fit together better.
Quilting experts agree—pressing and squaring are not just extra steps. They are the foundation for how to cut fabrics accurately. If you skip them, you might end up with puckers or uneven seams. F&A’s fabrics make this process easier because their quality control ensures every yard is consistent and smooth.
Fold for Cutting
Now, fold your fabric in half lengthwise, matching the selvage edges. Smooth out any bumps with your hands. This fold lets you cut longer strips with less effort. If you want to save time, you can even fold the fabric into quarters, but make sure everything stays lined up.
Always cut along the straight grain, which runs parallel to the selvage. This keeps your strips strong and helps them hold their shape in your quilt. F&A’s fabrics stay true to the grain, so you get reliable results every time.
Remember: Careful preparation sets you up for success when learning how to cut fabrics for quilting.
How to Cut Fabric Strips for Quilting?
Cutting fabric strips is the heart of every quilting project. If you want to know how to cut fabric strips for quilting with confidence, follow this step-by-step tutorial. You’ll find that a little care at this stage makes your sewing much easier later on.
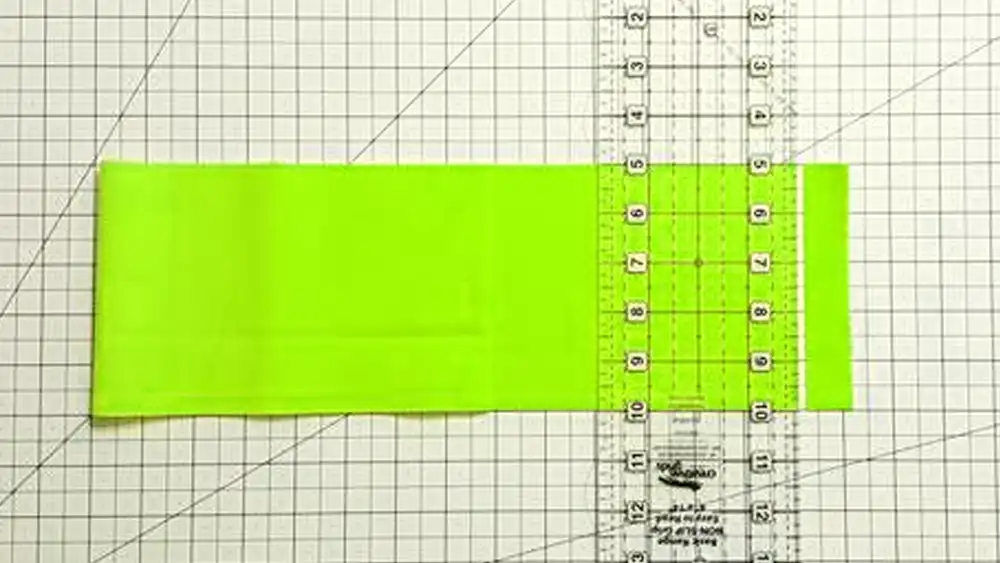
Align on Cutting Mat
Getting your fabric lined up just right is the first step in any cutting instruction. Here’s a quick tutorial to help you set up for success:
- Fold your fabric so the selvages match up perfectly. Make sure the grain runs straight and forms a crisp 90-degree angle at the fold.
- Press your fabric again if needed. A little starch can help, especially if you prewash your fabric. This keeps everything flat and easy to handle.
- Place your folded fabric on your self-healing cutting mat. Line up the fold with a horizontal grid line on the mat.
- Use a long ruler that spans the width of your mat. This helps you measure accurately and keeps your cuts straight.
- If you have a ruler with a lip, lock it against the edge of the mat. Hold the ruler firmly to prevent slipping.
- Stick with the same mat and ruler for all your cuts. This keeps your measurements consistent throughout your project.
- Don’t cut more than four layers at once. Too many layers can shift and throw off your accuracy.
Tip: Take your time with alignment. The better you line up your fabric, the easier it will be to cut fabric strips that are perfectly straight.
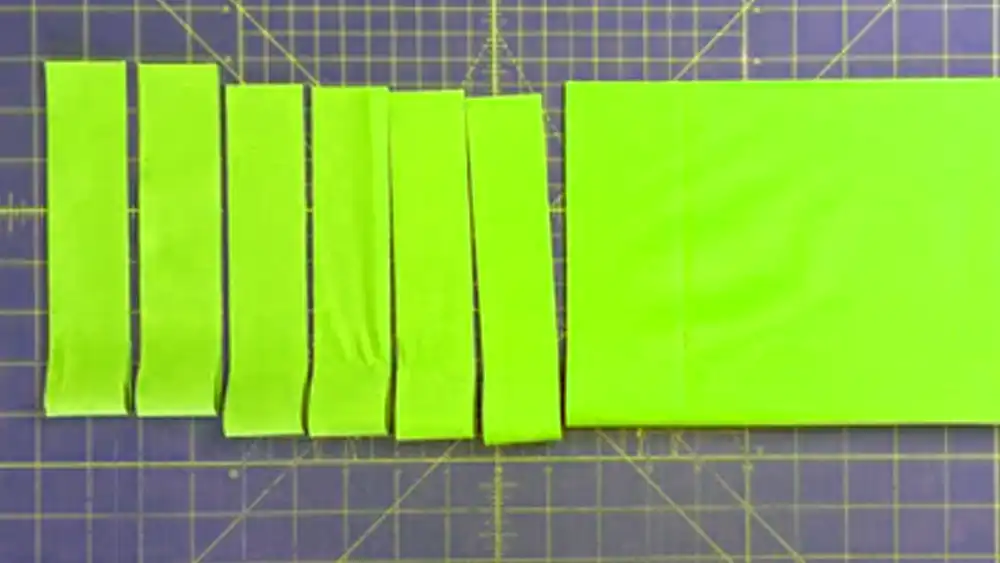
Cut WOF Strips
Now you’re ready to cut off strips (Width of Fabric strips). This method is a favorite in quilting because it gives you long, continuous pieces that are easy to work with. Here’s why so many quilters love cutting of strips:
- When you fold your fabric with the selvages together, it’s easier to handle and cut.
- Using a Stripology ruler or similar tool lets you cut multiple strips at once. This saves you time and helps you avoid mistakes.
- The ruler’s cut-out windows guide your rotary blade, so your cuts stay straight.
- The large ruler keeps your fabric stable on the mat, so nothing shifts while you work.
- Markings on the ruler make it simple to cut popular sizes, like 1½” strips, without extra measuring.
- Many quilters say that cutting WOF strips with a Stripology ruler makes the process faster and more accurate. You’ll spend less time lining up each cut and more time enjoying your project.
Note: Cutting wof strips is a great way to prepare for cutting multiple strips at once, especially if you want to make quick progress on your quilt.
Cut Fabric Strips Tutorial
Ready for a hands-on tutorial? Here’s how to cut fabric strips for quilting, step by step:
- Trim the Edge: Start by trimming the raw edge of your fabric. Place your ruler along the edge, making sure it lines up with the fold and the grid lines on your mat. Use your rotary cutter to slice off any uneven bits. This gives you a clean, straight edge to measure from.
- Measure Your Strip: Decide how wide you want your strip. Place the ruler at the correct measurement, using the markings on the ruler and mat for guidance. Double-check that the ruler is straight and the fabric hasn’t shifted.
- Cut the Strip: Hold the ruler firmly with one hand. On the other hand, run your rotary cutter along the edge of the ruler, pressing down smoothly. Keep your blade straight and steady.
- Repeat for More Strips: Move the ruler over to the next measurement and cut again. If you want to save time, fold your fabric into quarters. Just make sure all the folds and edges stay lined up. This lets you cut multiple strips at once, making the process much faster.
- Rotate or Flip for Comfort: If you find it hard to reach, rotate your mat or flip the fabric. This helps you keep your cuts accurate and prevents awkward angles.
- Stack and Sub-Cut: Once you have your strips, you can stack them and sub-cut them into smaller pieces if needed. This is especially helpful for patchwork or block-based designs.
Pro Tip: Always check that your strips are the same width before moving on. Consistency now means your quilt will fit together perfectly later.
This tutorial covers all the basics of how to cut fabric strips for quilting. You’ve learned how to cut off strips, how to cut fabrics efficiently, and how to use your tools for the best results.
Cutting fabric strips doesn’t have to be stressful. With these cutting instructions, you’ll find that cutting quilt fabric becomes a fun and satisfying part of your creative process.
If you want to master how to cut fabrics and enjoy cutting multiple strips with ease, keep practicing these steps. Each time you follow this tutorial, you’ll get better and faster. Soon, you’ll cut fabric strips like a pro and bring your quilting ideas to life.
Sub-Cutting and Accuracy Tips
Sub-Cutting Strips
Once you have your long fabric strips, you often need to cut them into smaller pieces for your quilt blocks. This step is called sub-cutting. Start by stacking a few strips on top of each other, making sure the edges line up perfectly.
Use your ruler to measure the exact length you need for each piece. Hold the ruler steady and cut straight down with your rotary cutter. Always double-check your measurements before you cut. This saves fabric and keeps your pieces uniform.
Tip: When preparing for your subcuts, iron your strips flat and stack them neatly. This helps you avoid shifting and keeps your cuts crisp.
How to Cut Fabrics Evenly?
Cutting fabric evenly takes patience and practice. If you rush, you might end up with pieces that don’t fit together well. Here are some steps you can follow to get even strips every time:
- Align your fabric with the grid lines on your cutting mat.
- Use a sharp rotary cutter and make sure only one blade is installed.
- Apply even pressure as you cut, moving the blade away from your body.
- Line up your ruler with the fabric grain and mat grid for guidance.
- Cut at a 90-degree angle to the fold for straight strips.
- Don’t cut too many layers at once—your blade size matters.
- Keep your tools in good shape by replacing dull blades.
- Measure twice, and cut once. This simple habit saves fabric and reduces mistakes.
Using specialized rulers, like a quarter-inch ruler or a shape-cut ruler, can also help you get precise cuts for different shapes and sizes. Practicing on scrap fabric builds your confidence and skill.
Troubleshooting
Sometimes, even with careful cutting, things go wrong. You might notice crooked strips, stretched edges, or uneven stitching. These issues can happen if you pull the fabric too tightly, use the wrong needle, or cut it at the wrong angle. To fix these problems:
- Press your strips before sewing to keep them flat.
- Handle bias strips gently to prevent stretching.
- Use a walking foot for even feeding if your fabric shifts.
- Adjust your machine tension and try sewing on a scrap first.
- Take breaks and use spray starch for extra control.
If you keep running into trouble, try watching a video tutorial or practicing on less expensive fabric. Every quilter makes mistakes, but with patience and practice, your accuracy will improve and your quilts will look amazing.
Conclusion
You now know how to cut fabric strips for quilting with confidence. Keep practicing and choose quality materials from F&A for the best results. Experts say that patience and precision make all the difference in quilting.
- Master rotary cutting with steady practice.
- Square your fabric and use weights for accuracy.
- Care for your tools and set up your workspace for success.
Stay patient, enjoy the process, and let your creativity shine!
FAQ
How do you keep fabric strips from fraying?
You can use pinking shears or apply a fabric sealant to the edges. Handle your strips gently and avoid pulling on the edges. Prewashing your fabric also helps reduce fraying.
What is the best width for quilt strips?
Most quilt patterns use strips that are 2½ inches wide. Jelly roll strips come in this size. Always check your pattern for the exact width before you start cutting.
Can you cut fabric strips without a rotary cutter?
You can use sharp fabric scissors and a ruler. Mark your lines with a fabric marker first. Rotary cutters give you straighter, faster cuts, but scissors work in a pinch.
Why do my strips come out crooked?
Your fabric may not be squared or aligned with the mat. Double-check your ruler and mat lines before each cut. Press your fabric flat and use a sharp blade for the best results.