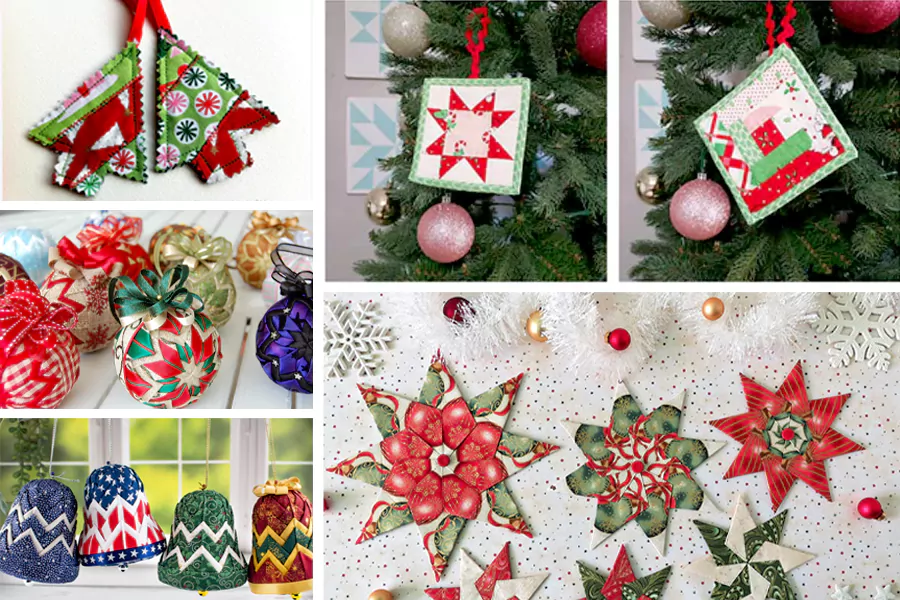
You can easily learn how to make quilted fabric ornaments at home—crafters of all ages and skill levels enjoy this fun, rewarding project. Thousands of people around the world join online ornament clubs and follow simple tutorials using fabric scraps and easy no-sew or sewn techniques.
F&A offers eco-friendly, high-quality fabrics that make your holiday ornaments stand out. Each ornament can feature dozens of fabric pieces, so you get endless creative options for holiday crafts and special celebrations.
Key Takeaways
- Gather simple materials like fabric scraps, batting, pins, and glue to start making quilted fabric ornaments easily at home.
- Choose eco-friendly fabrics such as organic cotton or recycled blends to create beautiful ornaments that help protect the environment.
- Follow step-by-step instructions: prepare a base, cut and fold fabric pieces, attach them carefully, and add creative embellishments for a unique look.
- Use no-sew methods with pins and glue for beginners or kids, or sew for extra detail and durability in your ornaments.
- Personalize your ornaments with embroidery, beads, or custom fabrics to make meaningful gifts and decorations that last for years.
How to Make Quilted Fabric Ornaments?
Materials and Tools
You do not need fancy equipment to start making quilted fabric ornaments. Most supplies are easy to find at home or at your local craft store. Here is a handy table to help you gather what you need:
| Category | Examples / Items Included |
|---|---|
| Fabrics | Coordinating Christmas fabrics, 4.5-inch white fabric square, batting |
| Threads | White thread, coordinating thread |
| Adhesives | Fabric glue spray, double sided basting tape |
| Cutting Tools | Rotary cutter, cutting mat, small scissors |
| Measuring Tools | Quilting ruler, measuring gauge, square quilter’s ruler |
| Sewing Accessories | Presser foot, quilting pins, marking pens, sewing stiletto, thread stand |
| Pressing Tools | Wool pressing mat, ironing mat, steam iron, fabric starch |
| Other Supplies | Quilting gloves, tailor’s clapper, batting, ribbon or rickrack for hanging |
You can also use fabric scraps for an eco-friendly approach. Many crafters love using leftover pieces from other projects to create a patchwork christmas tree ornament or quilted trees. If you want to see how many tools you might need, check out this chart:

Both no-sew and sewn methods work great for making quilted christmas ornaments. No-sew options use pins or glue, so they are perfect for beginners or kids. Sewn methods let you add extra details like beads or embroidery. You can make a batch of ornaments quickly, and both styles create beautiful, durable decorations for your christmas tree ornament collection.
Tip: F&A’s eco-friendly, high-quality fabrics make your ornaments look and feel special. Their custom service lets you design a unique patchwork christmas tree ornament or quilted trees for any occasion.
Choosing Fabrics
Picking the right fabric is one of the most fun parts of learning how to make quilted fabric ornaments. You can choose bold reds and greens for a classic christmas tree ornament, or mix in candy cane stripes and snowflake prints for a playful look.
Try using organic cotton, recycled materials, or hemp for a sustainable project. F&A offers a wide range of eco-friendly fabrics, including GOTS-certified organic cotton and recycled blends.
| Fabric Type | Quality & Eco-Friendly Credentials |
|---|---|
| Organic Cotton | GOTS certified, grown without synthetic pesticides, supports sustainable agriculture |
| Lyocell (Tencel) | Closed-loop production, biodegradable, low water and chemical use |
| Modal | Made from beech trees, energy-efficient, biodegradable |
| Hemp | Low water and pesticide needs, highly durable, low environmental footprint |
| 100% Recycled Fabrics | Made from waste, conserves energy and water, includes recycled cotton and polyester |
| Linen | Made from flax, requires less water, biodegradable, durable |
You can also use fabric scraps or upcycled materials for a zero-waste approach. Look for fabrics with natural dyes and check for certifications like GOTS or Oeko-Tex. These choices help you create beautiful quilted christmas ornaments while caring for the planet.
If you want a truly unique look, F&A’s custom fabric service lets you design your own prints for your next fabric ornament tutorials or patchwork christmas tree ornament projects.
Step-by-Step Guide
Prepare the Base
Getting started with your quilted ornament means preparing a sturdy base. Most crafters use Styrofoam balls because they are lightweight and easy to work with. You can also use foam shapes or even tightly packed fabric scraps for a more eco-friendly option.
- Take your Styrofoam ball and use a soft pencil to lightly mark the top, bottom, and four sides. This helps you divide the ball into even sections, which is important for a balanced design.
- Use a flexible measuring tape or a piece of string to wrap around the ball. Mark the halfway point all the way around. This line will guide your fabric placement.
- If you want extra texture, wrap the ball in a thin layer of batting or cushion foam. Secure it with a bit of fabric glue or pins. This step adds a soft, quilted feel to your ornament.
- For a professional finish, you can pipe the edges with fabric strips or bias tape. This not only looks great but also helps prevent fraying.
Tip: F&A’s custom fabrics let you choose unique prints or colors for your base layer, making your ornament truly one-of-a-kind.
Cut and Fold Fabric
Now comes the creative part—cutting and folding your fabric. This step is where your ornament starts to take shape.
- Cut your fabric into squares, usually between 2 1/2 and 4 inches, depending on the size of your base. Use a rotary cutter and a quilting ruler for clean, straight edges.
- Fold each square in half, pressing the crease with your fingers. This marks the center and helps with precise placement.
- Fold the corners of each square into the center crease to create a triangle. Press the folds firmly so they hold their shape.
- If you want a more intricate pattern, try layering different fabrics or using contrasting colors. F&A’s wide selection of eco-friendly fabrics gives you endless options for mixing and matching.
Stephanie’s popular tutorial shows how careful measuring and finger-pressing creases make a big difference in the final look. Taking your time with this step ensures your quilted ornament looks neat and professional.
Attach Fabric to Base
Attaching the fabric is where you see your design come together. You can use either a no-sew or sewn method, depending on your preference.
No-Sew Method:
- Place your first folded triangle at the marked center of the ball. Pin the point down with a small sequin pin.
- Continue adding triangles around the center, overlapping the edges slightly. Pin each one in place, following your marked lines for even spacing.
- Use a butter knife or a blunt tool to tuck the raw edges of the fabric under the previous layer. This keeps everything tidy and secure.
- Work in layers, moving outward from the center. Each new layer should cover the pins and raw edges of the previous one.
Sewn Method:
- If you prefer sewing, use a needle and thread to attach each folded piece. Small, hidden stitches work best.
- You can also use a sewing machine to join fabric pieces before attaching them to the base, creating patchwork patterns with vertical and horizontal joints.
Note: F&A’s custom fabrics can help you create a truly unique design. Try printing your own holiday patterns or family monograms for a personal touch.
Add Embellishments
This is where you can let your creativity shine! Embellishments turn a simple quilted ornament into a showstopper.
- Add a ribbon loop at the top for easy hanging. Cut a piece of ribbon, fold it into a loop, and pin or glue it securely to the top of your ornament.
- Cover any visible seams with decorative trims, rickrack, or fabric strips. This gives your ornament a polished look.
- Try adding beads, buttons, or even small charms for extra sparkle. Many crafters love using machine embroidery to personalize their ornaments. Beginners find embroidery surprisingly accessible, and it adds a special touch.
- Share your finished ornaments on social media to inspire others and join the crafting community. Many blogs and brands encourage you to post your creations and connect with fellow makers.
🎄 Don’t forget: The final step in how to make quilted fabric ornaments is all about making it your own. Use F&A’s sustainable fabrics and custom prints to create ornaments that reflect your style and values.
With this step-by-step guide, you can start constructing a quilted ornament that’s perfect for your holiday décor or as a heartfelt handmade gift. Take your time, enjoy the process, and watch your creativity come to life!
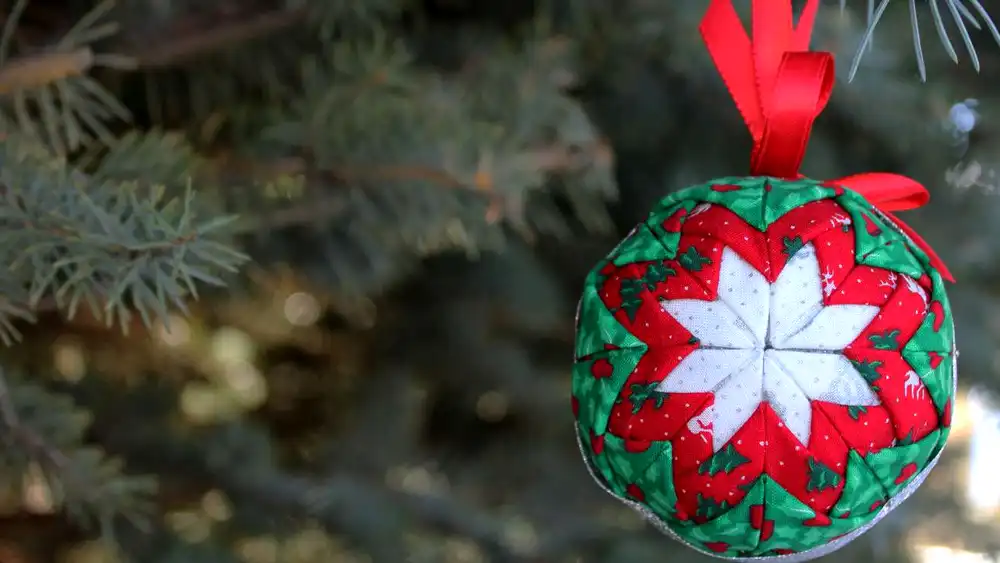
Fabric Star Quilted Christmas Ornaments
Cutting and Folding Stars
You can create beautiful fabric star quilted christmas ornaments with just a few simple tools. Start by picking three different F&A fabrics. Choose colors and patterns that look great together. Lay your fabric on a cutting mat.
Use a rotary cutter and ruler to cut squares in three sizes—one for the center, one for the middle layer, and one for the outer layer. Freezer paper templates help you get perfect shapes every time.
Fold each square in half, wrong sides together. Press the crease with your fingers. Fold in half again to make a smaller square and press. Open the square and fold each corner into the center, forming a triangle. Press each fold so it stays crisp. Repeat this for all your fabric pieces. You now have a stack of folded triangles ready to become stars.
Tip: Using F&A’s custom fabrics lets you design ornaments that match your holiday theme or family style.
Assembling the Star Ornament
Now you get to see your ornament come to life. Follow these steps to assemble your fabric star quilted christmas ornaments:
- Gather your supplies: folded fabric triangles, a Styrofoam ball, dressmaker pins, ribbon, a screw eye, and a thimble.
- Pin the first set of triangles to the center of the ball. Place them in mirrored pairs to cover the surface evenly.
- Add the middle layer by pinning triangles on the diagonal, forming the star shape.
- Continue with the outer layer, folding and pinning triangles to cover the rest of the ball.
- Repeat the folding and pinning steps on the other side of the ball.
- Insert a screw eye at the top and secure it with hot glue. This creates a spot for hanging.
- Wrap ribbon around the ornament to hide pins and seams. Add a loop for hanging.
You can use either the no-sew method with pins or sew the pieces for extra security. Don’t worry if the back doesn’t line up perfectly—most people won’t notice. Enjoy the process and admire your finished star!
Handmade Quilted Christmas Ornaments Ideas
Customization Tips
You can turn handmade quilted christmas ornaments into keepsakes that reflect your personality and style. Start by picking fabrics that match your favorite colors or holiday themes. F&A’s custom service lets you design your own prints, so your handmade christmas ornament can feature family names, special dates, or even a beloved pet. This makes every ornament unique.
Want to add more flair? Try these ideas:
- Use embroidery to stitch initials or festive messages.
- Sew on beads, sequins, or tiny buttons for sparkle.
- Layer different fabrics to create bold patterns or soft gradients.
- Attach charms or small trinkets that hold special meaning.
DIY holiday kits make it easy for you to get creative. These kits let you personalize each ornament, turning a simple project into a fun, hands-on activity. You can involve your family, making the process a bonding experience.
Many people find that making handmade quilted christmas ornaments is relaxing and rewarding. You get to see your creativity come to life, and the finished ornament feels extra special because you made it yourself.
Tip: Personalizing your quilted christmas ornaments adds a heartfelt touch to your christmas tree ornament or makes a thoughtful diy holiday gift.
Eco-Friendly Options
If you care about the planet, you can make handmade quilted christmas ornaments using sustainable materials. Fabric scraps from old clothes or past projects work great for easy tree ornaments and quilted trees. F&A offers eco-friendly fabrics like organic cotton and recycled blends, which help reduce waste and support a greener holiday season.
Many studies show that using natural or recycled fibers lowers the environmental impact of your crafts. Choosing quality materials also means your handmade christmas ornament will last for years. You can skip harsh chemicals and pick fabrics with certifications like GOTS or Oeko-Tex. These choices help protect the environment and keep your home safe.
Here are some eco-friendly embellishments you can try:
- Wooden beads or recycled glass buttons
- Natural fiber ribbons or twine
- Upcycled lace or trims
Making quilted christmas ornaments with sustainable materials is a smart way to celebrate the holidays. You help the planet and create beautiful decorations you can enjoy year after year.
Troubleshooting Quilted Ornament Projects
Common Mistakes
Making quilted ornaments can feel easy, but sometimes you run into little problems. Here are some common mistakes you might see:
- Fabric Fraying: You notice the edges of your fabric start to unravel. This can make your ornament look messy.
- Uneven Pinning: Some triangles or squares do not line up. Your design looks crooked or lopsided.
- Loose Embellishments: Ribbons, beads, or trims fall off after a few days.
- Bulky Layers: Too many fabric layers make the ornament hard to pin or sew.
- Visible Pins: Pins stick out or show through the fabric.
Tip: If you spot these issues early, you can fix them before finishing your ornament.
Helpful Tips
You can solve most problems with a few simple tricks. Try these tips to get the best results:
- Prevent Fraying: Use pinking shears or apply a small amount of fabric glue to the edges. F&A’s high-quality fabrics often fray less, so you get a cleaner look.
- Pin Evenly: Mark your base with clear lines before you start. Place each triangle or square right on the line. A quilting ruler helps keep everything straight.
- Secure Embellishments: Use strong glue or double-pin ribbons and trims. For beads or buttons, sew them on with sturdy thread.
- Manage Layers: Don’t use too many fabric pieces in one spot. Press each fold flat before pinning.
- Hide Pins: Tuck pins deep into the foam or cover them with ribbon or trims.
🧤 Wear a thimble to protect your fingers when pinning. If you get stuck, watch a quick online video for step-by-step help.
You can always reach out to the crafting community for advice. Many crafters share their own troubleshooting tips on social media and blogs. With a little patience, you’ll create ornaments that look beautiful and last for years!
Making quilted fabric ornaments at home brings out your creativity and adds a personal touch to any celebration. Many crafters say these projects feel “wonderful,” “cute,” and “bright and cheerful.”
- You get to use up fabric scraps in fun ways.
- People often share their ornaments and thank others for inspiring ideas.
- These crafts spark memories and encourage you to keep creating.
Try new designs with F&A’s unique fabrics. Share your finished ornaments online or check out more F&A DIY tutorials. Let your imagination lead the way! 🎨✨
FAQ
How long does it take to make one quilted fabric ornament?
You can finish a simple ornament in about 30 to 60 minutes. If you add lots of details or try a new technique, you might need a little more time. Take breaks and enjoy the process!
Can I use fabric scraps from old clothes?
Absolutely! Using fabric scraps from old shirts or dresses gives your ornaments a personal touch. You also help the environment by reusing materials. Just make sure the fabric is clean and not too stretchy.
What is the best way to hang my finished ornament?
Tip: Attach a ribbon loop or a piece of twine at the top. Pin or glue it securely. You can also use a small screw eye for extra strength. This makes it easy to hang your ornament on the tree.
Do I need a sewing machine for these ornaments?
No, you don’t need a sewing machine. You can make beautiful quilted ornaments using only pins, fabric, and a bit of glue. If you want to sew, that’s great too, but it’s not required.
How do I keep my ornaments looking new year after year?
Store your ornaments in a dry box or a fabric bag. Keep them away from moisture and direct sunlight. If they get dusty, gently wipe them with a soft cloth. Your ornaments will stay bright and beautiful!