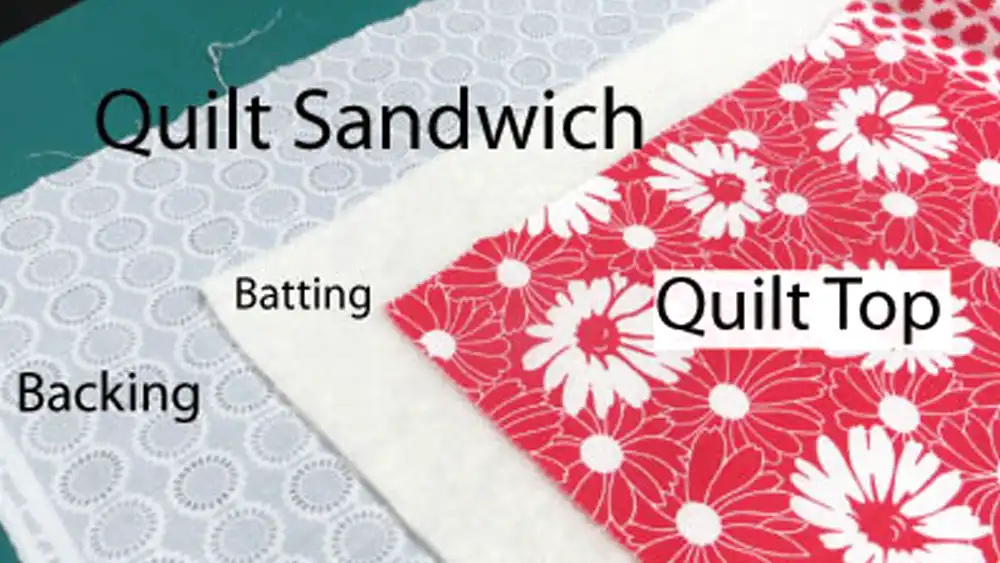
Putting together your quilt sandwich by learning how to assemble the quilt top, batting, and backing is easier than you think. Simply lay your backing fabric flat, smooth out your batting, and place your quilt top right on top.
Start in the center and work outward to keep everything smooth. Using high-quality materials, like F&A fabrics, makes the entire quilting process smoother. You can feel confident knowing your quilt will look great and stay secure from top to bottom.
Key Takeaways
- Use the right supplies like quilt top, batting, backing fabric, and basting tools to make assembly easy and smooth.
- Press and trim your quilt layers carefully to remove wrinkles and allow extra space for quilting and trimming.
- Lay your backing fabric wrong side up, then add batting centered, and finally place the quilt top right side up, smoothing each layer from the center out.
- Keep layers flat by taping the backing, smoothing batting and quilt top, and checking for wrinkles or bumps before basting.
- Choose a basting method—pin, spray, or thread—that fits your project and skill level to hold layers securely during quilting.
Materials and Tools
Essential Supplies
You want to start with the right supplies to make your quilt assembly smooth and stress-free. The Quilt Show points out that having the proper materials is key for a successful quilt finish. You will need:
- Quilt top: This is the decorative layer you have pieced together.
- Batting: This goes in the middle and gives your quilt its warmth and softness.
- Backing fabric: Choose a high-quality, durable option like F&A fabrics for the best results.
- Basting supplies: You can use safety pins, spray adhesive, or thread to hold your layers together.
- Thread: Pick a strong thread that matches your quilt top.
- Rotary cutter: A medium-sized rotary cutter helps you cut fabric quickly and accurately.
- Cutting mat: An 18″ x 24″ self-healing mat works well with rotary cutters.
- Quilting rulers: Sizes like 5″ x 24″ or 6″ x 12″ help you measure and cut straight lines.
“If you want to make a whole quilt, not just piece the front, you need batting, backing fabric, and basting supplies like pins, spray adhesive, or thread.”
Many quilters say these tools last for years and make a big difference in your quilting success. You might even want to borrow some tools before buying your own.
Optional Tools
Some extra tools can make assembling your quilt even easier. You might find these helpful:
- Smoothing spray or starch: These help keep your top and backing flat.
- Masking tape or painter’s tape: Use these to secure your backing to a table or floor.
- Large table or clean floor space: A big, flat area gives you room to spread out your layers.
- Extra pins or clips: These keep everything in place as you work.
- Iron and ironing board: Press your quilt top and backing for a crisp, smooth finish.
A little preparation with the right materials and tools sets you up for a hassle-free quilt assembly. When you use F&A backing fabric, you get a smooth, sturdy base that makes the rest of the process much easier.
Preparing Quilt Layers
Pressing and Trimming
Start by giving your quilt top and backing a good press with your iron. This step helps you get rid of wrinkles and creases that can cause problems later. If you want an even smoother finish, try using a little smoothing spray or starch.
Many quilters find that starching fabric after washing and before cutting keeps the fabric from stretching and makes sewing more accurate.
Tip: Pressing open all seams, especially in a pieced backing, creates a flatter quilt sandwich and helps prevent scrunching during quilting.
Next, trim your layers. Make sure your backing and batting are both 4 to 8 inches larger than your quilt top on all sides. This extra space gives you room for shifting during quilting and makes basting much easier.
You can use a rotary cutter and ruler for straight, clean edges. Prewashing your fabric, especially if you use fat quarters or larger pieces, can help prevent dye bleeding and shrinkage.
Here’s a quick look at how pressing and trimming can save you time:
| Step | Standard Time (minutes) |
|---|---|
| Pressing (ironing) | 1.65 |
| Total Assembly | 41.76 |
| Cycle Time | 1.92 |
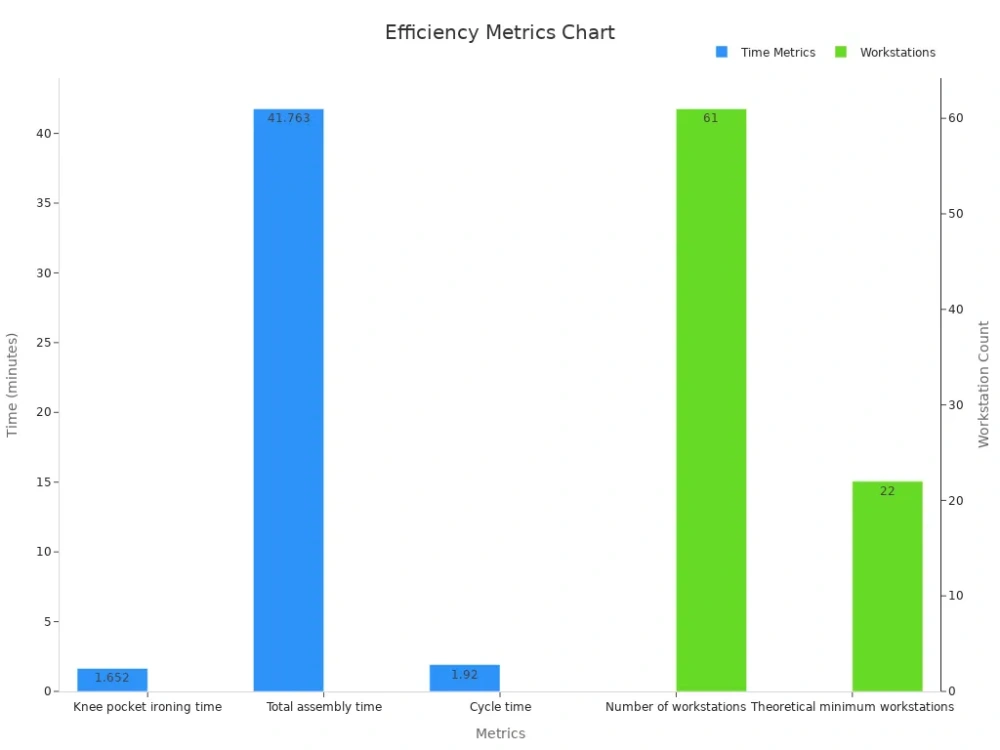
By taking a few extra minutes to press and trim, you set yourself up for a smoother, faster quilt assembly.
Checking Size and Alignment
Before you start layering, check the size of each piece. Lay your quilt top out flat and measure it. Then, double-check that your backing and batting are both big enough. You want them to extend at least 4 inches past the edges of your top on every side.
Accurate alignment matters. Consistent seam allowances help your blocks line up and your quilt look professional. Try this: Sew three strips together, each 1½ inches wide. After pressing, the center strip should measure exactly 1 inch.
If it doesn’t, adjust your seam guide. This simple test helps you catch mistakes before you assemble your layers.
Precision cutting also plays a big role. When every square is the same size, your quilt comes together with clean lines and perfect alignment. Taking time to check your sizes and seams now means fewer problems later and a better-looking finished quilt.
How to Assemble Quilt Top Batting and Backing?
Learning how to assemble a quilt top, batting, and backing can feel like a big step, but you can do it with just a few simple moves. Let’s break it down so you get a smooth, flat quilt sandwich every time.
Laying Out the Backing
Start with your backing. Lay it out on a clean, flat surface. You can use a large table or even the floor. Make sure the wrong side faces up. This way, the pretty side will show on the back of your finished quilt.
To keep your backing from shifting, use masking tape or painter’s tape. Tape the edges down so the fabric stays taut but not stretched. Smooth out any wrinkles with your hands as you go.
If you use F&A fabrics, you’ll notice how easy it is to get a flat, even surface. Their durability and finish help the fabric stay put while you work.
Tip: Always double-check that your backing is bigger than your quilt top on all sides. This gives you a safety margin for quilting and trimming later.
Adding the Batting
Now, grab your batting. Lay it right on top of the backing. Center it so you have an even border of backing showing all around. Batting can sometimes cling or bunch up, so take your time. Start in the middle and gently smooth outward with your hands.
If you see any lumps or folds, lift the batting and try again. You want everything as flat as possible. F&A’s high-quality backing makes this step easier because it doesn’t shift or wrinkle much. This helps you keep your layers even and ready for the next step.
Placing the Quilt Top
Next, it’s time to add your quilt top. Place it right side up, so the design faces you. This is where you see your hard work come together! Center the quilt top over the batting and backing. Make sure you have extra backing and batting showing on all sides.
Smooth the quilt top from the center out to the edges. Use your hands to press out any air bubbles or wrinkles. If you need to, gently lift and reposition the quilt top until it looks perfect. F&A fabrics help here, too. Their smooth finish lets you adjust the layers without snagging or stretching.
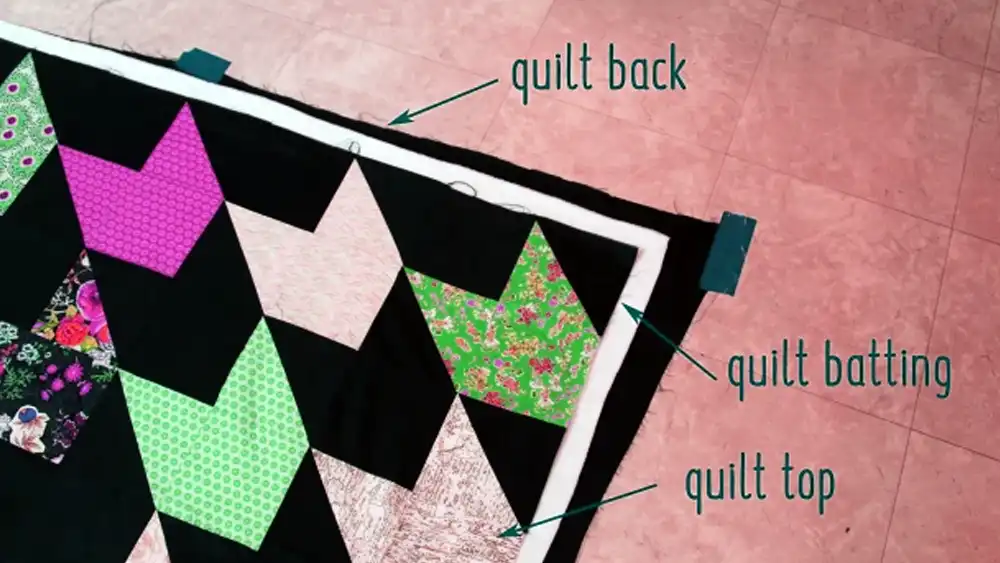
Note: The correct order for how to assemble quilt top batting and backing is backing (wrong side up), batting, then quilt top right side up.
Take a step back and check your work. All three layers should look flat and even. You’re now ready to baste and quilt!
Smoothing Layers
Preventing Wrinkles
You want your quilt to look smooth and professional. Wrinkles can sneak in if you rush or skip steps. Start by smoothing each layer with your hands as you lay it down. Work from the center of the quilt out to the edges. This method pushes any air or folds away from the middle.
Try these tips to keep wrinkles away:
- Use a clean, flat surface. A large table or floor works best.
- Press your quilt top and backing with an iron before you start.
- If you see a wrinkle, lift the layer and smooth it again. Don’t just pull on the fabric.
Tip: Smoothing spray or a light mist of water can help relax stubborn creases. Just let the fabric dry before you move on.
You can also use a lint roller to pick up any stray threads or dust. This keeps your quilt looking neat and helps the layers stick together better.
Keeping Layers Flat
Flat layers make quilting much easier. When you keep everything flat, your needle glides through the quilt without catching or bunching. Start by taping the backing to your surface. This holds it in place while you add the batting and quilt top.
Here’s a simple checklist to keep layers flat:
- Tape the backing fabric down, but don’t stretch it.
- Lay the batting on top and smooth it from the center out.
- Place the quilt top last, smoothing as you go.
Check for bumps or folds after each step. If you find one, lift the layer and try again. F&A fabrics help a lot here. Their smooth finish makes it easy to adjust and flatten each layer.
Remember: Take your time. A few extra minutes now will save you trouble when you start quilting.
Quilt Sandwich Basting Methods
You have your quilt sandwich ready and flat. Now it’s time to keep those layers together while you sew. Basting holds everything in place so your quilt stays smooth and doesn’t shift. Let’s look at three popular ways to baste your sandwich: pin basting, spray basting, and thread basting.
Pin Basting
Pin basting is a favorite for many quilters. You use curved safety pins or quilter’s pins to secure your quilt sandwich. Start in the center of your quilt and work outward.
Place pins every 4 to 6 inches, making sure they go through all three layers. This helps prevent shifting while you sew. Try to keep your pins in straight rows so you don’t miss any spots. Avoid using brass pins because they can rust over time.
Tip: Use Pinmoors or similar tools to make pin removal faster as you quilt.
Pin basting works well for most quilt sizes. It’s easy to remove pins as you move along with your sewing machine or hand quilting. High-quality batting and backing, like F&A, make pin basting smoother because the layers stay flat and easy to handle.
Spray Basting
Spray basting is quick and great for small projects like table runners or wall hangings. Lay out your quilt sandwich, then lift the top layer and spray a light adhesive on the batting. Smooth the quilt top back down, starting from the center and working outward. Repeat for the backing if needed.
- Spray basting almost eliminates pleats and puckers.
- The quilt can handle machine quilting without shifting.
- Pressing both sides after basting sets the adhesive and keeps layers secure.
- Smoothing each layer before assembly gives you a flat, wrinkle-free sandwich.
- Ironing at the end bonds everything together.
Store spray-basted quilts flat to keep the layers stuck together. Be careful not to overspray, or you might get sticky spots.
Thread Basting
Thread basting is perfect if you love hand quilting. Use a needle and thread to sew large stitches, about 3 to 4 inches apart, across your quilt sandwich. Start in the center and work outward, just like with the other methods. Make sure your stitches go through all layers. This method holds everything in place without pins or spray.
Thread basting takes more time, but it’s gentle on your fabric and easy to remove when you finish sewing. Secure your stitches well so nothing shifts as you quilt. Many hand quilters use a hoop to keep the sandwich tight while sewing.
No matter which method you choose, using quality materials like F&A batting and backing helps your quilt sandwich stay smooth and secure. You’ll find that sewing and quilting go much easier when your layers don’t shift or wrinkle.
Troubleshooting Quilt Assembly
Fixing Wrinkles
Wrinkles can sneak into your quilt layers, even when you try your best to keep things smooth. You might notice them after pressing or even after washing your finished quilt. Some quilters love the vintage look that gentle washing and wrinkling can give, but most want a crisp, flat surface for sewing.
You can fix wrinkles with a few easy tricks:
- Use a wrinkle release spray or a homemade fabric softener mix. Many quilters say these sprays work wonders on tough creases in batting.
- Keep your batting rolled instead of folded before you start. This simple step helps prevent deep wrinkles from forming.
- Press your quilt top and backing with a warm iron before you layer them. Always check the fabric care instructions first.
Many users report that these methods make the quilt look better and make sewing easier. You will find that handling your materials with care leads to a smoother, more professional finish.
If you spot a wrinkle after layering, gently lift the top layer and smooth it out with your hands. Take your time. A little patience now saves you trouble later during sewing.
Adjusting Shifted Layers
Sometimes, your quilt layers shift while you work. This can happen if you move your sandwich or if you baste in a hurry. Don’t worry—you can fix it before you start sewing.
Here’s what you can do:
- Untape or unpin the section where the layers have moved.
- Smooth out the backing first, making sure it stays flat.
- Re-center the batting and quilt top, smoothing from the center out.
- Re-pin or re-tape the layers, checking for bumps or folds.
| Problem | Quick Fix |
|---|---|
| Shifted layers | Re-smooth and re-pin |
| Wrinkles appear | Lift, smooth, and re-press |
Tip: Always check your layers before you start sewing. A flat, even quilt sandwich makes the rest of your project much more enjoyable.
You will notice that careful adjustments now lead to better results when you begin sewing. Your finished quilt will look neat, and sewing will go much more smoothly.
Conclusion
You’ve learned how to layer your quilt top, batting, and backing for a smooth finish. Take your time with each step, and you’ll see great results. Using high-quality materials like F&A fabrics makes quilting easier and more enjoyable.
Trust your process and enjoy every moment. Your quilt will look amazing, and you’ll feel proud as you move on to the next stage of your quilting journey. Ready to start quilting? You’ve got this! 🧵
FAQ
How do you keep quilt layers from shifting while quilting?
You can use safety pins, spray adhesive, or thread basting to hold your layers together. Start basting from the center and work outward. Smooth each layer as you go. This keeps everything flat and prevents shifting.
What size should my backing and batting be?
Your backing and batting should be 4 to 8 inches larger than your quilt top on all sides. This extra space gives you room for quilting and trimming. Double-check your measurements before you start layering.
Can I use any fabric for my quilt backing?
You can use many types of fabric, but high-quality cotton like F&A fabrics works best. It stays flat, feels soft, and holds up well during quilting and washing. Avoid stretchy or slippery fabrics for easier assembly.
What is the easiest basting method for beginners?
Pin basting is the easiest for most beginners. You just need curved safety pins and a little patience. Place pins every 4 to 6 inches, starting in the center. This method is quick to set up and easy to remove as you quilt.
Do I need to prewash my fabrics before assembling?
Prewashing helps prevent shrinkage and color bleeding. If you want your quilt to stay the same size and keep its colors bright, wash your fabrics before you start. Press them after washing for the smoothest results.