You don’t need fancy skills to make a cozy floor cushion for your space. This easy diy project lets you add comfort and style without breaking the bank. Store-bought cushions can be pricey, so a diy floor cushion could be a more budget-friendly option.
You’ll use beginner diy steps and simple materials. Fanda Fabrics has a huge selection of fabrics that work great for this project, so you can pick a look that matches your style.
Key Takeaways
Choose the right fabric for your floor cushion. Options like cotton, canvas, and Crypton fabric offer durability and comfort.
Use simple tools like fabric scissors, measuring tape, and pins to make the process easier. You don’t need fancy equipment.
Measure your fabric accurately to ensure a perfect fit. Always add an extra inch for seams to avoid tightness.
Consider adding features like zippers or handles for practicality. These make cleaning and moving your cushion easier.
Select the right filling for comfort. Options like polyester fiberfill or bamboo quilt batting provide softness and support.
DIY Floor Cushion Materials
Fabric Selection
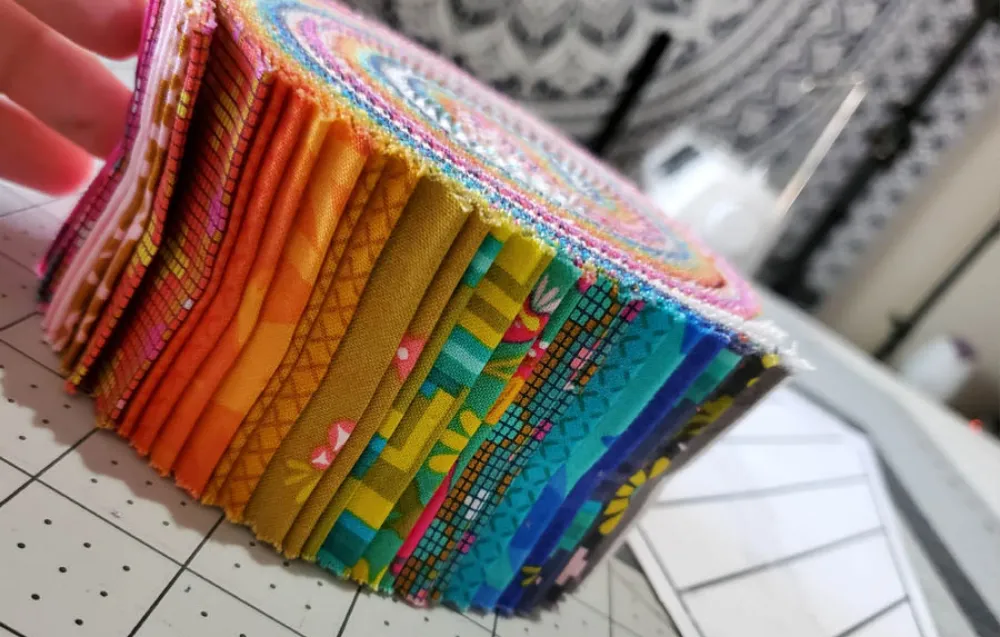
Picking the right fabric makes your floor cushion both comfy and stylish. You want something durable, soft, and easy to work with. Many beginners love using cotton, canvas, or upholstery fabric. Denim works well if you want a sturdy cushion with a cool look.
Crypton fabric is another great choice because it resists stains and odors, perfect for busy homes. If you want something unique, Fanda Fabrics offers Bright Quilt Fabric for bold colors, Batik Patchwork Fabric for intricate patterns, and Double Sided Quilted Fabric for extra versatility.
These options help you create a cushion that matches your personality. Customers rave about the softness and beauty of Fanda Fabrics, saying their cushions look and feel amazing.
Tip: Pre-wash your fabric before you start. This helps prevent shrinkage and keeps your cushion looking fresh.
Essential Tools
You don’t need fancy equipment to make a diy floor cushion. Here’s a simple list to get you started:
Fabric scissors
Measuring tape
Pins or fabric clips
Needle and thread (or a sewing machine)
Fabric glue or iron-on hem tape (for no-sew options)
High-density foam or polyester stuffing
Zipper or Velcro (optional for removable covers)
If you want to make an oversized floor cushion, just grab larger pieces of fabric and more filling. You can use bamboo quilt batting from Fanda Fabrics for a soft, eco-friendly touch.
Optional Features
Want to add extra comfort or style? Check out these ideas:
Filling Type | Description |
|---|---|
Memory Foam Scraps | Firm support is great for long lounging sessions. |
Polyester Fiberfill | Soft and lightweight, easy to fluff up. |
Bean Bag Filler | Moldable and plush, perfect for relaxed seating. |
Cotton Batting | Breathable and natural, it offers moderate support. |
You can also add upholstery buttons for a tufted look or choose from hundreds of colors and textures. Decorative ties or a removable cover make cleaning easier. Fanda Fabrics gives you plenty of choices to customize your diy floor cushion.
How to Make a Floor Pillow: Cutting & Preparation
Measuring Fabric
Getting your measurements right is the first step to a great diy floor pillow. You want your cushion to look neat and fit perfectly, so grab a soft tape measure. Flexible tape works best because it hugs the curves and corners of your fabric. Here’s a simple way to measure for any shape:
Lay your fabric flat on a table or the floor.
Measure the length by running the tape along the longest side. Write down the number.
Measure the width across the shorter side. Jot that down too.
Don’t forget the thickness! Measure straight down from the top to the bottom at the thickest spot. Keep your cushion as fluffy as you want it to be.
If you’re making a round pillow, wrap the tape around the widest part to get the circumference.
Add about 1 inch to each measurement. This extra bit gives you room for seams and helps the cover fit over the filling without being too tight.
Tip: Always double-check your numbers before you cut. It’s easier to trim extra fabric than to fix a piece that’s too small.
If you want to know how to make a floor pillow that’s round, you’ll need to cut a large fabric circle. Use a string and pencil to draw a perfect circle, or trace around a big bowl or hula hoop.
Cutting Techniques
Now that you’ve measured, it’s time to cut your fabric. Clean, straight edges make sewing much easier and give your diy floor pillow a polished look. Here’s how you can get those crisp lines:
Set up a large, flat surface. Cover it with a self-healing cutting mat if you have one. This keeps your fabric from slipping.
Use sharp fabric scissors or a rotary cutter. Dull blades can snag or fray the fabric.
Place a sewing ruler on your fabric to guide your cuts. This helps you keep everything straight.
For extra accuracy, pull a thread from the fabric to create a straight guideline. This works especially well with woven fabrics.
Mark your cutting lines with a ruler and fabric chalk or a washable marker before you start.
Floor Cushion Assembly
Sewing Panels
You’re ready to start sewing your floor cushion panels. This step brings your diy floor cushion to life. You’ll join the cut fabric pieces to create a sturdy, comfy seat. Here’s a simple step-by-step process you can follow for a classic square cushion:
Cut two large squares of fabric, each about 44″ by 44″. If you want an oversized floor cushion or a custom-made giant floor cushion, adjust the size to fit your space.
Snip a 5″ by 5″ square from each corner of both fabric pieces. This helps shape the cushion and makes assembly easier.
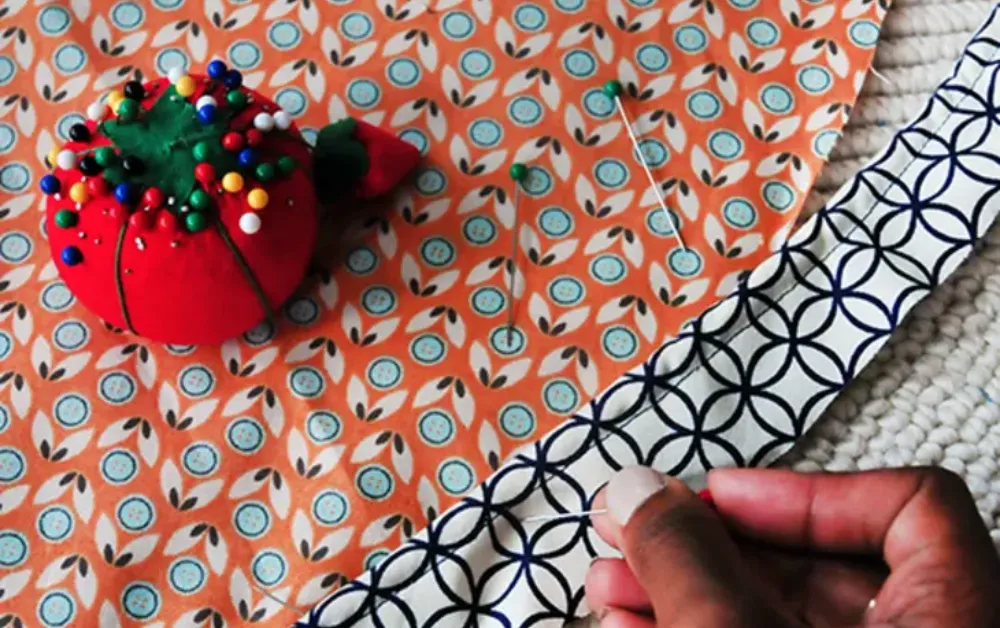
Place the fabric pieces together with the right sides facing each other. Pin all the way around the edges.
Sew the straight edges, but leave the corner cut-outs and a 5-6″ opening unsewn. You’ll need this opening for turning and stuffing later.
Pin the corners together, making sure they’re perpendicular to the seams on the cushion sides.
Tip: Use a 1/2″ seam allowance for strength. This keeps your cushion sturdy, even with lots of use.
When you sew the panels, you want durability and a neat finish. Check out these popular sewing techniques:
Technique | Description |
|---|---|
Topstitching | Sew along the open seam about 1/8″ – 1/4″ from the seam edge to reinforce the seam. |
Zigzag Stitching | Finish raw edges with a zigzag stitch to prevent unraveling and strengthen the seam. |
Seam Allowance | Use a 1/2″ seam allowance for the final seam to ensure durability and strength in the cushion. |
You can use a single topstitch for most cushions. If you feel confident, try a double topstitch for extra durability. Want to add a pop of color? Experiment with contrasting thread colors or decorative topstitches. Use a guide foot for consistent stitching, and consider placing a lightweight material underneath the seam for better alignment.
Choosing the right thread matters for your cushion sewing project. Here’s a quick guide:
Thread Type | Key Features | Best Use Case |
|---|---|---|
Bonded Polyester | Durable, weather-resistant, bleed-resistant | Marine environments |
PTFE/ePTFE | Flexible, chemical-resistant, UV-resistant, friction-resistant | Heavy-duty fabrics |
Polyester (Dacron) | UV and water resistant, minimal stretch | Outdoor projects |
Nylon | Flexible, strong, suitable for indoor upholstery, weather-resistant options | Indoor and outdoor upholstery |
Polyester and nylon threads work great for most diy floor cushion projects. They’re strong and resist wear, so your cushion lasts longer.
Adding Features
Want to make your floor cushion even more practical? You can add handles or zippers for easy use and cleaning. Handles make it simple to move your cushion from room to room. Many diy fans love adding two sturdy handles to their cushions. Just sew fabric strips to the sides before you finish the seams.
Zippers are another popular feature. They let you remove the cover for washing or swap out the filling. To add a zipper, sew it into one side panel before you assemble the cushion. Velcro works too if you prefer a softer closure.
Note: Handles and zippers aren’t just for looks. They make your cushion easier to use and keep clean.
If you want a tufted look, try adding upholstery buttons. Sew them through the cushion after stuffing to create stylish indents. You can also make piping for a pillow by sewing a strip of fabric around a cord and attaching it to the cushion edges. This gives your diy floor cushion a professional finish.
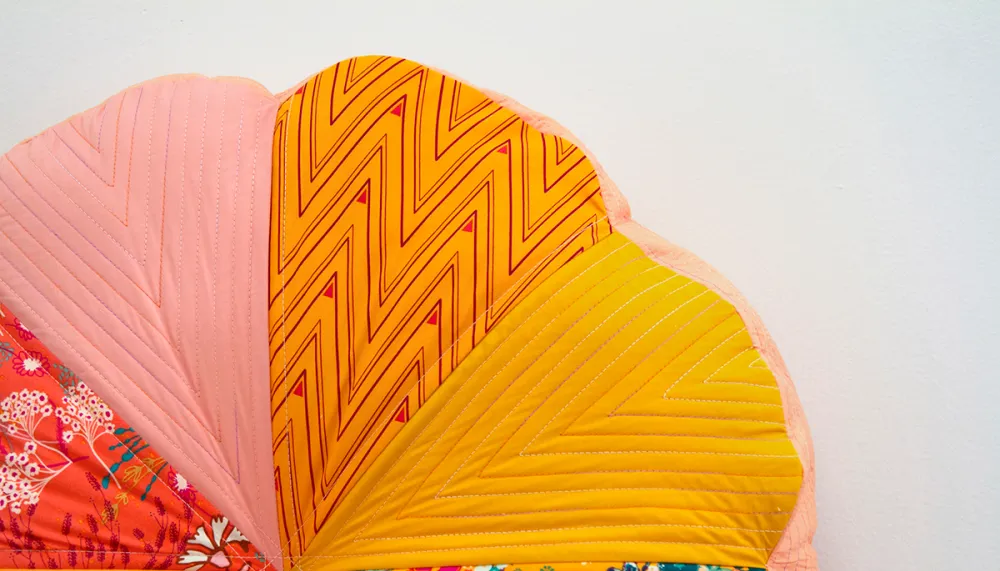
Creating Shape
Getting the right shape is key to a comfy, attractive floor cushion. You want your cushion to look uniform and feel great when you sit on it. Here’s how you can shape your cushion during assembly:
Fold one edge to the other and mark the center with chalk or a pen. This helps you keep everything even.
Pin the two sides of the pillow together, inside-out. Leave one side open for stuffing.
Unpin three sides, turn the pillow case right-side-out, and stuff your insert or filling inside.
Re-pin the open side and sew it shut by hand or with your machine.
If you want a plush, full cushion, use plenty of fiberfill or bamboo quilt batting. For a more structured look, try memory foam scraps or a euro insert. After stuffing, fluff the cushion and smooth out the edges.
You can create an indent in the middle using a long needle and strong embroidery thread. This helps the cushion keep its shape and adds a designer touch.
Callout: Take your time with stuffing and shaping. A well-shaped cushion feels better and looks more inviting in your space.
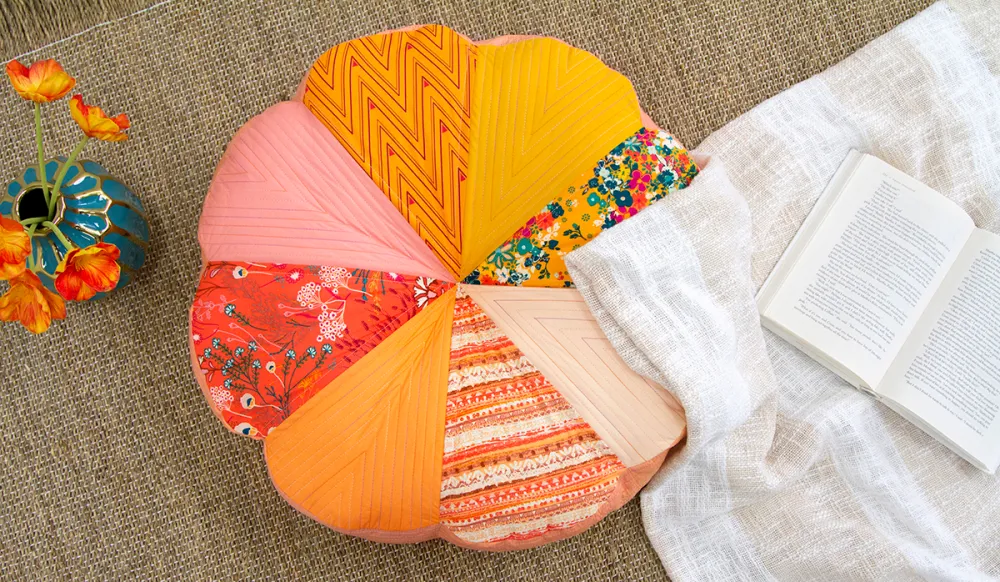
Once you finish, your diy floor cushion is ready for lounging, reading, or movie nights. You’ve created a custom-made giant floor cushion that fits your style and needs.
Stuffing & Finishing
Filling Choices
Choosing the right filling makes a big difference in how your floor cushion feels and lasts. You have lots of options, each with its own perks. Check out this table to compare some of the most popular fillings:
Filling Type | Comfort Characteristics | Durability Characteristics |
|---|---|---|
Foam | Firm contours to your body | Keeps shape, long-lasting |
Down | Super soft, cloud-like | Needs fluffing, may clump |
Polyester Fiberfill | Fluffy, budget-friendly, easy to clean | Holds shape, machine washable |
Kapok | Medium-soft, eco-friendly | Sustainable, keeps shape |
Microfiber | Plush, great insulation | Hypoallergenic, easy care |
Feather | Medium-firm, structured | Less durable, may cause allergies |
Wool | Firm, moisture-wicking | Durable, resists mold and dust mites |
Cotton | Soft, breathable | Easy care, renewable |
If you want an eco-friendly and comfy option, try bamboo quilt batting from Fanda Fabrics. Bamboo grows fast, uses less water, and breaks down naturally. It’s a renewable resource and doesn’t need pesticides or harsh chemicals. You get a cushion that’s soft, breathable, and good for the planet.
Closing the Cushion
You want your diy floor cushion to look neat and last a long time. There are a few ways to close it up for a professional finish:
Use an invisible stitch (ladder stitch) for a seamless look.
Add a zipper to the floor pillow for easy removal and washing.
Try Velcro if you want a quick, no-fuss closure.
Go for an envelope closure with overlapping fabric panels.
If you’re making an oversized floor cushion, a zipper or Velcro makes cleaning much easier. Press your seams open before closing for a crisp edge.
Tip: Take your time with the final stitches. A tidy closure makes your cushion look store-bought!
Care Tips
Keeping your floor cushion fresh is simple if you follow a few easy steps:
Vacuum regularly with an upholstery attachment to remove dust and pet hair.
Wipe spills right away with a dry white cloth.
For stains, dab gently with cool water or a mild detergent.
If your cushion has a removable cover, toss it in the washing machine if the fabric allows.
For deep cleaning, use a soft brush and soapy water, then rinse and air dry.
The fabric you choose affects care. Cotton and polyester blends are easy to wash. Velvet or wool needs special attention. Removable covers make cleaning a breeze, especially for busy homes or high-traffic areas.
Conclusion
You just learned how to make a diy floor cushion from start to finish. Beginners often face challenges like cutting fabric, sewing zippers, or getting the right amount of filling, but you can overcome these with simple tricks and practice.
Popular fabrics like cotton canvas, denim, velvet, and corduroy work great for any floor cushion. Try different styles or even make an oversized floor cushion for extra comfort. Explore the unique fabrics at Fanda Fabrics and share your creations—you might inspire someone else!
FAQ
How do I pick the best fabric for my floor cushion?
You want a fabric that feels soft and holds up well. Cotton, canvas, and quilted fabrics from Fanda Fabrics work great. Try Bright Quilt Fabric for bold colors or Batik Patchwork Fabric for unique patterns.
Can I make a floor cushion without a sewing machine?
Yes! You can sew by hand using a needle and thread. Fabric glue or iron-on hem tape also works for simple, no-sew cushions. Just make sure you secure the edges tightly.
What size should my floor cushion be?
Most people like cushions between 24″ and 44″ square. Measure your space first. Oversized cushions are perfect for lounging or movie nights. Add extra inches for seam allowance.
How do I keep my cushion clean?
If your cushion has a removable cover, toss it in the washing machine. For spot cleaning, use a damp cloth and mild soap. Vacuum regularly to keep dust away.
What filling works best for comfort and support?
Polyester fiberfill is soft and easy to use. Bamboo quilt batting from Fanda Fabrics gives you eco-friendly comfort. Foam inserts add firm support. Mix fillings for a custom feel.