You might feel nervous about starting a new sewing project, but you can make a quilted cosmetic bag with ease. This tutorial gives you a chance to try beginner sewing projects and create something useful.
Imagine picking out your favorite patterns from Fanda Fabrics and watching your bag come together. You can follow a full video tutorial or read step-by-step instructions. The quilted cosmetic bag tutorial helps you build skills and confidence. Gather your materials and get ready to sew!
Key Takeaways
Start your sewing journey with quality materials from Fanda Fabrics. Using durable fabrics ensures your cosmetic bag looks great and lasts longer.
Pre-wash and square your fabric before cutting. This prevents shrinking and helps maintain the bag’s shape.
Follow the step-by-step instructions carefully for layering, quilting, and sewing. Each step builds your skills and confidence.
Personalize your bag by mixing patterns and adding decorative elements. This makes your creation unique and reflects your style.
Take your time and enjoy the process. Sewing can relieve stress and boost your creativity, so celebrate your finished project!
Materials & Tools
Fanda Fabrics Essentials
When you start your quilted cosmetic bag, you want to use materials that look great and last. Fanda Fabrics offers everything you need for a beautiful and sturdy project. Here’s a quick look at the essentials and how Fanda Fabrics stands out:
Essential Materials/Tools | Description |
|---|---|
Two patterns in one, soft and durable, perfect for bags. | |
Pre-cut, coordinated fabrics in vibrant colors and patterns. | |
100% cotton, tested for strength and colorfastness, lots of choices for every style. | |
Soft, breathable, and adds the right amount of structure. | |
Fanda Fabrics Quality | Premium cotton, vibrant colors, excellent support, trusted by top brands worldwide. |
You can find these essentials at Fanda Fabrics. Their products make your sewing experience smoother and your finished bag more professional.
Additional Supplies
You’ll need a few more tools to get started. Don’t worry if you’re new—these are easy to find and use:
Basic sewing tools: pins, needles, thread, seam ripper, rotary cutter, quilting ruler, scissors, and an iron.
Interfacing or fusible fleece for extra structure.
A zipper (By Annie, zippers are a favorite for beginners).
Fabric marking tool,s like a Chaco Marker.
Clover Wonder Clips instead of pins for easier fabric handling.
A stiletto for precise fabric placement.
Tip: Use high-quality cotton, canvas, and stabilizers for the best results. If you’re unsure about yardage, online calculators can help you figure out how much fabric and batting you need.
Many beginners feel unsure about how much fabric or which stabilizer to pick. You might also wonder which zipper works best. Take your time, ask questions, and remember—choosing quality materials from Fanda Fabrics sets you up for success!
Fabric & Batting Prep
Cutting Fabric
Choosing the right fabric sets you up for a successful project. Fanda Fabrics offers double-sided quilted fabric, vibrant quilting bundles, and a wide quilting collection. You get premium cotton, bold colors, and patterns that make your cosmetic bag stand out.
Before you cut, make sure you pre-wash your fabric. This helps prevent shrinking later. Lay your fabric flat and square it up so the edges are straight. Use a rotary cutter and quilting ruler for clean lines. Always follow the grain of the fabric. This keeps your bag from stretching out of shape.
Here’s a quick guide for cutting pieces for a standard-sized quilted cosmetic bag:
Component | Dimensions |
|---|---|
Focus Fabric (outside) | 14 inches x 15 inches |
Batting | 14 inches x 15 inches |
Quilting inner liner | 14 inches x 15 inches |
Lining Fabric | 14 inches x 15 inches |
Hook and Loop tape strips | 12 inches |
Tip: Buy a little extra fabric if you want to match stripes or plaids. This gives you room to line up patterns.
Common mistakes include skipping the pre-wash, not squaring the fabric, and ignoring the grain. Take your time and double-check measurements. You’ll avoid headaches later.
Prepping Batting
Cotton quilt batting from Fanda Fabrics feels soft, breathes well, and adds structure to your bag. You can also find bamboo, silk, and blends for special projects. Fanda Fabrics lets you customize batting to fit your needs.
Cut your batting to match the size of your main fabric and lining. Fusible batting works great for durability. Place the batting between your outer fabric and lining. Quilt the layers together using straight lines or free motion quilting. Trim the quilted piece to your final size for a neat finish.
Cotton batting is easy to sew and perfect for beginners.
Bamboo batting is lightweight and eco-friendly.
Wool batting keeps things warm for winter projects.
Polyester batting resists shrinking and stays flat.
Note: Quilting the layers before assembly helps your bag hold its shape and last longer.
With careful prep, you’ll have sturdy panels ready for sewing. Your quilted cosmetic bag will look professional and feel durable every time you use it.
Quilted Cosmetic Bag Tutorial
Ready to dive into your quilted cosmetic bag tutorial? This is where your project comes to life. You’ll layer, quilt, and sew your way to a beautiful boxy makeup bag. Let’s break it down step by step so you can enjoy the process and get a professional finish.
Layering & Quilting
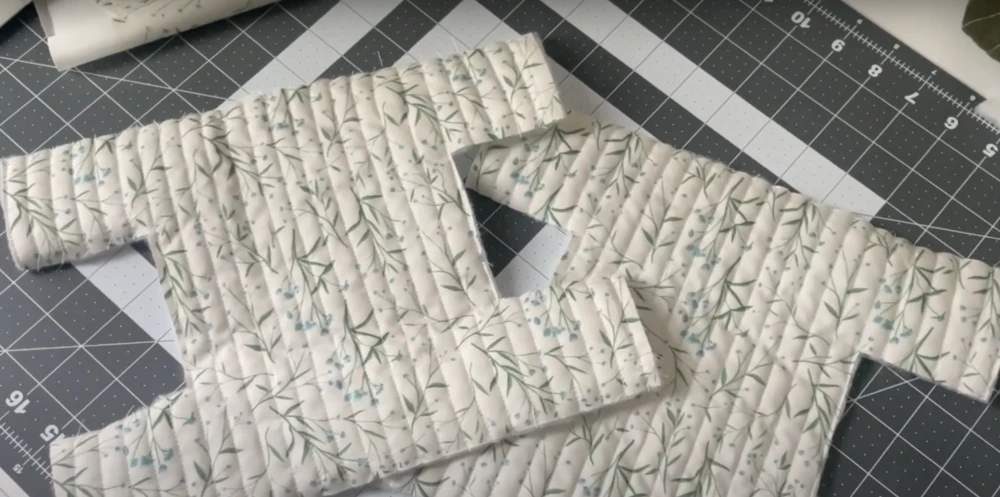
Start by laying out all your pieces. You want to make sure everything lines up before you begin sewing. Here’s a simple way to layer and quilt your panels for the boxy makeup bag:
Cut your exterior, lining, accent, and batting pieces using your favorite Fanda Fabrics materials.
Fuse interfacing to the wrong side of your exterior and lining pieces if you want extra structure.
Place the batting behind the exterior fabric. If you use fusible batting, press it in place. If not, pin it securely.
Use a fabric marker to draw diagonal lines on the batting side. This helps you keep your quilting straight and even.
Set your machine to a no. 8 stitch length. Sew along the lines you drew, quilting the layers together.
Trim the quilted panel to your final size. Make sure the edges are neat and square.
Tip: Quilting with Fanda Fabrics’ double-sided quilted fabric makes this step even easier. You get two patterns in one, and the fabric holds its shape well.
You can try simple straight lines or get creative with free-motion quilting. Both work great for a quilted cosmetic bag tutorial. If you want a classic look, stick with diagonal lines. For a modern twist, try wavy or geometric patterns.
Sewing the Panels
Now it’s time to sew the panels together and build your boxy makeup bag. This part is where your sewing skills shine. Follow these steps for a smooth assembly:
Place your quilted exterior panels right sides together. Pin or clip the edges to keep them from shifting.
Sew around the sides and bottom, leaving the top open. Use a quarter-inch seam allowance for best results.
Press the seams open as you go. This helps your bag look crisp and professional.
To create the boxy shape, pinch each bottom corner so the side and bottom seams line up. Mark a line across the corner (about 2 inches from the tip) and sew along this line. Trim off the excess fabric.
Repeat with the lining panels, but leave a small gap in the bottom seam for turning the bag right side out later.
If your boxy makeup bag has a front pocket or handle, sew those pieces on before assembling the main panels.
Insert the lining into the exterior, right sides together. Pin around the top edge.
Sew around the top, then turn the bag right side out through the gap in the lining. Stitch the gap closed by hand or machine.
Push the lining inside the bag and press the top edge. Topstitch around the opening for a polished finish.
Note: Using Fanda Fabrics’ quilting bundles or quilting collection gives your boxy makeup bag a unique look. Mix and match patterns for a fun, personalized style.
If you want more visual help, check out reliable tutorials like the ones on QuiltingBoard or YouTube. These guides show every step, from sewing the panels to finishing the seams.
Troubleshooting Tips
Even the best quilted cosmetic bag tutorial can hit a few bumps. Don’t worry—every sewist faces challenges. Here are some common problems and how to fix them:
Fabric puckering after sewing: Make sure you use the right interfacing and slow down your stitching speed. Guide the fabric gently and let the machine do the work.
Uneven seams or blocks that don’t line up: Cut your fabric carefully and use a seam guide. Always press seams as you go.
Bunched up batting or backing: Pin or fuse your batting securely before quilting. Check that your layers stay flat.
Running out of thread mid-row: Wind extra bobbins before you start sewing. Keep an eye on your thread supply.
Wavy quilt edges: Press your seams and edges well. Trim panels to keep everything square.
Skipped stitches or broken needles: Change your needle after every project. Remove pins as you sew to avoid hitting them.
Improper thread tension: Test your tension on a scrap piece before starting your boxy makeup bag.
Puckered fabric: Increase your stitch length and loosen the tension if needed.
Tip: Take your time and double-check each step. Rushing leads to mistakes. If you get stuck, step away for a few minutes and come back with fresh eyes.
Fanda Fabrics’ high-quality materials help you avoid many common issues. Their fabrics sew smoothly and hold up well, making your boxy makeup bag sturdy and stylish.
If you want more inspiration or step-by-step visuals, check out tutorials from trusted sources like QuiltingBoard or YouTube. These resources can help you master every part of the quilted cosmetic bag tutorial.
How to Sew a Quilted Makeup Bag?
You’ve quilted your panels and you’re ready for the most exciting part—turning those flat pieces into a beautiful, boxy makeup bag. If you’ve ever wondered how to sew a quilted makeup bag that looks professional, you’re in the right place. Let’s walk through the steps together, from zipper to finishing touches.
Adding the Zipper
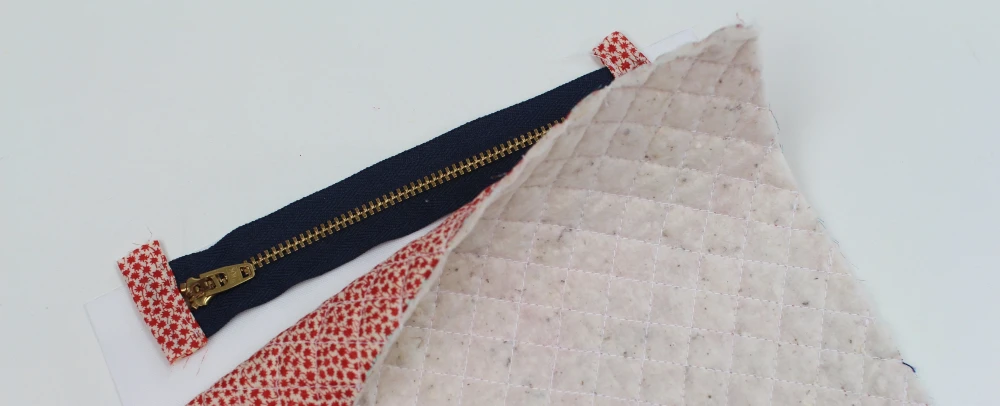
Attaching the zipper might seem tricky, but you can master it with a few simple tricks. Here’s how you do it:
Lay one quilted outer panel right side up. Place the zipper face down along the top edge.
Put a lining piece on top, right side down, so the zipper is sandwiched between the outer and lining fabrics.
Clip or pin the layers together. Make sure the zipper pull is at least 3 inches unzipped. This makes turning the bag easier later.
Sew along the top edge using a zipper foot. Keep your stitches straight and close to the zipper teeth.
Fold the fabrics back so the right sides are facing out. Press the seam flat with an iron.
Topstitch close to the zipper. This keeps the fabric from catching in the zipper and gives a crisp look.
Repeat these steps for the other side of the zipper with the remaining outer and lining pieces.
Tip: If your zipper is too long, mark 1/2 inch from the fabric edge and create a new zipper stop with a wide zig-zag stitch. Trim the excess zipper for a perfect fit.
You want the zipper to line up perfectly. Use pins or a dab of fabric glue to keep everything in place. Always fold the zipper teeth toward the lining before you sew to avoid a pinched look. If you want sharp corners, grab a point turner after sewing.
Shaping the Bag
Now you get to see your bag take shape! This step gives your makeup bag that roomy, 3D look.
Place the outer panels right sides together. Do the same with the lining pieces.
Sew around the sides and bottom of the outer panels. Leave the top (zipper edge) open.
Sew the lining panels together, but leave a 3-inch gap at the bottom. You’ll use this gap to turn the bag right side out.
To make boxed corners, pinch each bottom corner so the side and bottom seams line up. Mark a line across the corner, about 2 inches from the tip.
Sew along this line, then trim off the excess fabric, leaving about 1/8 inch seam allowance.
Repeat for all four corners—two on the outer bag, two on the lining.
Note: Don’t skip interfacing if you want your bag to hold its shape. Reinforce important seams with a few extra stitches. Always use a needle that can handle thick layers when sewing.
If you want to know how to sew a quilted makeup bag that stands up on its own, focus on these boxed corners. They give your bag structure and style. Remember to press your seams as you go. This step makes a big difference in the final look.
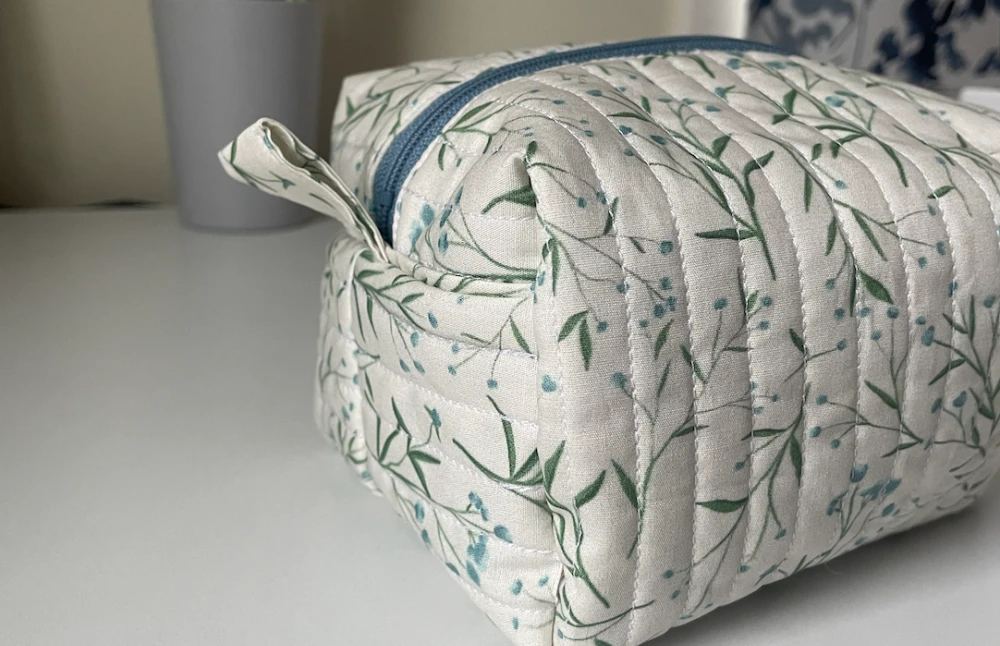
Finishing Touches
You’re almost done! These last steps will make your bag look polished and professional.
Turn the bag right side out through the gap in the lining. Use a point turner to push out the corners for a crisp finish.
Tuck the lining inside the outer bag. Press the top edge with an iron for a neat look.
Topstitch around the top edge, just above the zipper. This secures the lining and adds a finishing touch.
Hand-sew or machine-sew the gap in the lining closed.
Give your bag a final press to smooth out any wrinkles.
Pro Tip: Trim any uneven edges before you sew the final seams. Press every seam, especially around the zipper and corners, for a crisp, professional finish.
Personalize Your Bag with Fanda Fabrics
You can make your quilted makeup bag truly unique by mixing and matching patterns from Fanda Fabrics. Try these ideas:
Use charm squares from Fanda Fabrics to create a patchwork exterior. Each bag will have its own personality.
Mix different charm packs to tell a color story that matches your style.
Add a fabric label, a tassel, or a decorative zipper pull for extra flair.
Personalization Idea | How to Do It |
|---|---|
Patchwork Exterior | Sew together charm squares for the outer panels. |
Color Story | Combine different Fanda Fabrics prints and solids. |
Decorative Details | Attach a tassel, label, or fun zipper pull. |
You can experiment with bold prints, soft florals, or even holiday themes. Fanda Fabrics offers so many options that every bag you sew can look completely different.
Remember, sewing is about expressing yourself. Don’t be afraid to try new combinations or add your own twist!
If you follow these steps, you’ll know exactly how to sew a quilted makeup bag that’s sturdy, stylish, and totally you. Enjoy the process, and don’t forget to show off your finished creation!
Conclusion
You did it! Take a moment to admire your quilted cosmetic bag and the new skills you picked up. Many quilters say finishing a project brings pride, boosts their mood, and helps them feel more creative.
Quilting can relieve stress and build self-confidence.
Sharing your work connects you with others and inspires new ideas.
Want to show off your bag? Post a photo on Instagram, Facebook, or Pinterest. Drop your questions or tips in the comments below. Remember, Fanda Fabrics has everything you need for your next creative adventure. Keep practicing—your confidence and creativity will only grow!
FAQ
How do I choose the best fabric for my quilted cosmetic bag?
You want fabric that feels soft but holds its shape. Cotton from Fanda Fabrics works great. Try double-sided quilted fabric for easy sewing. Pick colors and patterns that make you smile. Pre-wash your fabric to avoid shrinking later.
Can I sew this bag without a sewing machine?
Yes, you can sew by hand. Use small, tight stitches for strength. A sewing machine makes the process faster and neater, but hand sewing works if you take your time.
What size zipper should I use?
Most quilted cosmetic bags use a 12- to 14-inch zipper. Here’s a quick guide:
Bag Width | Zipper Length |
|---|---|
10″ | 12″ |
12″ | 14″ |
Tip: If your zipper is too long, trim it and sew a new stop.
How do I keep my bag looking new after washing?
Wash your bag on a gentle cycle with cold water. Air dry or tumble dry on low. Press with a warm iron if needed. High-quality fabrics from Fanda Fabrics hold up well and keep their color.