Does your craft space overflow with vibrant bolts of fabric, yearning for a place to be admired and easily accessed? Do you dream of transforming your quilt fabric collection from a disorganized jumble into a symphony of stored inspiration?
Then this detailed guide about quilting fabric storage ideas is for you, discerning quilter! We delve into a world of creative storage solutions, helping you reclaim your space and unleash your inner organizational guru. From space-saving shelves to repurposed furniture and clever vertical space hacks, we’ll explore a variety of methods to suit your needs and budget.
Declutter and Categorize: The Foundation of Fabric Organization
Before diving into storage solutions, a crucial first step is decluttering your fabric stash. Be honest with yourself: are there forgotten fabrics lingering from past projects? Do you have multiples of similar colors or patterns?
Here’s how to tackle the pre-storage prep:
- Sort through your fabrics: Lay out your entire collection and categorize them by color, pattern, fabric type (cotton, wool, etc.), or project theme. This allows you to assess what you truly need and use.
- Donate or sell unused fabrics: Give unwanted fabrics a new life by donating them to fellow quilters, charity organizations, or even holding a fabric swap.
- Embrace the purge: If a fabric no longer sparks joy, don’t be afraid to let it go. Holding onto unused fabric can create physical and mental clutter.
Space Saving Solutions: Shelving Your Fabric Stash

Once your fabric collection is streamlined, it’s time to explore storage options. Here are some space-saving shelving ideas to keep your fabrics organized and accessible:
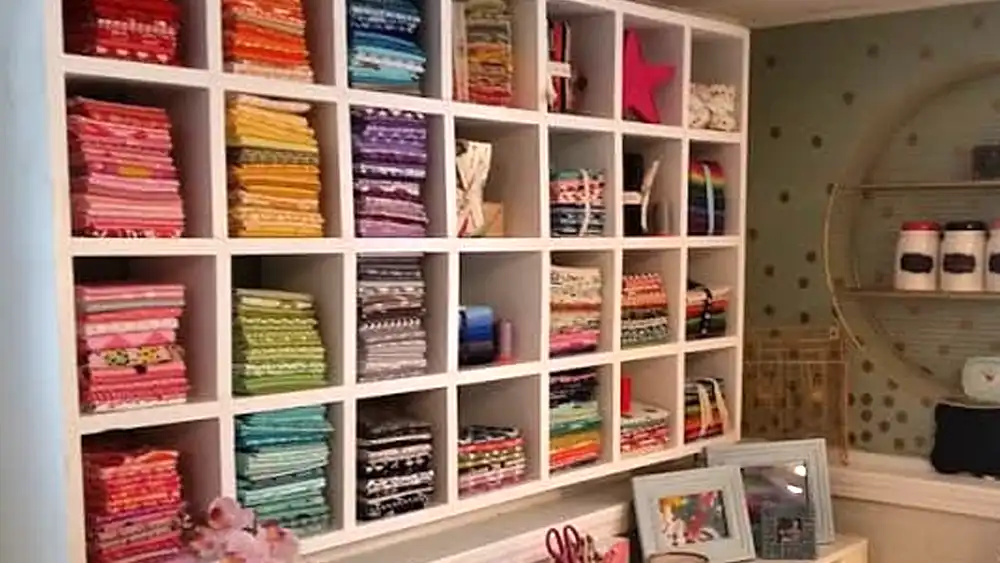
Open shelving: Sturdy floor-to-ceiling open shelves provide excellent visibility and easy access to your fabric collection. They’re ideal for frequently used fabrics or categorized bolts. Here are some additional tips for using open shelving effectively:
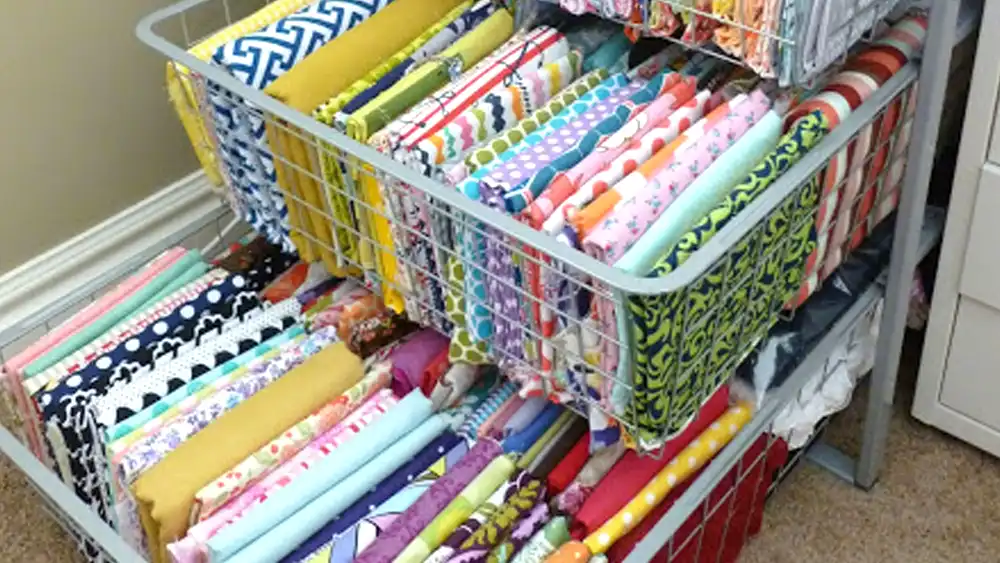
- Utilize cubbies or bins: For smaller fabric cuts or scraps, compartmentalize open shelves with cubbies or bins. This keeps everything organized and prevents loose fabric from creating clutter.
- Label everything: Clearly label shelves or bins to identify fabrics easily, saving you time and frustration searching through your stash.
Pegboard panels: Unlock the potential of your walls with pegboard panels. Here’s how to use them for fabric storage:
- Hang fabric bolts: Mount dowel rods or sturdy S-hooks onto the pegboard and hang your fabric bolts for space-efficient storage. This method offers a visual feast of color and inspiration, keeping your most-loved fabrics within easy reach.
- Maximize vertical space: Pegboards are perfect for utilizing vertical space. Even in rooms with limited floor space, you can create a designated fabric storage area that keeps your collection organized and easily accessible.
Stackable bins: Invest in stackable plastic or fabric bins for categorized fabric storage. Here’s how to get the most out of using bins:
- Choose clear or opaque bins: Clear bins allow you to see what’s inside at a glance, while opaque bins can protect light-sensitive fabrics. Opt for whichever best suits your needs and storage space.
- Label clearly: Ensure each bin is clearly labeled with the fabric category stored inside. This makes it easy to find what you’re looking for without having to rummage through multiple bins.
Creative Containers: Thinking Beyond the Box (or Bin)

For those seeking unique and stylish storage solutions, there’s a world of possibilities beyond traditional shelves and bins.
Here are some creative container ideas to spark your imagination:
Repurposed furniture: Breathe new life into old furniture! Here are some ideas to get you started:
- Dressers and hutches: Transform old dressers or hutches into dedicated fabric storage units. Add shelves, drawers, or hanging rods to customize the space for your specific needs. Drawers are ideal for storing folded fabric or pre-cut squares, while shelves or hanging rods can accommodate larger pieces.
- Armoires: Upcycle an armoire into a beautiful and functional fabric storage solution. The hanging space inside armoires is perfect for storing fabric bolts, while shelves or drawers can be used for categorized storage of smaller fabric cuts or quilting tools.
Vintage suitcases: Don’t underestimate the charm and utility of vintage suitcases! Here’s how to incorporate them into your fabric storage plan:
- Stackable storage: Stack a collection of vintage suitcases for a charming and functional storage solution. This is a perfect option for storing fat quarters, jelly rolls, or other smaller fabric cuts.
- Thematic touch: Vintage suitcases can add a touch of personality and vintage charm to your craft space.
Upcycled fabric bolts: Repurpose empty fabric bolts into unique fabric baskets. Here’s how to make your own:
Creative baskets: Simply fold the bottom of the empty fabric bolt inwards and secure it with fabric glue or stitching. These upcy
cycled baskets are perfect for storing scraps, pre-cut fabric squares, or quilting tools, adding a touch of handmade charm to your storage solution.
Utilizing Vertical Space: Taking Advantage of Walls and Doors
Don’t underestimate the potential of vertical space! Here are some clever ideas for maximizing wall and door real estate:
Hanging fabric organizers: Utilize hanging fabric organizers with multiple compartments for categorized fabric storage. Here’s how to get the most out of them:
- Wall mounted or over-the-door: These organizers can be mounted on walls or closet doors, depending on your available space.
- Compartmentalization: The compartments allow you to categorize your fabrics by color, type, or project, keeping everything organized and accessible.
- Clear pockets (optional): Opt for hanging organizers with clear pockets if you want to see the fabrics stored inside without having to remove them.
Over-the-door shoe organizers: Repurpose over-the-door shoe organizers for storing smaller fabric cuts. Here’s how to transform them into a quilt fabric storage solution:
- Perfect for small cuts: The individual pockets in shoe organizers are ideal for storing pre-cut fabric squares, scraps, or quilting tools like rotary cutters and rulers.
- Maximize unused space: Over-the-door shoe organizers utilize often-overlooked space, keeping your frequently used quilting supplies within easy reach.
DIY fabric rolls: Create your own fabric rolls using PVC pipes or cardboard tubes. Here’s how to make and use them:
- The DIY approach: This is a budget-friendly storage solution that allows you to customize the size of the rolls to fit your specific needs.
- Fabric storage and display: Cover the PVC pipes or cardboard tubes with fabric for a decorative touch. You can then use these DIY fabric rolls to store frequently used fabrics and hang them on the wall for easy access and visual inspiration.
Beyond Storage: Tips for Maintaining an Organized Fabric Stash
Having a designated storage space is key, but maintaining an organized system requires ongoing effort. Here are some additional tips to keep your fabric haven under control:
- Rotate your fabric: Don’t let your favorites languish at the back of the shelf. Regularly rotate your fabrics to keep them fresh in your mind and spark new project ideas.
- Utilize space-saving techniques: Fold fabrics neatly or roll them onto cardboard tubes to maximize storage space and prevent wrinkles. Consider techniques like jelly rolling for larger fabric cuts.
- Label everything: Clearly label your bins, shelves, or drawers for effortless identification and to avoid time-consuming rummaging.
- Regular decluttering: Schedule regular decluttering sessions to remove unused scraps or revisit forgotten fabrics for potential project inspiration.
How to Fold Quilting Fabric for Storage

Here are some effective methods for folding quilting fabric for storage, depending on the size and type of fabric you have:
Folding Fat Quarters and Smaller Cuts:
- Simple Fold: Lay the fabric flat with the selvedge (finished edge) at the top. Fold the bottom edge up to meet the selvedge. Then, fold the fabric in half again. This creates a neat and compact size for storing fat quarters or jelly rolls in bins, drawers, or hanging organizers.
- Jelly Roll Fold: This method is specifically for jelly roll cuts (typically 2.5″ wide strips). Lay the jelly roll flat and unfurl it slightly. Starting from one end, begin rolling the fabric diagonally inwards, towards the opposite selvedge. Continue rolling tightly until you reach the end. This creates a space-saving cylinder that can be stored upright in bins or drawers.
Folding Yardage and Larger Pieces:
- Bolt Fold: If you have leftover fabric from a project or prefer to store yardage in its original fold, you can utilize the bolt fold technique. Here’s how:
- Lay the fabric flat with the selvedge at the bottom.
- Imagine dividing the fabric into thirds lengthwise.
- Fold one-third of the fabric inwards, bringing the raw edge towards the selvedge.
- Repeat step 3 with the other third of the fabric, folding it inwards on top of the first fold. Now you have the fabric folded into thirds.
- Half-Yard Folds: For yardage that you plan to use more frequently, consider folding it in half-yard increments. Lay the fabric flat and measure or mark half-yard lengths. Fold the fabric at these markings, creating a stack of manageable sections. This method allows for easier access to specific portions of the fabric without having to unfold the entire piece.
Additional Tips:
- Ironing (Optional): If wrinkles are a concern, you can iron your fabric before folding for a neater and more compact storage solution. However, some quilters prefer a more relaxed look and skip ironing.
- Cardboard Inserts: For larger fabric pieces stored on shelves, consider using cardboard inserts cut to the width of the fabric. These inserts help maintain the fold and prevent wrinkles.
- Labeling: Regardless of the folding method, label your stored fabric with the type, color, or project name for easy identification when searching for specific pieces.
By choosing the appropriate folding technique and utilizing these tips, you can efficiently store your quilting fabric collection, maximizing space and keeping your fabrics wrinkle-free and ready for your next creative project.
How to Organize Quilt Fabric

Organizing your quilt fabric effectively involves a two-pronged approach: establishing a designated storage space and implementing a system for categorizing and storing your fabrics. Here’s a breakdown to help you conquer the fabric chaos:
Prepping for Organization: Declutter and Categorize
Before diving into storage solutions, take some time to declutter your fabric collection. Here’s what this entails:
Spread it out: Lay out your entire fabric stash on a large surface like a floor or table. This allows you to see the full scope of your collection.
Sort and categorize: Group your fabrics based on a system that works for you. Here are some common methods:
- Color: Organize by color spectrum, creating a rainbow of fabric hues. This is visually appealing and can spark inspiration for future projects.
- Pattern: Group fabrics by similar patterns, like florals, geometrics, or solids. This makes it easier to find specific types of prints you need.
- Fabric Type: Categorize by fabric type, such as cotton, wool, or linen. This is helpful if you have specific project requirements.
- Project Theme: If you have a lot of fabric scraps or pre-cuts leftover from past projects, consider storing them by project theme for easy reference in future endeavors.
Declutter ruthlessly: Be honest with yourself. Are there fabrics you no longer love or won’t use? Donate them to charity organizations, fellow quilters, or hold a fabric swap to give them a new life.
Choosing Your Storage Space: Shelving and Beyond
Now that your fabric collection is streamlined, it’s time to create a designated storage space. Here are some options to consider:
Shelving:
- Open shelves: Great for frequently used fabrics or categorized bolts. Ensure shelves are sturdy enough to support the weight of your fabric collection.
- Cubby shelves: Ideal for smaller fabric cuts, scraps, or quilting tools. Cubbies keep things organized and prevent loose fabric from creating clutter.
Creative containers: Breathe new life into old furniture or explore unique options:
- Repurposed furniture: Transform old dressers, hutches, or armoires into dedicated fabric storage units. Add shelves, drawers, or hanging rods to customize the space.
- Vintage suitcases: Stack a collection of vintage suitcases for a charming and functional storage solution, perfect for storing fat quarters or smaller cuts.
- Upcycled fabric bolts: Repurpose empty fabric bolts into fabric baskets for storing scraps or pre-cut squares.
Utilizing vertical space: Don’t underestimate walls and doors!
- Hanging fabric organizers: These compartmentalized organizers mounted on walls or closet doors allow you to categorize fabrics by color, type, or project.
- Over-the-door shoe organizers: Repurpose them for storing smaller fabric cuts, scraps, or quilting tools.
- DIY fabric rolls: Create your own fabric rolls using PVC pipes or cardboard tubes covered in fabric. Hang them on the wall for easy access and visual inspiration.
Categorization and Labeling: Keeping Track of Your Fabric Symphony
- Categorize within storage: Once you’ve chosen your storage solutions, maintain the categorization system you established during decluttering.
- Label everything: Clearly label shelves, bins, drawers, or hanging organizers with the category stored inside. This saves you time and frustration searching for specific pieces.
Maintaining Your Organized Fabric Haven
- Rotate your fabric: Regularly rotate your fabrics to keep them fresh in your mind and spark new project ideas.
- Space-saving techniques: Fold fabrics neatly, roll them onto cardboard tubes, or use techniques like jelly rolling for larger cuts to maximize storage space and prevent wrinkles.
- Regular decluttering: Schedule decluttering sessions to remove unused scraps or revisit forgotten fabrics for potential inspiration.
By following these tips and choosing the storage solutions that best suit your space and preferences, you can transform your quilt fabric collection from a chaotic jumble into a well-organized haven that fuels your creative spirit for years to come.
Conclusion
With a little planning and creativity, you can transform your quilt fabric storage space from a chaotic jumble into a symphony of organization. Remember, an organized space fosters a more inspiring and productive quilting environment.
So, unleash your inner storage guru, embrace these ideas, and get ready to create a haven for your fabric collection that fuels your quilting passion for years to come.
Happy Stitching!