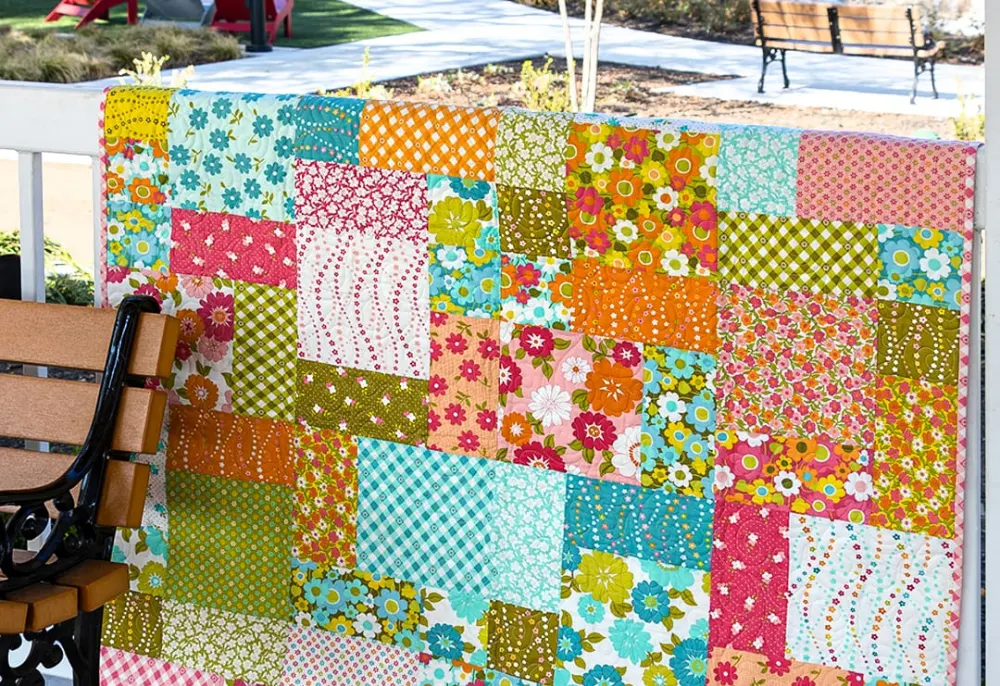
You can turn leftover fabric scraps into a one-of-a-kind patchwork skirt, and the process feels both fun and rewarding. Patchwork skirt sewing helps you reduce waste, save money, and create something truly unique. You need the right instructions, some patience, and a creative spirit.
By making your skirt, you keep scraps out of landfills and enjoy a sustainable approach to fashion. No matter your skill level, you’ll find patchwork skirt projects let you explore new ideas and express your style.
Key Takeaways
Use leftover fabric scraps to create a unique, eco-friendly patchwork skirt that saves money and reduces waste.
Gather the right tools like rotary cutters, rulers, and sewing machines to make cutting and sewing easier and more precise.
Plan your fabric layout by grouping scraps by color or pattern to create a balanced and attractive design.
Cut fabric pieces carefully with seam allowances, and consider using precut fabric squares to save time and ensure neat seams.
Sew your skirt in tiers, add a comfortable waistband, and finish with hemming or lining for a polished, durable skirt.
Supplies for Patchwork Skirt Sewing
Tools and Materials
Before you dive into your patchwork skirt project, you’ll want to gather a few essential tools. Having the right supplies makes the process smoother and helps you achieve a polished result. Here’s what you’ll need:
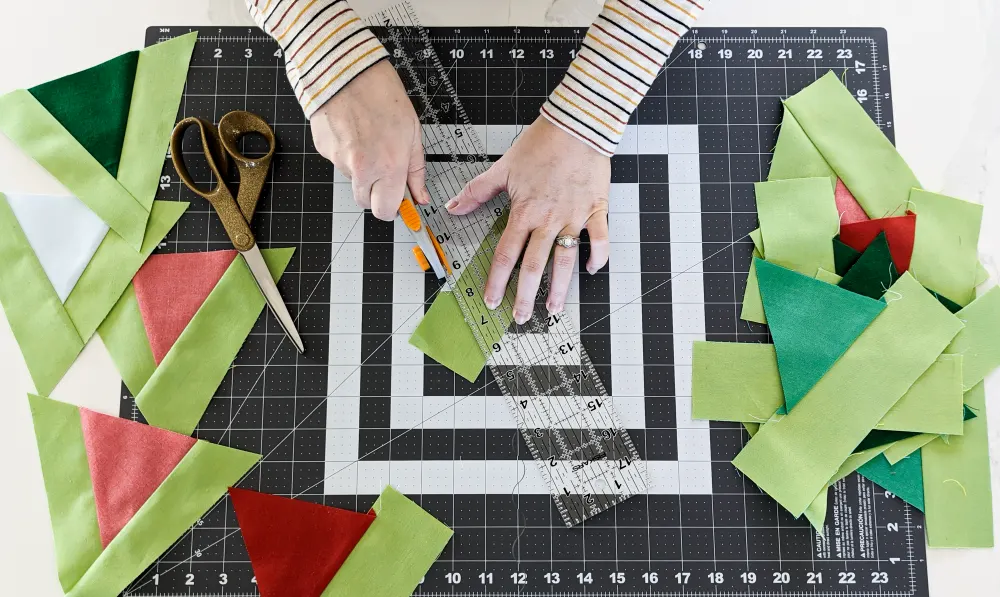
Rotary cutter and self-healing cutting mat for clean, straight cuts
Wide, clear ruler for accurate measuring and cutting
Fabric shears and all-purpose scissors for trimming and shaping
Snips for thread trimming and seam ripping
Weights or pins to hold fabric layers in place
Chalk or fabric pens for marking lines that wash away
Measuring tape, seam gauge, and acrylic quilting rulers for precision
Hand-sewing needles, thimble, and needle threader for finishing touches
Steel straight pins, safety pins, and a magnetic pin cushion
Standard sewing machine (a serger or coverstitch machine is optional)
Seam ripper, magnetic seam guide, washable glue stick, and steam iron
Tip: Weights can be easier to use than pins when you’re cutting multiple layers of fabric. They help keep everything flat and prevent shifting.
You’ll also need a collection of fabric scraps in different colors and patterns. These scraps are the heart of your patchwork skirt and let you get creative with your design.
Choosing Fanda Fabrics Products
If you want your patchwork skirt to stand out, Fanda Fabrics offers some fantastic options. Their Batik Patchwork Fabric features vibrant, hand-dyed patterns that add a unique touch to any project. The Quilting Collection includes 100% cotton fabrics with a tight weave and medium weight, making them strong and easy to work with.
You’ll find a wide range of colors and prints, so you can mix and match to suit your style.
Layer Cakes from Fanda Fabrics come as precut 10” x 10” squares, which saves you time on cutting and ensures consistency in your patchwork blocks. The Kaleidoscope Quilting Fabrics bring bold, symmetrical designs and bright colors, perfect for anyone who loves a statement piece.
Many customers rave about the vibrant colors, superb quality, and reliable service from Fanda Fabrics. You’ll also enjoy fast delivery, great value, and plenty of design support—everything you need to make your patchwork skirt project a success.
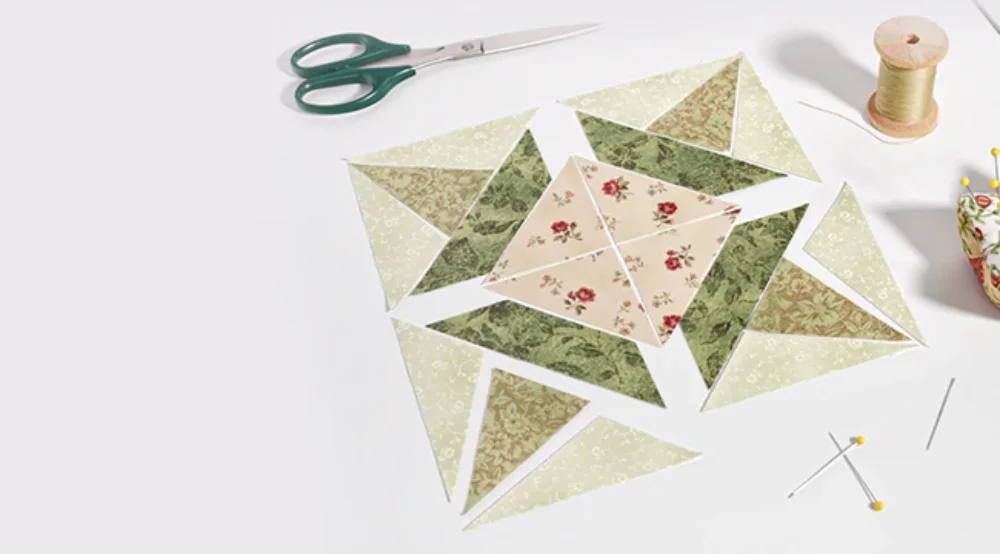
Selecting and Cutting the Fabrics
Grouping and Planning
Before you start cutting the fabrics, take a moment to plan your patchwork skirt. Lay out all your fabric scraps and look for patterns, colors, or textures that catch your eye. You can group your pieces by color family, print style, or even by fabric weight. This step helps you create a skirt that feels balanced and visually interesting.
Arrange your scraps in small piles—maybe all the blues together, florals in another, and solids in a third.
Think about the overall look you want. Do you want a rainbow effect, a soft pastel vibe, or a bold contrast?
Sketch a quick layout or snap a photo of your arrangement. This makes it easier to remember your plan as you start cutting the fabric.
Tip: Mixing large and small prints can add depth to your skirt. Don’t worry if your pieces aren’t perfect matches—patchwork is all about charm and creativity!
Cutting Techniques
Cutting is where your patchwork skirt starts to take shape. Most quilters recommend pressing your fabric first. Ironing helps flatten out wrinkles and makes cutting the fabrics much easier. Use a rotary cutter and a self-healing mat for clean, straight edges. If you prefer, fabric scissors work well for smaller pieces.
Here’s a simple process to follow:
Sort your fabric by color or pattern.
Press each piece flat.
Trim your scraps into even rectangles or squares. A common size for patchwork skirts is about 4.5 inches square, but you can adjust this to fit your design.
Always include a seam allowance—usually ¼ inch on each side.
After cutting, iron the pieces again to keep them crisp and ready for sewing.
Cutting Tool/Technique | Description and Use Case |
|---|---|
Rotary Cutter | Great for precise, straight lines and multiple layers. |
Cutting Mat | Protects your surface and helps measure accurately. |
Ruler | Ensures your squares and rectangles are even. |
You might run into a few challenges while cutting the fabrics. Sometimes, fabric frays or edges look uneven. To avoid this, always use sharp scissors or a fresh rotary blade. Cut along the grainline when possible. If you’re working with knits or slippery fabrics, go slow and use extra pins or a walking foot when sewing.
Note: Pre-wash your cotton fabrics before cutting. This prevents shrinkage and keeps your skirt looking great after the first wash.
Using Layer Cakes and Precuts
If you want to save time and get a consistent look, try using Layer Cakes or other precut bundles from Fanda Fabrics. These 10” x 10” squares come ready to use, so you can skip a lot of the measuring and cutting. Just lay out your precuts, decide on your arrangement, and start sewing.
Layer Cakes make it easy to plan your skirt panels. You can cut each square into smaller pieces or use them as-is for larger blocks.
The consistent size means your seams will line up neatly, giving your skirt a polished finish.
Fanda Fabrics also offers charm packs and other precuts, so you can mix and match for even more variety.
When you use precuts, you don’t have to worry about uneven edges or mismatched sizes. This makes the assembly process much smoother, especially if you’re new to patchwork sewing.
Pro Tip: If you want a more custom look, combine precuts with your own fabric scraps. This adds a personal touch and lets you use up smaller pieces you already have.
Planning and cutting the fabrics is one of the most creative parts of making a patchwork skirt. Take your time, enjoy the process, and remember—there’s no right or wrong way to do it. Your skirt will be as unique as you are!
Patchwork Skirt Sewing: Assembly Steps
Arranging Patchwork Panels
Arranging your patchwork panels is where your creativity shines. Lay out all your patchwork pieces on a large table or the floor. Move them around until you see a pattern or color flow that feels right. You want your skirt to look balanced, so try not to cluster similar colors or prints together. Instead, spread them out for a lively, cohesive look.
Cut your fabric patches accurately and consistently. This helps everything fit together and keeps your skirt from looking wonky.
Pay attention to the grainline when arranging and cutting. This keeps your panels stable and helps the skirt drape nicely.
If you use directional prints, make sure they all face the same way. This small detail makes a big difference in the final look.
Sketch your design or take a quick photo before you start sewing. This gives you a reference as you work.
Tip: Try strip piecing if you want to speed things up. Sew long strips of fabric together, then cut them into smaller sections. This method keeps your patchwork skirt sewing organized and efficient.
A table can help you keep track of your layout:
Panel Number | Color/Pattern | Direction | Notes |
|---|---|---|---|
1 | Blue Floral | Upward | Center Front |
2 | Red Stripe | Upward | Left Side |
3 | Yellow Dot | Upward | Right Side |
Take your time with this step. The more attention you give to arranging your panels, the more professional your skirt will look.
Sewing Tiers and Panels
Now comes the fun part—patchworking the skirt tiers and sewing everything together. Start by sewing your rectangles or squares into long strips. These strips will become the tiers of your skirt. Most patchwork skirt sewing projects use three tiers, but you can add more for extra fullness.
Here’s a step-by-step guide to assembling tiers and attaching tiers for your skirt:
Lay out all your tiers for the front and back. Double-check your arrangement.
Sew your patchwork pieces together along the long sides, using a consistent 1/4-inch seam allowance. This keeps your seams neat and your skirt the right size.
Join the ends of each strip to form a circle. You now have the base for each tier.
Trim each tier to size with a rotary cutter and ruler. This step keeps your edges straight and your tiers even.
Adjust your sewing machine settings for gathering. Set the stitch length to the longest setting (about 5mm) and loosen the upper thread tension.
Sew two parallel rows of gathering stitches near the top edge of the lower tier. Leave long thread tails.
Pull the bobbin threads to gather the fabric evenly. Pin the gathered edge to the bottom edge of the tier above.
Sew the tiers together, right sides facing. Press the seams flat or open with an iron for a crisp finish.
Repeat for all tiers until your skirt is complete.
Note: Always pre-wash your fabrics before sewing. This prevents shrinkage and keeps your patchwork skirt looking great after washing.
Common mistakes can sneak in during this stage. Avoid skipping seam pressing, using the wrong seam allowance, or ignoring the grainline. These details make a big difference in the fit and finish of your skirt.
If you notice puckering, check your machine tension and needle. Pressing with a hot iron can help smooth out minor puckers.
Trimming and Squaring
After you finish sewing the tiers, it’s time to trim and square your panels. This step gives your patchwork skirt a polished, professional look.
Hold your patchwork firmly and use a rotary cutter to trim away any excess fabric or uneven edges.
Place a square quilting ruler on your panels. Align the ruler’s lines with your seams to keep everything straight.
Trim the right and top edges first. Rotate your panel, then trim the left and bottom edges.
Press your seams carefully. A tailor’s clapper can help set the seams for a crisp finish.
If you have half-square triangles or angled seams, line up the ruler’s 45-degree line with the seam for perfect squaring. Take your time here. Clean, squared panels make the rest of your patchwork skirt sewing much easier.
Pro Tip: Hide thread ends and knots inside the seams for a neat finish. This small step keeps your skirt looking tidy inside and out.
When you finish trimming and squaring, your skirt panels will fit together perfectly. You’re now ready for the final steps—adding the waistband and hemming.
Waistband and Finishing
Adding Waistband Options
When you reach the waistband, you have a few great choices. Many people love elastic waistbands because they stretch and move with you. An elastic waistband gives your patchwork skirt a comfortable fit and a flattering shape. You can wear your skirt all day and feel relaxed.
If you want something adjustable, try a wrap-around style. This type lets you tie the skirt to fit your waist perfectly, which works well for different body shapes.
To add the waistband, start by sewing the side seams and finishing the edges. Fold and press the top edge of your skirt to make a casing for the elastic. Leave a small opening so you can slide the elastic through. Use a safety pin to guide the elastic around the waist.
Overlap the ends by half an inch and sew them together with a zig-zag stitch. Close the opening and, if you like, topstitch the waistband for a neat finish. This method keeps your skirt secure and comfortable.
Lining and Hemming
A lining makes your skirt feel smooth and helps it last longer. Choose a soft, lightweight fabric for the lining. Sew the lining to the skirt at the waist before you add the waistband. For extra comfort, add a small jump pleat at the hem of the lining. This lets you move easily and keeps the lining from pulling.
When you hem the skirt, use a serger or a twin needle for a clean edge, especially if your skirt has a flare. For curved hems, keep the hem narrow and use basting stitches to ease in any extra fabric. Press the hem well and use tiny stitches for an invisible look. These steps help your skirt look polished and last through many wears.
Customizing with Fanda Fabrics
You can make your patchwork skirt truly unique with Fanda Fabrics. Try mixing different fabric types from their collections, like cotton, poplin, or even pre-quilted fabrics. Add decorative stitching, embroidery, or appliqué for extra flair. Use universal or quilting needles to keep your stitches smooth and your skirt strong.
Fanda Fabrics offers so many patterns and textures that you can create a skirt that matches your style. With the right care, your skirt will stay vibrant and durable, ready for any adventure.
Conclusion
Your finished skirt is ready to wear and show off! Try pairing your patchwork skirt with a simple tee or denim jacket for a casual look. Fashion experts suggest mixing textures, adding embroidered pockets, or even chopping the hem for a deconstructed vibe.
You can experiment with bleaching or vintage trims to make your patchwork skirt stand out. Every patchwork skirt lets you use scraps, favorite quilt blocks, or hand stitching, giving you endless creative freedom. Visit Fanda Fabrics for more inspiration and start your next patchwork adventure!
FAQ
How do I wash my patchwork skirt?
You should wash your skirt in cold water with a gentle detergent. Turn it inside out and use a delicate cycle. Line dry or tumble dry on low. This keeps your colors bright and your fabric strong.
Can I sew a patchwork skirt without a sewing machine?
Yes, you can! Hand sewing works well for patchwork. Use small, tight stitches for strength. It takes more time, but you get a handmade look and lots of control over each seam.
What if my fabric scraps are all different weights?
Mixing fabric weights is okay, but try to group similar ones in each tier. If you use heavy and light fabrics side by side, your skirt might hang unevenly. Press seams well for a smooth finish.
Do I need to line my patchwork skirt?
You don’t have to, but a lining adds comfort and helps your skirt last longer. It also keeps the inside neat and prevents see-through spots, especially if you use light-colored fabrics.
Can I use Fanda Fabrics’ precuts with my scraps?
Absolutely! Combining Fanda Fabrics’ precuts with your scraps gives your skirt a unique look. Precuts save time and help your seams line up, while your scraps add a personal touch.