Tulle fabric, prized for its delicate and airy quality, is often used in bridal wear, costumes, and decorative applications. However, its fine, net-like structure makes it susceptible to tears and snags. Repairing tulle requires gentle techniques to maintain its integrity and appearance. This guide provides methods for effectively fixing common tulle damage.
Understanding the nature of tulle is crucial for successful repairs. Whether dealing with small holes or larger tears, the goal is to minimize visibility and prevent further damage. Employing appropriate tools and materials ensures a seamless repair, preserving the fabric’s beauty and functionality. These techniques are essential for anyone working with this versatile material.
Tulle Fabric Damage Reasons

Tulle fabric, known for its delicate, net-like structure, is susceptible to damage from various sources. Understanding these reasons is crucial for proper care and maintenance.
Snagging and Tearing:
Tulle’s open weave makes it highly vulnerable to snagging on sharp objects, jewelry, or rough surfaces. Once a thread is pulled, it can create runs or tears, compromising the fabric’s integrity. This is especially true for fine tulle used in bridal wear or delicate garments. Even minor contact with abrasive surfaces can cause significant damage. Therefore, careful handling and storage are essential to prevent snags and tears.
Friction and Abrasion:
Repeated friction, such as rubbing against other fabrics or surfaces, can wear down the delicate fibers of tulle. This is particularly problematic in areas of garments that experience frequent movement or contact, like underarms or seams. Over time, friction can thin the fabric, leading to holes or weakened areas. Proper lining and gentle handling can minimize this type of damage.
Chemical Exposure:
Tulle can be damaged by exposure to certain chemicals, including harsh detergents, bleach, and perfumes. These substances can weaken the fibers, cause discoloration, or even dissolve the fabric. It is very important to use gentle cleaning methods and avoid direct contact with harsh chemicals. Also, some hairsprays and other cosmetic products can damage the fabric.
Heat and Sunlight:
Excessive heat, such as from ironing or drying on high settings, can melt or warp tulle fibers. Direct sunlight can also cause fading and weaken the fabric over time. Tulle should be dried flat, or hung to dry away from direct sunlight. When ironing, a cool setting and a protective cloth are essential to prevent damage.
Improper Storage:
Storing tulle garments in cramped or humid conditions can lead to wrinkles, creases, and mildew. Folding tulle tightly can also create permanent creases. It is best to store tulle garments by hanging them in breathable garment bags or loosely folding them with acid-free tissue paper to prevent damage from improper storage.
How to Repair Tulle Fabric

Repairing tulle fabric requires a delicate touch and precise techniques to maintain its sheer and ethereal quality. Proper repair methods can extend the life of tulle garments and decorative items, preserving their original beauty. Here’s a guide to repairing tulle fabric:
Step 1: Assess the Damage and Gather Supplies
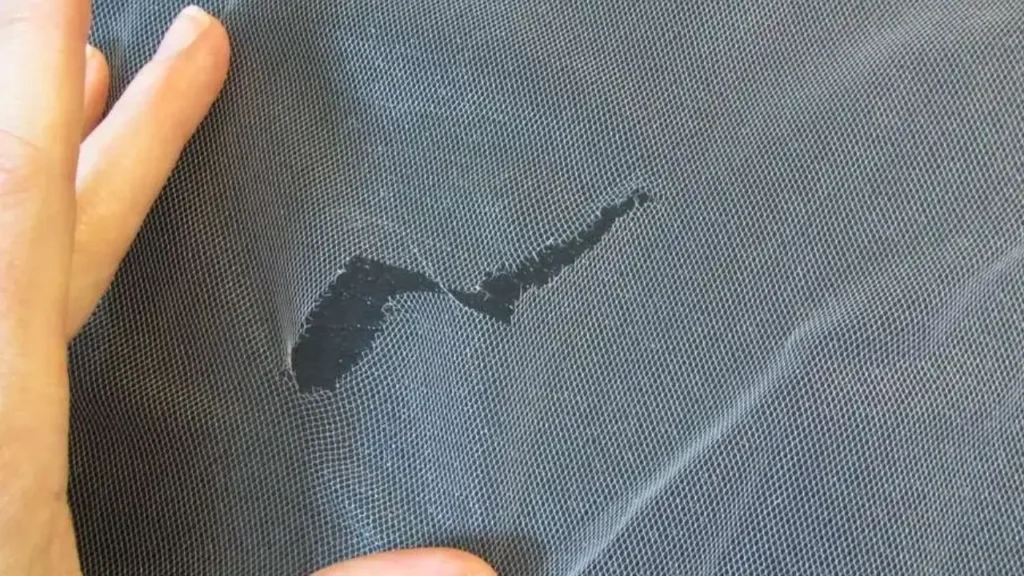
Begin by carefully assessing the damage to the tulle. Determine the size and nature of the tear or hole. Gather necessary supplies, including fine needles, matching thread, and small scissors. Choose a thread that closely matches the tulle’s color and texture to ensure a seamless repair.
Accurate assessment of the damage is crucial for selecting the appropriate repair method. Small tears may require simple stitching, while larger holes may necessitate patching. Matching thread to the tulle’s color minimizes visibility of the repair. Using fine needles prevents further damage to the delicate fabric.
Proper preparation ensures a smooth and efficient repair process. Having all necessary supplies readily available prevents interruptions and maintains focus. Cleanliness is essential; ensure your hands and workspace are free from dirt or oils that could stain the tulle.
Step 2: Repair Small Tears and Snags
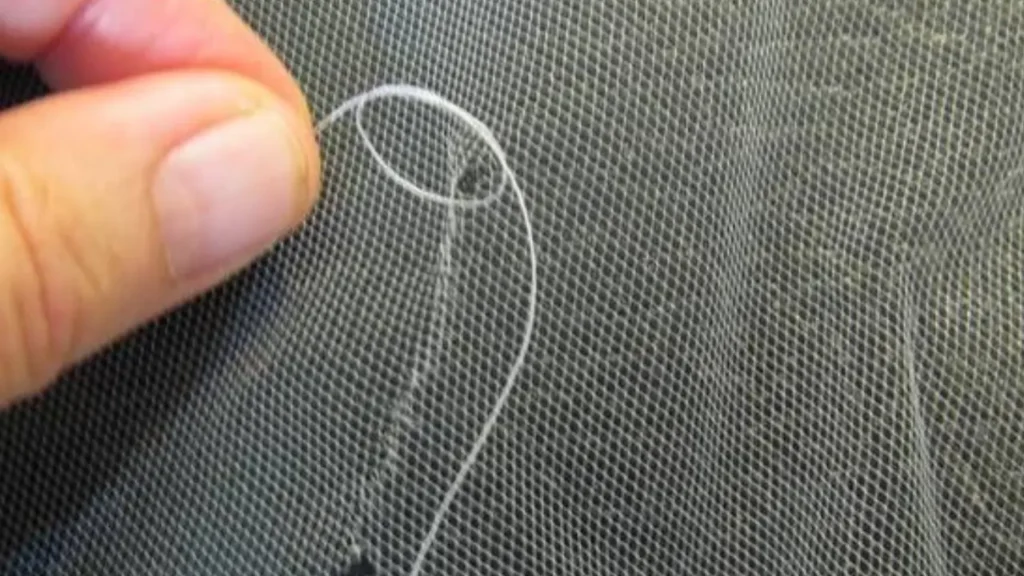
For small tears or snags, use a fine needle and matching thread to carefully stitch the damaged area. Begin by gently aligning the torn edges. Use small, delicate stitches to secure the fabric, following the tulle’s weave pattern. Avoid pulling the thread too tightly to prevent puckering or distortion.
Small tears and snags can often be repaired with minimal visibility. Gentle stitching along the tulle’s weave pattern ensures a seamless repair. Consistent stitch size and tension prevent unevenness. Securing the thread with small, tight knots prevents unraveling.
When repairing snags, gently pull the loose thread back into place before stitching. If the snag has created a run, carefully stitch along the run to secure the threads. Avoid stretching the tulle during the repair process to maintain its original shape and texture.
Step 3: Patch Larger Holes
For larger holes, you’ll need to patch the tulle. Cut a piece of matching tulle slightly larger than the hole. Position the patch underneath the hole, aligning the weave patterns. Use fine stitches to secure the patch to the surrounding tulle, ensuring the edges are neatly attached.
Patching larger holes requires careful alignment and stitching. Aligning the weave patterns ensures the patch blends seamlessly with the surrounding fabric. Secure the patch with small, tight stitches to prevent shifting or unraveling.
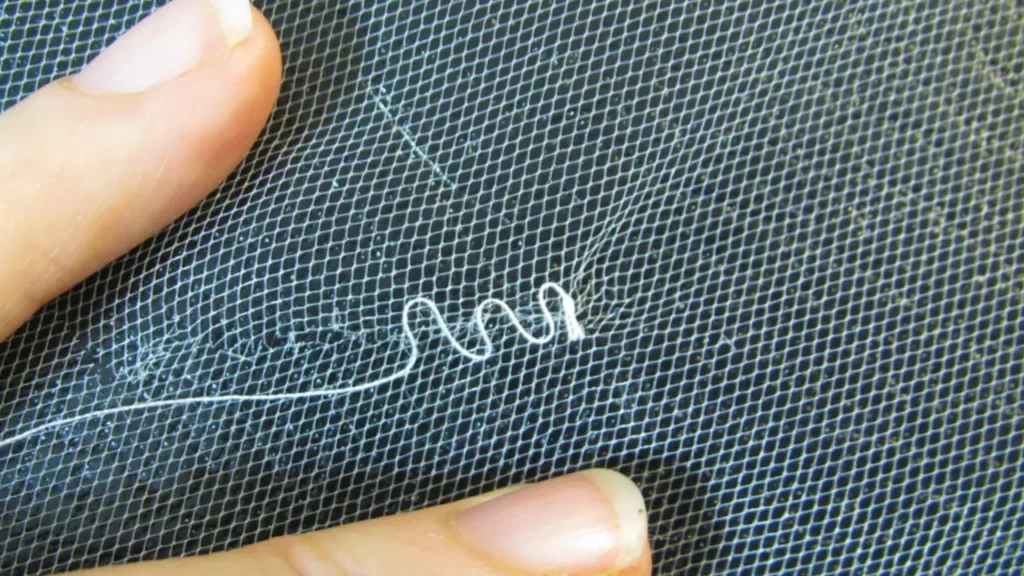
When patching, consider using a zigzag stitch or a very fine running stitch to secure the edges. Ensure the patch lies flat and smooth against the tulle. Avoid creating bulky seams that could be visible or uncomfortable. Gently press the repaired area with a cool iron to flatten any puckering.
How to Fix a Hole in Tulle Fabric

Fixing a hole in tulle fabric requires delicate handling and precise techniques to maintain its sheer and ethereal quality. Proper repair methods can extend the life of tulle garments and decorative items, preserving their original beauty. Here’s a guide to fixing a hole in tulle fabric:
Step 1: Assess the Hole and Gather Supplies
Begin by carefully assessing the size and shape of the hole in the tulle. Determine if the hole is a simple tear or a larger, more complex opening. Gather necessary supplies, including fine needles, matching thread, and small scissors. Choose a thread that closely matches the tulle’s color and texture to ensure a seamless repair.
Accurate assessment of the hole is crucial for selecting the appropriate repair method. Small tears may require simple stitching, while larger holes may necessitate patching. Matching thread to the tulle’s color minimizes visibility of the repair. Using fine needles prevents further damage to the delicate fabric.
Proper preparation ensures a smooth and efficient repair process. Having all necessary supplies readily available prevents interruptions and maintains focus. Cleanliness is essential; ensure your hands and workspace are free from dirt or oils that could stain the tulle.
Step 2: Repair Small Holes with Stitching
For small holes or tears, use a fine needle and matching thread to carefully stitch the damaged area. Begin by gently aligning the edges of the hole. Use small, delicate stitches to secure the fabric, following the tulle’s weave pattern. Avoid pulling the thread too tightly to prevent puckering or distortion.
Small holes can often be repaired with minimal visibility. Gentle stitching along the tulle’s weave pattern ensures a seamless repair. Consistent stitch size and tension prevent unevenness. Securing the thread with small, tight knots prevents unraveling.
When repairing, ensure the stitches are close together to prevent the hole from widening. If the hole has created a run, carefully stitch along the run to secure the threads. Avoid stretching the tulle during the repair process to maintain its original shape and texture.
Step 3: Patch Larger Holes with Matching Tulle
For larger holes, you’ll need to patch the tulle. Cut a piece of matching tulle slightly larger than the hole. Position the patch underneath the hole, aligning the weave patterns. Use fine stitches to secure the patch to the surrounding tulle, ensuring the edges are neatly attached.
Patching larger holes requires careful alignment and stitching. Aligning the weave patterns ensures the patch blends seamlessly with the surrounding fabric. Secure the patch with small, tight stitches to prevent shifting or unraveling.
When patching, consider using a zigzag stitch or a very fine running stitch to secure the edges. Ensure the patch lies flat and smooth against the tulle. Avoid creating bulky seams that could be visible or uncomfortable. Gently press the repaired area with a cool iron to flatten any puckering.
Things to Avoid for Tulle Fabric Protection
Tulle fabric, prized for its delicate and airy appearance, requires careful handling to maintain its pristine condition. Avoiding certain practices can significantly extend the lifespan and beauty of tulle garments and decorations. Here are key things to avoid for tulle fabric protection:
Sharp Objects and Rough Surfaces
Avoid exposing tulle to sharp objects or rough surfaces that can snag or tear the delicate weave. Even minor contact with zippers, jewelry, or abrasive materials can cause significant damage. Store tulle garments in protective bags and handle them with care. When working with tulle, ensure your hands and workspace are free from rough edges or sharp tools.
Tulle’s open weave structure makes it highly susceptible to damage from sharp objects. Once a thread is pulled, it can create runs or tears, compromising the fabric’s integrity. Be especially cautious when wearing tulle near other fabrics with embellishments or rough textures. Always inspect your surroundings to minimize the risk of snagging.
Excessive Friction and Pulling
Prevent excessive friction or pulling on tulle, as this can weaken the fibers and lead to tears or holes. Repeated rubbing against other fabrics or surfaces can wear down the delicate threads. When handling tulle, use gentle movements and avoid stretching or pulling the fabric. Be particularly careful when sewing or altering tulle garments.
Friction is a common cause of wear and tear in tulle, especially in areas that experience frequent movement. Avoid tight-fitting garments or accessories that can rub against the tulle. When cleaning or steaming tulle, use gentle techniques and avoid vigorous scrubbing or pulling. Allow tulle garments to hang freely to prevent unnecessary stress on the fabric.
Harsh Chemicals and Cleaning Agents
Avoid exposing tulle to harsh chemicals or cleaning agents, such as bleach, strong detergents, or solvents. These substances can weaken or discolor the fibers, leading to irreversible damage. Use gentle, pH-neutral cleansers specifically designed for delicate fabrics. When in doubt, opt for hand washing with cold water and mild soap.
Many household chemicals can degrade the fibers of tulle, causing them to become brittle or discolored. Avoid spraying perfumes or hairsprays directly onto tulle garments. When cleaning tulle, avoid using fabric softeners or dryer sheets, as they can leave residues that weaken the fabric. Always test cleaning products on a small, inconspicuous area before applying them to the entire garment.
High Heat and Direct Sunlight
Protect tulle from high heat and direct sunlight, as these can cause the fibers to melt, warp, or fade. Avoid ironing tulle directly; if necessary, use a cool setting and a protective cloth. Do not dry tulle garments in direct sunlight or expose them to high temperatures from dryers or heaters.
Excessive heat can permanently damage the delicate structure of tulle, causing it to lose its shape and texture. Direct sunlight can also fade the color of tulle, especially in light-colored fabrics. When storing tulle garments, keep them in cool, dry places away from direct sunlight. Use breathable garment bags to protect them from dust and light.
Improper Storage and Folding
Avoid storing tulle garments in cramped or humid conditions, as this can lead to wrinkles, creases, and mildew. Do not fold tulle tightly, as this can create permanent creases. Hang tulle garments freely or loosely fold them with acid-free tissue paper to prevent damage. Use breathable garment bags to protect tulle from dust and light.
Improper storage can lead to irreversible damage to tulle fabric. Avoid storing tulle garments in plastic bags or containers, as they can trap moisture and promote mildew growth. Ensure tulle garments are completely dry before storing them. When traveling, loosely roll tulle garments to prevent creases.
Conclusion
Repairing tulle fabric requires delicate handling and precise techniques to maintain its sheer and ethereal quality. Whether mending small tears or reinforcing larger areas, using the right tools and methods is crucial for a seamless finish. Patience and attention to detail ensure the repaired section blends seamlessly with the rest of the fabric.
Proper repair techniques extend the lifespan of tulle garments and decorative items, preventing further damage and preserving their original beauty. By mastering these methods, you can confidently restore and maintain your tulle creations, ensuring they remain elegant and intact.
For high-quality tulle fabric perfect for your projects and repairs, request a quote from Fanda Fabrics today. We offer a wide range of tulle options, ensuring you find the perfect match for your needs. Get in touch to discuss your requirements and benefit from our expert services.
