You want to know how to quilt a wall hanging as a beginner? Start by picking the right fabrics and prepping them well. Many beginners find matching seams and keeping layers smooth tricky, but you can fix these issues with careful pinning and prewashing.
Fanda Fabrics gives you top-notch materials for every wall hanging project. Don’t worry if you make mistakes—quilting is a journey, and you’ll get better with practice.
Tip: Try using safety pins for layering and test your fabric for colorfastness before sewing.
Key Takeaways
Choose high-quality 100% cotton fabrics and prewash them to prevent color bleeding and shrinkage.
Gather essential tools like rotary cutters, sharp scissors, and marking pens to make cutting and sewing easier.
Follow step-by-step instructions to cut, sew, and assemble your quilt top carefully, using pins and pressing seams for neat results.
Layer your quilt with batting and backing, then quilt the layers by hand or machine to add texture and hold everything together.
Add borders, bind edges, and attach a hanging sleeve or other hardware to display your wall hanging beautifully and securely.
Supplies for Wall Hanging Quilts

Essential Materials
Before you start your wall hanging project, you’ll want to gather all the right materials. Here’s what you’ll need:
100% cotton fabric for the quilt top and backing (choose colorfast options for lasting beauty)
Cotton batting to give your wall hanging a soft, plush feel
Wool felt appliques or embellishments like buttons and embroidery floss for extra detail
Hanging hardware, such as a wooden dowel or a sleeve, for easy display
Illustrated patterns or instructions to guide your design
Most beginners find that using a kit can make things easier. Kits usually include everything you need to finish your wall hanging and cost around $27 to $33. If you prefer to pick your fabrics, designer-curated bundles help you match colors and prints with confidence.
Tip: Cotton is a natural, eco-friendly choice. It’s biodegradable and helps reduce waste compared to synthetic fabrics.
Tools Checklist
You don’t need a fancy setup to make a beautiful quilt, but having the right tools makes the process smoother. Here’s a handy table of recommended tools and their uses:
Tool Category | Recommended Tool / Brand | Purpose / Benefit |
|---|---|---|
Cutting Mat | Olfa Folding Cutting Mat | Smooth, portable surface for cutting fabric |
Rotary Cutter | Kai Rotary Cutter | Sharp, precise cuts |
Scissors | Karen Buckley Scissors | Great for curves and appliqué |
Marking Pens | Frixion Pens | Heat-erasable marks for easy fabric guides |
Machine Needles | Schmetz Microtex Sharp 80/12 | Accurate piecing, prevents skipped stitches |
Thread | Aurifil Cotton Mako 50wt | Strong, flat seams |
Hand Quilting Needles | Bohin Big Eye Needles | Smooth, easy hand stitching |
Clips | Wonder Clips | Hold layers together without pins |
Quilting Rulers | Creative Grids 6.5×12.5 inch Ruler | Accurate, non-slip cutting |
Safety first! Always cut away from your body and keep rotary cutters locked when not in use.
Choosing Fanda Fabrics Quilting Collection
Picking the right fabric sets the tone for your wall hanging. Fanda Fabrics stands out because you get premium 100% cotton with a smooth texture and high thread count. Their Quilting Collection offers a huge variety of prints, colors, and even extra-wide backing fabrics—perfect for a seamless quilt finish.
You can find curated bundles that make it easy to coordinate your project, whether you’re a beginner or a seasoned quilter.
Fanda Fabrics uses advanced manufacturing to keep quality consistent. Their wide back options (up to 118 inches) mean you won’t have to piece together smaller fabrics for the back of your wall hanging.
This saves time and gives your quilt a professional look. Plus, their global reputation and eco-friendly choices make them a smart pick for anyone who wants a beautiful, lasting wall hanging.
How to Quilt a Wall Hanging: Step by Step
Ready to learn how to quilt a wall hanging from start to finish? Let’s break down each step so you can follow along and create a beautiful quilted wall hanging for your space.
Prepare and Cut Fabric
Start by choosing your fabrics. Many beginners like to use precut bundles because they make color matching easy. You’ll need light and dark tone strips for contrast. Here’s a simple way to cut and prep your fabric:
Cut thirty-one 12-1/2″ long light strips and thirty-one 12-1/2″ long medium or dark strips from 2-1/2″ precut fabric strips.
Pair each dark or medium strip with a light strip.
Place the pairs right sides together and pin at each short edge.
Stitch each end with a scant 1/4″ seam allowance using a quilting needle and presser foot.
Chainstitch the strips, then clip the threads between sets.
Press all seams flat, then open with steam from your iron. Use a tailor’s clapper for crisp seams.
Fold each tube in half, showing more or less of the light fabric as you like.
Cut along both folded edges to create two flat strata strips from each tube.
Lay out and stagger the strips in two columns, keeping dark fabrics toward the center.
Offset strips by one row, placing one half at the top of Column A and the other at the bottom of Column B.
Take a photo of your layout for reference.
Tip: Pre-wash your fabrics, especially reds and darks, to prevent color bleeding and shrinkage. Use pinking shears or zigzag stitches to keep edges from fraying.
Assemble Quilt Top
Now you’ll sew your strips together to make the quilt top. Keep these tips in mind to avoid common mistakes:
Watch your guide, not the needle, to keep lines straight.
Square up your blocks before joining them so everything fits together.
Pin at points and intersections to prevent shifting.
Measure carefully before adding sashing or borders. Cut strips on the straight grain.
Press seams with an up-and-down motion, not sliding, to avoid stretching.
Here’s a quick table to help you troubleshoot:
Common Mistake | How to Avoid It |
|---|---|
Skipping Pre-Washing | Pre-wash with cold water and mild detergent. |
Using Wrong Tools | Use sharp rotary cutters and accurate rulers. |
Poor Color Coordination | Stick to simple palettes and coordinated bundles. |
Inconsistent Seam Allowances | Use a seam guide or special presser foot. |
Not Squaring Up Blocks | Trim blocks with a square ruler before assembling. |
Note: If you notice puckering or uneven seams, loosen your needle tension, use a walking foot, and pin seams frequently.
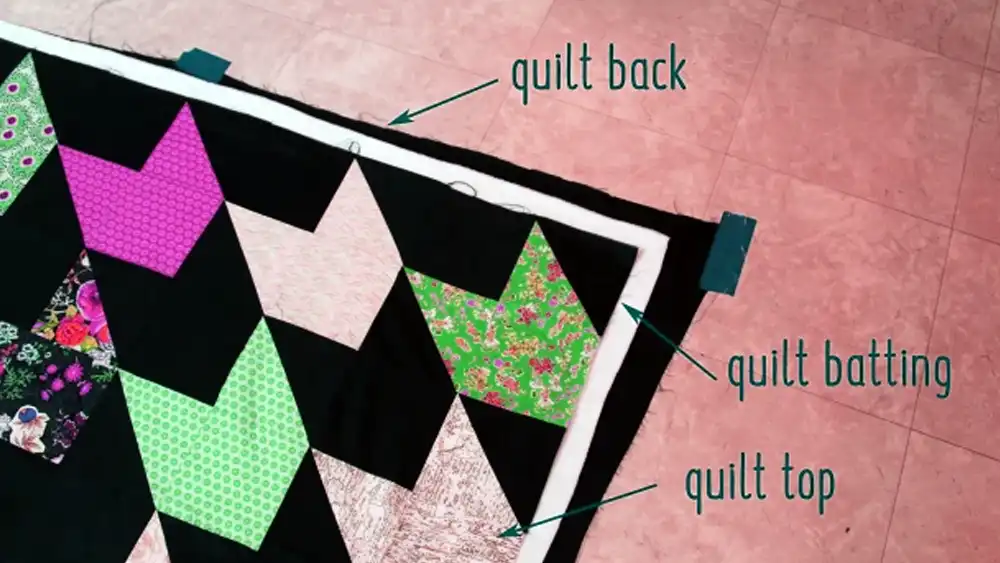
Layer with Batting and Backing
Layering is key for a flat, professional wall hanging. Place your quilt top face down, add batting, then backing. Cotton or 80/20 cotton/poly batting works best for stability. Some quilters add a layer of wool or bamboo batting for extra loft and texture. For backing, choose a stable cotton fabric.
Fanda Fabrics’ Wide Back Quilting Fabric makes this step easier. These extra-wide options eliminate seams, giving your wall hanging a smooth, seamless back. You can customize the design, color, and finish to match your project. Specialized finishes like pre-shrinking and wrinkle resistance add durability.
Tip: Double batting (cotton under wool) helps your quilt hang flat and shows off the quilting texture.
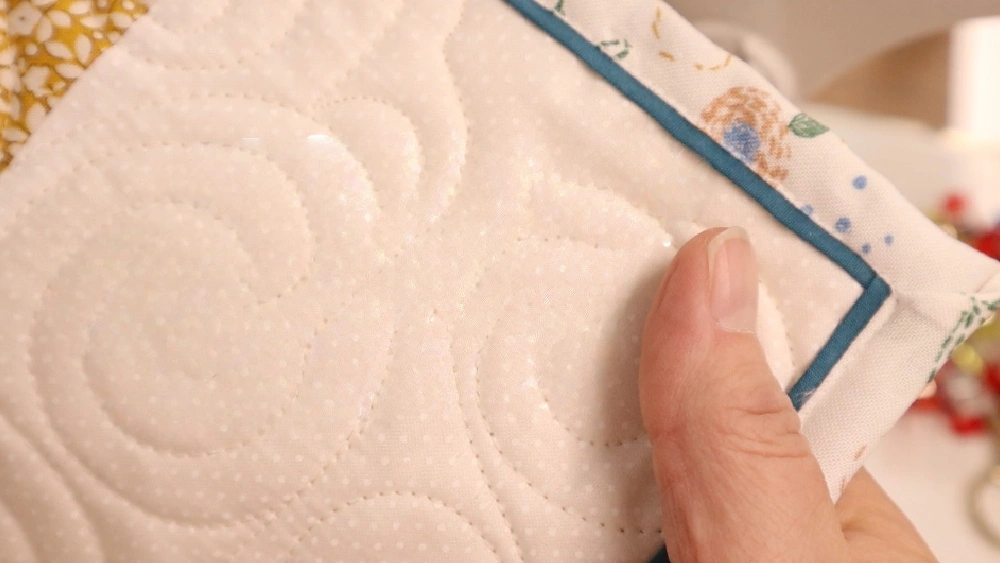
Quilt the Layers
Quilting binds the layers together and adds texture. You have a few options:
Hand quilting: Use running stitches with a hoop or frame.
Machine quilting: Sew the layers together with a home or long-arm machine.
Tying: Fasten layers with yarn or thread knots for a quick finish.
Use thin batting or flannel to reduce bulk. If you plan to frame your wall hanging, quilt the top and batting together before adding backing and binding. Stretch and staple the quilted piece onto a wooden frame for display.
Troubleshooting tips:
Loosen needle tension to prevent puckering.
Use stitch lengths around 2.0 to 2.5 mm.
Stabilize fabric with spray starch or water-soluble stabilizers.
Change needles regularly and check thread tension.
Pin pieces before sewing and let the feed dogs move the fabric.
Tip: If you see puckers, press seams with steam or unpick and resew. Always use a sharp needle for clean stitches.
Add Borders and Bind Edges
Borders and binding give your wall hanging a finished look. Here’s how to do it right:
Measure and pin borders carefully to avoid distortion.
Use the “hang test” by folding the quilt in half to check for waviness.
Cut borders to the correct length by measuring in several places.
Sew borders with a consistent quarter-inch seam allowance. Press seams in opposite directions to nest them.
Use a flat surface for measuring and cutting.
For binding:
Choose single-fold binding for wall hangings.
Calculate fabric needed by measuring the perimeter and adding extra for corners.
Trim excess batting and backing to a scant 1/8 inch.
Pin binding at least 6 inches from a corner, mark 1/4 inch from the edge at corners for neat mitered corners.
Plan your binding color to blend or contrast with the border.
Common issues:
Uneven borders often come from uneven tension. Pin carefully and press seams gently.
Squaring up the quilt before binding ensures a neat finish.
Cut binding strips precisely and avoid pulling too tightly when folding over the edge.
Note: Sew with the quilt top facing up to monitor seams. Pin borders thoroughly to prevent dragging and uneven seams.
Now you know how to quilt a wall hanging step by step. Each stage builds your skills and brings you closer to a finished quilt you’ll be proud to display.
How to Hang a Quilt on the Wall?
Add a Hanging Sleeve
One of the best ways to hang a quilt is by adding a fabric sleeve to the back. You sew a strip of fabric along the top edge of your quilted wall hanging. This sleeve lets you slide a wooden dowel or curtain rod through, which spreads the weight evenly and keeps your wall hanging flat.
You avoid poking holes in your quilt, and the sleeve stays hidden from view.
To make a sleeve, cut a strip of fabric about 4 inches wide and as long as the quilt’s top edge. Fold the edges under, press, and sew the sleeve to the back, just below the binding. Slide your dowel through the sleeve and rest it on hooks or nails. This method works well for both lightweight and heavier quilts.
Tip: If you use Fanda Fabrics Double Sided Quilted Fabric, you can create a reversible wall hanging. The pre-quilted, double-sided design means you don’t need extra backing or batting, and you can flip your display for a fresh look anytime.
Alternative Hanging Methods
You have plenty of options if you want to hang a quilt without a sleeve. Here’s a quick look at some popular choices:
Hanging Method | Description | Advantages / Notes |
|---|---|---|
Photo Corners | Fabric corners on the back hold a dowel. | No holes in quilt, gentle on fabric. |
Loops Method | Sew fabric loops along the top edge for a dowel. | Even support, easy to hang and remove. |
Velcro Strips | Attach Velcro to the quilt and a wood strip on the wall. | No holes, strong hold, easy removal. |
Magnets | Use tiny magnets and a metal strip mounted with Command Strips. | No damage, great for rentals. |
Clip Curtain Rings | Clips attach to the quilt edge and hang on small nails. | Simple, minimal damage, easy to swap quilts. |
Commercial Hangers | Specialized hangers fit through sleeves or tabs. | Secure, designed for quilts, easy to use. |
You can also use push pins for a quick solution, but try to avoid direct pinning if you want to keep your quilt in perfect shape.
Display Tips
You want your quilted wall hanging to look its best. Hang a quilt-like artwork by using a decorative rod, quilt hanger, or even a vintage ladder. Try creating a gallery wall with several small quilts or blocks for a cozy, creative vibe. If you have a reversible wall hanging, flip it every season for a fresh look.
Lighting makes a big difference. Place your wall hanging at eye level, about 55 to 66 inches from the floor. Use picture lights or wall sconces at a 30-degree angle to highlight the texture without harsh shadows.
Keep your quilt out of direct sunlight to prevent fading. Rotate your display every few months to keep things interesting and protect the fabric.
Note: When you hang a quilt, always check that your hardware can support the weight. Store extra quilts in a cool, dry place when not on display.
Conclusion
You’ve learned each step to create a wall hanging, from cutting fabric to adding a hanging sleeve. Many beginners, like Catherine Hudson, find these guides “so cute & simple to make.” Fanda Fabrics gives you durable, colorfast cotton that makes your quilt last.
If you have questions about thread, borders, or quilting techniques, just ask below. Share your progress in online groups or with friends—your creativity inspires others. Ready to start quilting? Grab your favorite fabrics and go for it!
FAQ
How do I choose the right batting for my wall hanging?
You want your wall hanging to look crisp and hang flat. Go for thin cotton or cotton/poly batting. These types keep your quilt lightweight and easy to display. Avoid thick or puffy batting for best results.
Can I quilt a wall hanging by hand if I don’t have a sewing machine?
Absolutely! You can hand quilt using simple running stitches. Use a hoop to keep your fabric tight. Hand quilting gives your wall hanging a classic, textured look. It’s a relaxing way to finish your project.
What size should I make my wall hanging?
Most wall hangings range from 18″ x 24″ to 36″ x 36″. You can make single block wall hangings for smaller spaces or go bigger for a bold statement. Measure your wall before you start to get the perfect fit.
How do I keep my quilted wall hanging from sagging?
Add a hanging sleeve or use evenly spaced loops at the top. Make sure your dowel or rod supports the weight. For larger quilts, use extra support in the middle. This keeps your wall hanging flat and neat.
Can I wash my quilted wall hanging?
Yes, you can wash it gently by hand or on a delicate cycle. Use cold water and mild detergent. Lay it flat to dry. Avoid wringing or twisting the fabric to keep your quilt looking fresh and crisp.