Have you ever found the perfect fabric for your quilt backing, only to realize it has a big repeat pattern that could look a little odd if you don’t match it up properly? Don’t worry, you’re not alone! Pattern matching for quilt backing is all about aligning those prints for a smooth, cohesive look that ties everything together. While it might seem tricky at first, once you learn how to do it, your quilt backs will have that polished, professional finish.
If you’re a new quilter, mastering this technique is a game changer. It helps you create clean seams and makes your quilt look much more refined. Plus, the satisfaction of seeing a perfectly matched print is totally worth it! Ready to learn how to pattern match fabric for your quilt backing? Let’s dive in with this step-by-step guide, and soon you’ll be matching prints like a pro.
Why Pattern Matching Matters for Quilt Backing?
Pattern matching ensures that the design elements on your quilt backing flow seamlessly from one fabric piece to another, giving a more professional and polished finish. Without proper alignment, even the smallest misstep can create a jarring visual effect, especially with large repeating patterns like stripes, geometric designs, or floral motifs.
Here are some key reasons pattern matching matters:
- Visual Continuity: Properly matched patterns make seams less noticeable, creating a cohesive look.
- Professional Finish: Well-matched patterns give your quilt a clean, high-quality appearance, enhancing its overall beauty.
- Attention to Detail: Pattern matching showcases your skills and attention to detail, making your quilt stand out as a work of art.
Pattern matching may not be necessary for all quilt backings, especially with solid or very small, non-directional prints. However, when using fabric with bold or large-scale patterns, taking the time to match the design across seams can elevate your quilt significantly.
Materials and Tools You’ll Need
Before we jump into the fun part, let’s gather everything you’ll need to make pattern matching on your quilt backing a breeze. Here’s your essential checklist:
Essential Tools for Pattern Matching
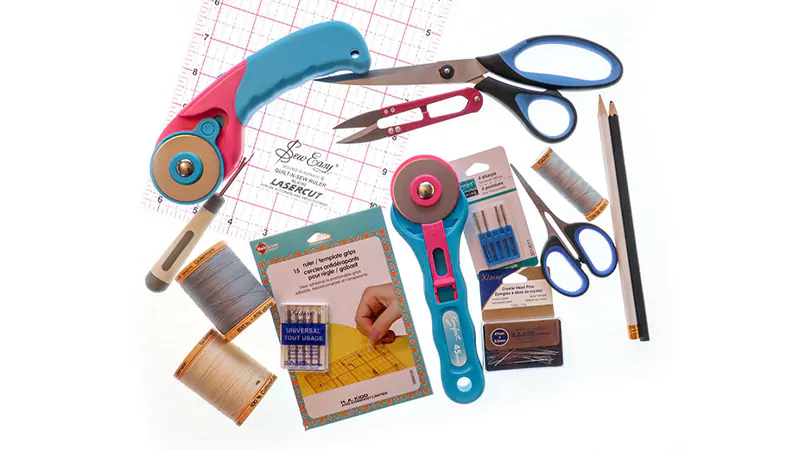
- Rotary Cutter – A sharp, reliable cutter is a must for clean, crisp edges.
- Ruler – A quilting ruler (preferably with grid lines) will help keep your cuts straight and spot-on.
- Pins – These are optional, but they help hold everything in place while you line up your print.
- Glue Stick – A washable fabric glue stick works wonders for holding the fabric in place before sewing.
- Ironing Mat or Wool Pressing Mat – Perfect for pressing seams without risking damage to your fabric.
- Iron – A good iron is key to setting seams and keeping everything neat.
- Sewing Machine – Of course, you’ll need your machine to stitch it all together!
- Piecing Thread – Choose a fine, strong thread for clean seams.
- Scissors – These come in handy for trimming fabric or threads.
- Cutting Mat – A self-healing cutting mat protects your surface while you cut.
Choosing the Right Fabric for Easy Matching
When picking your fabric, opt for prints with a clear, repeatable pattern. Stripes and geometric patterns are generally easier to match than florals, which can be trickier due to their randomness. Stripes and geometric patterns are usually a breeze to line up.
As for repeat styles, half-drop repeats and mirror-image patterns are more challenging, but once you practice, you’ll feel more confident!
Fabric weight is important too—medium-weight cotton is ideal because it’s neither too flimsy nor too heavy to handle.
How to Pattern Match Fabric for Quilt Backing? A Step-by-Step Guide
Now that you have your tools and materials ready, let’s go through the pattern matching process step by step.
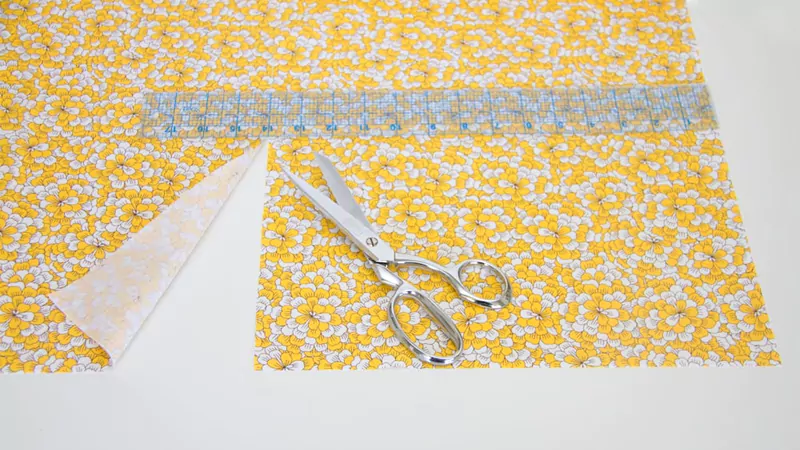
Step 1: Prepare Your Fabric
Cut off the selvage edges. Selvage can be a bit stiff, and it messes with your ability to match prints neatly. So, make sure to cut those off for a clean edge.
Press your fabric with a warm iron. You want to get rid of any wrinkles before starting the pattern matching process—wrinkles can throw everything off.
Trim your fabric to size. Measure your quilt backing and cut it according to the size you need. Be sure to leave a little extra for seam allowances!
Step 2: Understand Your Pattern Repeat
Now that your fabric is prepped, it’s time to look at the pattern itself.
Identify the repeat pattern—this is the part of the design that repeats itself across the fabric. Measure the distance from one repeat to the next. This helps you figure out how much fabric you need to match it properly.
Once you’ve got that down, visualize how the print will align once your backing panels are sewn together. This step ensures that your quilt back will have a seamless look when it’s pieced together.
Step 3: Fold and Align for Matching
Folding your fabric. I recommend folding about 1 inch of fabric along the edge. This clean fold will help you align your prints as you match them.
Align the repeat pattern with the fold. Whether you’re matching left to right or top to bottom, this step is key for keeping everything neat. To make sure your fold stays consistent, grab a seam gauge. It’ll help you make sure the folds are even every time.
Step 4: Pinning and Gluing for Accuracy
Now it’s time to make sure everything stays in place while you sew.
Pinning is always helpful—it holds the fabric secure as you sew and prevents any shifting. For extra accuracy, you can use a washable fabric glue to temporarily hold the fabric in place before stitching. Just make sure to let it dry! Once the glue is dry, heat set it with an iron to keep the prints from slipping while you sew.
Step 5: Stitching the Seams Together
Sewing along the folded edge. Make sure to use a consistent stitch length so your fabric doesn’t shift around. For perfect alignment, sew directly on the crease of your fold. This keeps the prints in perfect alignment and gives your seams a clean finish.
Step 6: Press and Trim for a Clean Finish
Once your seams are stitched, press your seams open. This will help the fabric lie flat and make the seams look crisp and professional. After that, trim any excess seam allowance to about ¼” or ½”. Trimming helps reduce bulk and ensures your quilt backing will lay smoothly.
Step 7: Check Your Pattern Matching
Flip the fabric over and admire your matched prints! If everything looks good, you’re in the clear! If there’s a mismatch here and there, don’t stress. You can easily re-sew the seams or adjust the folds slightly to fix the pattern alignment.
Step 8: Final Touches and Setting Up the Quilt Back
Before you cut your final pieces, it’s a good idea to double-check your alignment.
This quick check ensures your quilt back is perfect before you attach it to your quilt top. Once everything looks good, you can move on to attaching your backing to the quilt top. Make sure both layers are aligned properly before you start basting, and your quilt will be all set for the next steps.
Common Mistakes and How to Avoid Them
Misalignment
It happens when your prints don’t line up the way you want them to. To avoid this, make sure to take your time when lining up the fabric. Use pins or a glue stick to temporarily hold the fabric in place, and always double-check that your prints are aligned properly before you start sewing.
Misfolding
If you don’t fold the fabric evenly or consistently, the prints can shift and create gaps or overlaps. A seam gauge is your best friend here—it helps ensure that your folds are uniform and neat. Folding about 1 inch will give you a clean edge that’s easier to work with.
Puckering
It’s annoying, but preventable! To avoid puckering, make sure your fabric is properly pressed before you start sewing, and use a consistent stitch length. If you feel any tension while sewing, stop and smooth out the fabric before continuing.
FAQs
Can You Use Any Fabric for Quilt Backing?
Sure, you can use most fabrics, but it’s best to choose something sturdy like quilting cotton or flannel. Stay away from delicate fabrics like silk or stretchy materials, as they can be tricky to work with and may affect the quilt’s overall durability.
Can You Mix Different Fabrics in a Quilt?
Absolutely! Mixing fabrics adds texture and interest. Just make sure the fabrics are similar in weight and feel. For consistency, try to stick with like-for-like fabrics (like all cotton or all flannel), and avoid mixing fabrics that shrink or stretch differently.
Should Quilt Backing Be Pieced Horizontal or Vertical?
You can piece it either way—it’s up to you! Vertical piecing is a classic choice and means fewer seams across the width. But it all depends on the quilt’s size and the fabric you’re working with. Go with what works best for your project.
How Much Bigger Than Quilt Should Backing Be?
Aim for 4 to 6 extra inches on all sides of your quilt top. This extra fabric gives you room for trimming, basting, and adding seam allowances, ensuring a smooth, clean finish.
What Do I Do If My Quilt Backing Is Not Wide Enough?
Join two pieces together: If it’s not wide enough, simply sew two pieces together along the length.
Align the prints: Make sure the patterns match up so they flow smoothly.
Press the seam flat: Press the seam open to avoid any puckering.
Trim excess fabric: Trim the edges so your backing is square and even.
Double-check the dimensions: Ensure you’ve got enough fabric to cover the quilt with extra room on all sides.
Conclusion
Mastering pattern matching for quilt backing is a game-changer for your quilting projects. It gives your quilt a polished, professional finish that truly stands out. With pattern matching, your quilt’s design will flow seamlessly from one piece to the next, making your seams virtually disappear.
While it might take some practice, don’t worry—patience is key! With each project, you’ll get better, and before you know it, your quilt backs will look amazing.
If you’re ready to try your hand at pattern matching, why not start with some beautiful fabrics from F&A Fabric? Whether you’re after bold prints or subtle patterns, their collection has something perfect for your next quilt project. Get started today and take your quilting to the next level!