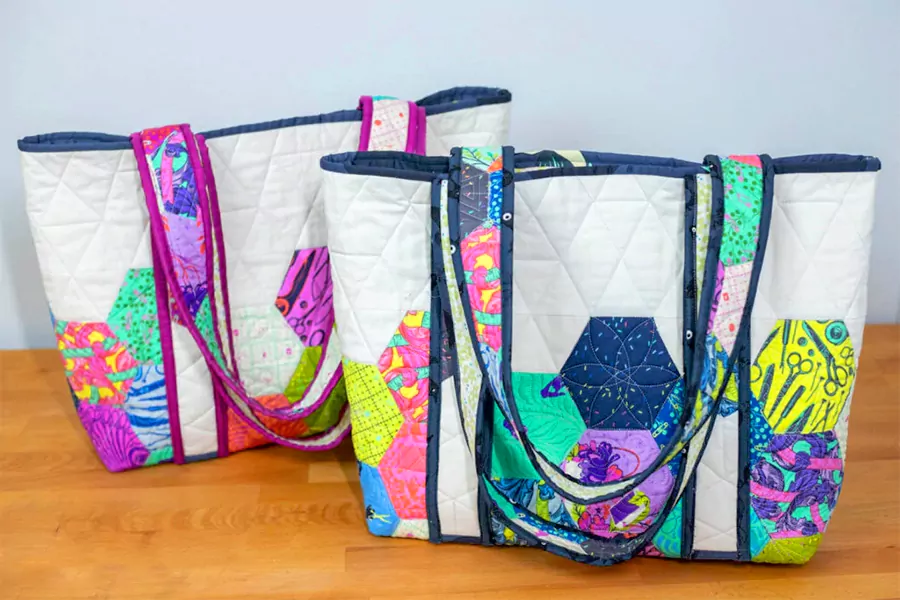
Looking for a fun, practical project to dive into? Making a quilted tote bag is the perfect way to create something stylish and useful, even if you’re just starting out with quilting! Whether you’re an experienced crafter or a beginner, this guide will walk you through each step. You’ll turn beautiful quilted fabric into a sturdy tote bag—ideal for carrying books, groceries, or even as a thoughtful gift.
Ready to begin? Be sure to check out the quilted fabrics at F&A Fabric for high-quality materials to get started!
Supplies You’ll Needed
Fabric Materials
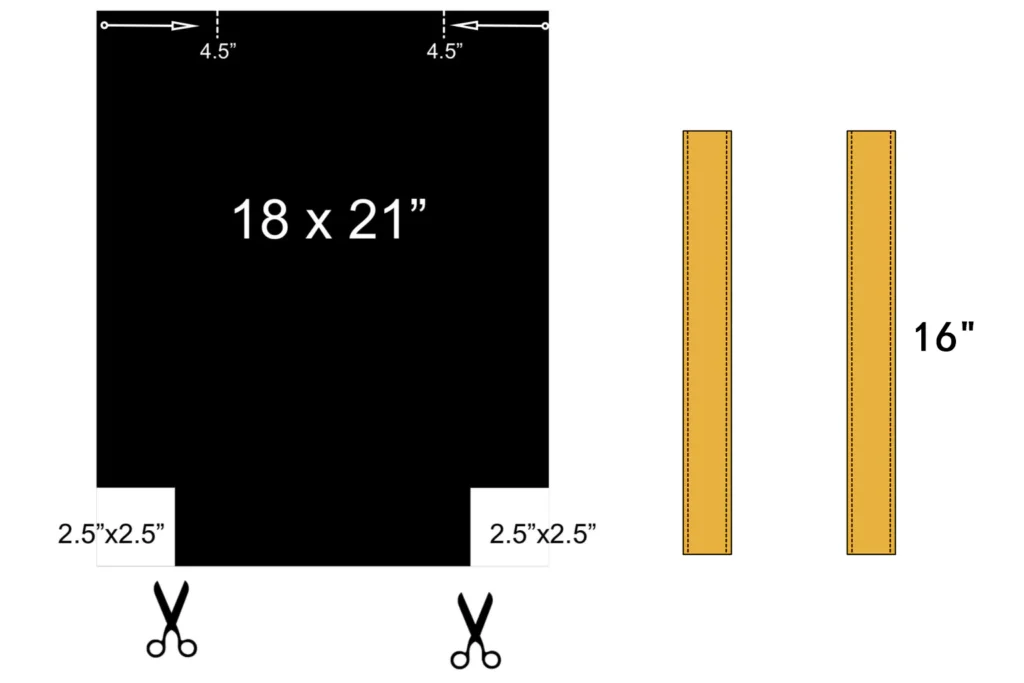
- Quilted Fabric: Pre-quilted fabric or make your own with batting and fabric (dimensions for the bag panels: 18” x 20” each, or customize based on preference).
- Lining Fabric: 1/2 yard of cotton or linen fabric for a sturdy interior lining (dimensions: 18” x 20”).
- Handles Fabric: 1/2 yard fabric or pre-made leather/canvas straps (dimensions: 2 strips of 4” x 30”).
- Batting: Poly-Fil or similar low-loft batting (optional, for added structure).
Notions and Tools
- Sewing Machine: Heavy-duty machine for quilting.
- Heavy Duty Needle (14/90 or 16/100).
- Coordinating Thread:** To match fabric or contrast.
- Fabric Marking Pen or Tailor’s Chalk.
- Rotary Cutter, Ruler, and Cutting Mat.
- Pins, Scissors, and Iron.
- Turning Tool (for handles) (optional).
How to Make a Tote Bag From Quilted Fabric: Step-by-Step Guide
Step 1: Cut Your Fabric Pieces
First things first, grab your fabric and cut the pieces. You’ll need two pieces of quilted fabric for the front and back of your tote—each should be 18” x 20” (or whatever size you want). Then, cut one piece for the lining—again, 18” x 20”. Don’t forget to cut two strips for the handles, each 4” x 30” (you can adjust these if you prefer longer or shorter handles).
Step 2: Create the Handle Straps
Handles are key to making your tote sturdy and functional. Start by folding each strip of fabric lengthwise, right sides together. Sew along the long edge, then turn the straps right side out using a turning tool (or a safety pin if you don’t have one). Press the straps flat and topstitch down both edges for extra strength and a neat finish.
Step 3: Quilt the Fabric Panels (If Not Using Pre-Quilted Fabric)
If you’re not using pre-quilted fabric, here’s where you can get creative with your quilting! Cut a piece of batting to match your exterior fabric size (18” x 20”), and layer it between your quilted fabric and lining fabric. Now, quilt it! You can go for simple straight lines, a fun diagonal pattern, or even some free-motion quilting. Quilting will not only make your tote look amazing, but it’ll also add durability.
Step 4: Sew the Bag Exterior
With your panels ready, it’s time to assemble the bag. Place the quilted fabric pieces right sides together, and sew around the edges with a ¼” seam allowance, leaving the top open. After that, turn the bag right side out and press the seams flat. You’ll start to see the shape of your tote coming to life!
Step 5: Create the Bag Bottom
Create a boxed bottom. Pinch the bottom corners of the bag to form a triangle. Measure about 2” from the tip of the triangle and sew across. Do this for both corners, and you’ll add that professional, structured look to your tote.
Step 6: Assemble the Bag Lining
Let’s work on the lining. Cut and sew the lining pieces in the same way you did for the exterior, ensuring it fits snugly inside the bag. Don’t forget to box the bottom of the lining the same way you did for the exterior. This will ensure both the lining and exterior match up perfectly.
Step 7: Attach the Handles
With the exterior and lining ready, it’s time to attach the handles. Place them about 3” from each side seam of the bag, and pin them in place. Sew along the edges of the handles, reinforcing the stitching for extra durability. You’ll want these handles to be nice and sturdy!
Step 8: Join the Lining and Exterior
Now, let’s join the lining and exterior of the tote. With right sides together, slide the lining inside the exterior bag. Sew around the top edge, leaving a small gap (about 2-3”) for turning the bag right side out later. Make sure everything lines up neatly before you sew!
Step 9: Turn the Bag Right Side Out
This is the fun part—turning your tote right side out! Carefully pull the bag through the gap in the lining, then press the top edge for a crisp, clean finish. Sew the gap closed, either by hand or with a machine, and voilà! Your tote is taking shape.
Step 10: Final Touches
For that extra polished look, topstitch around the top edge of the bag. This not only reinforces the bag but gives it a clean, professional finish. If you want to make your tote truly unique, feel free to add extra touches—like pockets, buttons, or even some decorative stitching. Once you’re done, your quilted tote bag is ready to rock!
Optional Additions and Customizations
As your quilted tote bag comes together, you might want to take it up a notch with some fun, personalized touches. These optional additions not only boost the look of your tote but also add some extra functionality. Let’s dive into a few easy ways to make your bag truly your own!
Adding a Zipper Closure

A zipper is a great way to add extra security and keep everything inside your tote safe. Here’s how to add one:
Step 1: Choose Your Zipper
Pick a zipper that’s just a little longer than the width of your tote. Lay it flat with the right side facing up, and pin it to the top edge of your tote, right sides together.
Step 2: Attach the Zipper
Sew along the zipper tape with your sewing machine, making sure to stay close to the zipper teeth. A zipper foot will make this step easier, but if you don’t have one, just take it slow!
Step 3: Topstitch the Edge
Once the zipper is on, finish the top edge by sewing a topstitch along the zipper. This not only keeps the zipper secure but also gives your tote a neat, finished look.
Step 4: Test the Zipper
Before you call it done, open and close the zipper a few times to make sure it moves smoothly. Once it’s working perfectly, you’re good to go!
Adding a Magnetic Snap
A magnetic snap closure adds a neat finish to your bag without a lot of fuss. Here’s how to install it:
Step 1: Mark Where the Snap Will Go
Decide where you want the snap to sit on the inside of the bag, usually about 3 inches from the top edge. Use fabric chalk or a pencil to mark the spots.
Step 2: Attach the Female Snap
On the inside of the bag, make small slits where you marked. Push the prongs of the female part of the snap through the fabric, and bend the prongs outwards to secure it in place.
Step 3: Attach the Male Snap
Now, place the male part of the snap on the outside of the bag, aligning it with the female part. Mark the spots for the prongs, then repeat the process to attach the male side.
Step 4: Test the Snap
Press the two snap parts together to make sure they connect properly. If they hold well, your snap is good to go!
Decorative Elements
Here’s where you can get really creative! Adding embroidery, appliqué, or fabric paint can totally transform your tote. Here’s how to get started:
Step 1: Plan Your Design
Think about what kind of design you’d like. Maybe a cute flower pattern, a funny saying, or something more abstract? Sketch it out on paper or with fabric markers first.
Step 2: Try Embroidery
If you’re going for embroidery, stretch the fabric in an embroidery hoop. Pick a simple stitch, like a backstitch or satin stitch, and start stitching your design. Don’t worry if you’re new to this—there are lots of beginner tutorials to help you along the way.
Step 3: Experiment with Appliqué
Appliqué is when you sew fabric shapes onto your tote. Cut out your chosen shapes (flowers, animals, etc.) and use a zigzag stitch to attach them. You can mix and match fabrics and textures for a cool, layered effect.
Step 4: Get Creative with Fabric Paint
Fabric paint is an easy way to add pops of color. Use stencils if you want clean lines, and let the paint dry completely before using your bag.
Step 5: Add Personal Touches
Go ahead and get extra creative—add buttons, beads, or fabric patches for a truly unique look. Even a single button on the handle can add a cute touch!
FAQ’s
What Fabric Should I Use to Make a Tote Bag?
For a durable and stylish tote bag, quilting cotton is a top choice. It’s sturdy yet soft, making it perfect for both everyday use and creative designs. If you’re looking for a more structured look, you can choose canvas or denim, as these fabrics hold their shape well. Don’t forget to consider a quilted fabric if you want extra padding and durability.
Why Are Quilted Bags So Popular?
Quilted bags are popular because they’re durable, versatile, and stylish. The quilting adds texture and depth, making your bag stand out. It also provides extra padding, making them perfect for carrying heavier items without losing shape. Plus, they come in endless fabric designs, so you can always find one that suits your style.
Is Cotton or Polyester Better for Tote Bags?
Cotton is a great option for tote bags because it’s breathable, easy to work with, and feels soft to the touch. However, polyester is more durable, water-resistant, and holds its shape better, making it ideal for more structured bags. Depending on your needs, you may even want to mix both fabrics for the best of both worlds.
How Many Meters of Fabric Do I Need for a Tote Bag?
You’ll need about 1 to 1.5 meters of fabric for a standard-sized tote bag. This includes fabric for the exterior, lining, and handles. If you plan on adding extra elements like a zipper or pockets, you might need a bit more fabric, so always check your pattern instructions for exact measurements.
Are Quilted Bags Still in Fashion?
Yes, quilted bags are still very much in fashion. Their timeless appeal and functionality make them a wardrobe staple. Whether you’re looking for a casual bag or something more elegant, quilted bags are versatile enough to match any outfit, and their continued popularity shows that they’re here to stay.
Conclusion
Making your own quilted tote bag is easier than you think! From cutting your fabric to adding those special finishing touches, these simple steps will help you create a bag that’s both stylish and functional.
Quilted fabric adds durability and structure, making your tote perfect for everyday use. Play around with different fabrics and patterns to make your tote as unique as you are—whether you’re running errands or enjoying a day out.
Ready to get started? Grab your fabric and let’s get sewing! For top-quality quilting fabrics that’ll help your tote truly shine, head over to F&A Fabric to find the perfect match for your project. Happy sewing!