Fabric painting is a fun and creative way to personalize clothing, bags, and other textiles. However, if you want your designs to last, heat setting is a crucial step. This process involves applying heat to the painted fabric, which helps the paint bond with the fibers and become more durable. Without heat setting, your designs may fade, crack, or peel over time, especially after washing.
This blog post will guide you through the simple process of heat setting fabric paint. We’ll cover different methods, including using an iron, a heat press, and even a hairdryer. We’ll also provide tips and tricks for achieving the best results, ensuring your fabric creations remain vibrant and long-lasting.
What Is Fabric Paint Heat Setting

Fabric paint heat setting is a crucial process that involves applying heat to fabric after painting to permanently bond the paint to the fabric fibers. This fabric paint heat setting process is essential for ensuring the longevity and durability of your painted designs. Without proper heat setting, the paint may crack, peel, or fade, especially after washing or exposure to sunlight.
Heat setting essentially “cures” the paint, transforming it from a flexible film on the fabric’s surface into an integral part of the fabric itself. This creates a more durable and long-lasting finish that can withstand regular wear and tear.
What Does Heat Setting Fabric Paint Do
Heat setting fabric paint is a crucial step that involves applying heat to the painted fabric. This process transforms the paint from a flexible film on the fabric’s surface into an integral part of the fabric fibers.
By essentially “curing” the paint, heat setting significantly enhances the paint’s durability and wash-fastness. It helps prevent the paint from cracking, peeling, or fading, ensuring your designs remain vibrant and long-lasting even after multiple washes and regular wear and tear.
How to Heat-Set Fabric Paint

Fabric painting is a fun and creative way to personalize clothing, accessories, and home decor. However, to ensure your vibrant designs last, it’s crucial to properly heat set the paint. Heat setting helps the paint bond permanently with the fabric fibers, preventing cracking, peeling, and fading, even after multiple washes.
This guide will walk you through the essential steps of heat setting fabric paint, including choosing the right method and understanding the importance of thorough drying. By following these simple techniques, you can enhance the durability of your creations and enjoy your beautiful, handmade pieces for years to come.
Step 1: Allowing for Thorough Drying
Thorough drying is paramount before heat setting. If the paint isn’t completely dry, trapped moisture can create steam during heating, leading to bubbling, cracking, and even lifting of the paint. Drying times vary based on factors like paint thickness, fabric type, and environmental conditions. Heavier paint applications and certain fabrics will naturally take longer.
It’s crucial to be patient and allow ample drying time, even if the paint appears dry to the touch. Improving air circulation around the painted fabric can help speed up the process. To check for dampness, gently press your finger against the painted area. If it feels damp or cool, it’s not ready for heat setting.
Step 2: Choosing Your Heat Setting Method
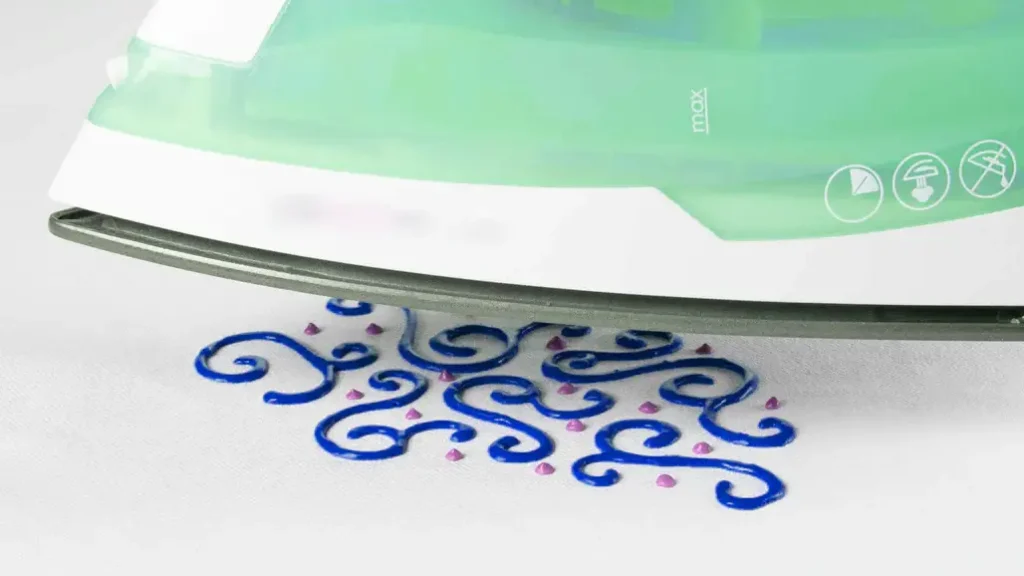
Ironing is the most common method. A protective layer, like a thin cloth or parchment paper, should be placed over the design to prevent direct iron contact and scorching. Ironing from the back side ensures even heat distribution and minimizes the risk of damaging the paint. Refer to the fabric care label to determine the highest safe ironing temperature. Use continuous movement to prevent localized overheating.
Heat presses offer more precise temperature and pressure control, resulting in more consistent heat distribution. Always follow the manufacturer‘s instructions for your specific heat press model.
The dryer method utilizes high heat to cure the paint. However, promptly remove the fabric to prevent overheating. This method may not be suitable for all fabric types, especially delicate fabrics or those with embellishments.
Step 3: Test Wash (Optional)
A test wash allows you to assess the durability of the heat-setting process. Wash the fabric according to the care instructions and carefully inspect the design for any signs of fading, cracking, peeling, or bleeding. If you notice any issues, re-heat setting may be necessary.
By understanding these nuances and following these guidelines, you can effectively heat set your fabric paint and create long-lasting, vibrant designs that will withstand the test of time and multiple washes.
How to Heat Set Fabric Paint With an Iron
Heat Setting Fabric Paint with an Iron
Ironing is the most common and accessible method for heat setting fabric paint at home. It’s generally suitable for most fabric types and provides good results when done correctly. Here’s a step-by-step guide:
1. Prepare the Fabric: Ensure the painted fabric is completely dry before ironing. This is crucial to prevent steam from forming and damaging the paint. Drying times can vary depending on the paint thickness, fabric type, and environmental conditions.
2. Protect the Design: Place a clean, thin cloth or a sheet of parchment paper over the painted design. This protective layer prevents direct contact between the hot iron and the paint, which can cause scorching or damage to the artwork.
3. Iron from the Back: Iron the fabric from the back side, applying steady pressure for 3-5 minutes. This ensures even heat distribution and minimizes the risk of damaging the paint.
4. Adjust Iron Temperature: Refer to the fabric care label for the highest recommended ironing temperature. Use the appropriate heat setting on your iron to avoid damaging the fabric.
Important Considerations:
- Continuous Movement: Keep the iron moving continuously to prevent localized overheating, which can scorch the fabric or damage the paint.
- Fabric Type: Adjust the ironing time and pressure based on the fabric type. Delicate fabrics may require lower temperatures and shorter ironing times.
- Test in an Inconspicuous Area: Before ironing the entire design, test the heat setting in an inconspicuous area of the fabric to ensure it doesn’t cause any damage.
By following these steps carefully, you can effectively heat set your fabric paint with an iron and ensure your creations are long-lasting and vibrant.
How to Heat Set Fabric Paint With a Heat Press
Heat Setting Fabric Paint with a Heat Press
Heat presses offer the most consistent and professional results for heat setting fabric paint. They provide precise temperature and pressure control, ensuring even heat distribution across the entire design. Here’s how to use a heat press:
Prepare the Fabric:
- Ensure the painted fabric is completely dry before heat pressing.
- If necessary, place a thin layer of heat-resistant fabric or parchment paper between the fabric and the heat press platen to protect the paint from direct contact.
Set the Heat Press:
- Refer to the manufacturer‘s instructions for your specific heat press model.
- Set the temperature and time according to the fabric type and the paint manufacturer‘s recommendations.
- Typical heat press settings for fabric paint range from 300°F to 350°F (149°C to 177°C) for 15-30 seconds.
Apply Even Pressure:
- Place the fabric securely between the heat press platens.
- Close the press firmly and evenly to ensure consistent pressure across the entire surface.
Monitor the Process:
- Keep a close eye on the fabric during the heat press cycle.
- Avoid overheating, which can scorch or damage the fabric.
Allow to Cool:
Once the timer expires, carefully open the heat press and allow the fabric to cool completely before handling.
Benefits of Using a Heat Press:
- Consistent Results: Provides even heat distribution for optimal paint curing.
- Time Efficiency: Can heat set multiple items quickly and efficiently.
- Professional Finish: Produces high-quality results comparable to professional textile printing.
Important Notes:
- Safety First: Always follow the manufacturer‘s safety guidelines for operating the heat press.
- Test in an Inconspicuous Area: Before heat pressing the entire design, test the settings in an inconspicuous area of the fabric to ensure it doesn’t cause any damage.
By using a heat press, you can achieve professional-quality results and ensure your fabric paint designs are durable, vibrant, and long-lasting.
How to Heat Set Jacquard Fabric Paint
Heat Setting Jacquard Fabric Paint
Jacquard fabric paints are designed to be durable and washable, but they require proper heat setting to achieve optimal results. Here’s how to heat set Jacquard fabric paint:
1. Allow for Thorough Drying:
- Crucial Step: Ensure the painted fabric is completely dry before any heat setting method. This typically takes at least 24 hours, but thicker paint applications may require longer.
- Check for Dampness: Gently press your finger against the painted area. If it feels damp or cool, it’s not ready for heat setting.
2. Choose Your Heat Setting Method:
Ironing:
- Most Common: This is the most common method for home use.
- Protect the Design: Place a thin cloth or parchment paper over the painted area to prevent direct iron contact.
- Iron from the Back: Iron the fabric from the back side, applying steady pressure for 3-5 minutes per area.
- Temperature: Use the highest heat setting appropriate for the fabric. Refer to the fabric care label for guidance.
Dryer:
- High Heat: Tumble dry the fabric on the highest heat setting for 30-60 minutes.
- Prompt Removal: Remove the fabric from the dryer immediately after the cycle ends to prevent overheating.
- Fabric Considerations: This method may not be suitable for all fabrics, especially delicate ones or those with embellishments.
Heat Press:
- Professional Results: Heat presses offer precise temperature and pressure control, resulting in even heat distribution.
- Manufacturer Instructions: Follow the manufacturer‘s instructions for your specific heat press model. Typical settings may range from 300°F to 350°F (149°C to 177°C) for 15-30 seconds.
3. Test Wash (Optional):
- Assess Durability: After heat setting, it’s a good idea to test wash the fabric to ensure the paint has properly adhered.
- Wash and Inspect: Wash the fabric according to the care instructions and check for any signs of fading, cracking, or peeling.
Important Notes:
- Manufacturer Recommendations: Always refer to the specific instructions provided by Jacquard for the best results with their particular fabric paints.
- Test in an Inconspicuous Area: Before heat setting the entire design, test the method in an inconspicuous area of the fabric to ensure it doesn’t cause any damage.
By following these steps, you can effectively heat set your Jacquard fabric paint and create long-lasting, vibrant designs that will withstand washing and regular wear and tear.
How to Heat Set Fabric Paint Without an Iron
While ironing is the most common method, there are alternative ways to heat set fabric paint:
1. Using a Dryer:
- High Heat: Tumble dry the fabric on the highest heat setting for 30-60 minutes.
- Prompt Removal: Remove the fabric from the dryer immediately after the cycle ends to prevent overheating.
- Fabric Considerations: This method may not be suitable for all fabrics, especially delicate ones or those with embellishments.
2. Oven Method (Use with Caution):
- Prepare the Fabric: Place the painted fabric between layers of clean, unprinted paper towels or parchment paper.
- Oven Temperature:
- Low Temperature: Set your oven to the lowest temperature setting possible, usually around 200-250°F (93-121°C).
- Short Duration: Heat the fabric for a very short period, typically 2-3 minutes.
- Supervision: Closely monitor the fabric while it’s in the oven to prevent scorching or fire.
3. Heat Press:
- Professional Results: Heat presses offer more precise temperature and pressure control, resulting in even heat distribution.
- Manufacturer Instructions: Follow the manufacturer‘s instructions for your specific heat press model, adjusting the settings based on the fabric type and paint manufacturer‘s recommendations.
Important Notes:
- Test in an Inconspicuous Area: Before using any of these methods, it’s crucial to test the heat setting in an inconspicuous area of the fabric to ensure it doesn’t cause any damage.
- Fabric Paint Instructions: Always refer to the specific instructions provided by your fabric paint manufacturer for the most accurate and reliable heat setting guidelines.
These alternative methods provide flexibility for those who may not have an iron readily available. However, always prioritize safety and use caution when using heat sources other than an iron.
How Long to Heat Set Fabric Paint
The heat setting time for fabric paint can vary depending on the method you choose and the specific paint manufacturer‘s recommendations.
Ironing: When using an iron, apply steady pressure for 3-5 minutes per area.
Dryer: If using a dryer, tumble dry on high heat for 30-60 minutes.
Heat Press: Heat press times will vary depending on the specific model and the manufacturer‘s instructions.
General Guidelines:
- Thoroughness: Ensure the entire painted area receives adequate heat for the recommended time.
- Even Pressure: Apply consistent pressure to ensure even heat distribution.
- Fabric Type: Delicate fabrics may require shorter heat setting times or lower temperatures.
Manufacturer Instructions: Always refer to the specific instructions provided by your fabric paint manufacturer for the most accurate and reliable heat setting guidelines. They may have specific time and temperature recommendations for their particular products.
By following these guidelines and paying close attention to the specific needs of your fabric and paint, you can ensure your designs are properly heat set for maximum durability and longevity.
What Happens if You Don’t Heat Set Fabric Paint
If you don’t heat set fabric paint, the paint will remain flexible and may not adhere properly to the fabric fibers. This can lead to several issues:
- Fading: The colors may fade significantly after washing, especially with repeated laundering.
- Cracking and Peeling: The paint film can become brittle and crack, especially in areas of stress or movement. This can cause the paint to peel off the fabric, ruining your design.
- Transferring: The paint may transfer to other clothing or surfaces when rubbed or washed.
- Washability: Un-heat-set paint may not be washable at all, or may only withstand gentle hand washing.
In essence, skipping the heat setting process significantly reduces the durability and longevity of your fabric painting project. Your designs may not withstand normal wear and tear, and the vibrant colors you worked hard to achieve may quickly fade or disappear.
Conclusion
By properly heat setting your fabric paint, you can ensure your creations remain vibrant and long-lasting. This simple step significantly improves the durability of your designs, making them resistant to washing, fading, and cracking. Now that you know the process, you can confidently experiment with various fabric painting techniques and unleash your creativity.
Ready to bring your fabric painting projects to life? Fanda Fabrics offers a wide selection of high-quality fabrics perfect for your next DIY endeavor. Explore our wholesale fabric options and discover the perfect materials to complement your artistic vision.
Visit Fanda Fabrics today and let your imagination run wild!