Wondering how to cut fabric for quilting without the stress? Cutting your fabric is a crucial first step in creating a quilt, and it’s easy to feel overwhelmed when you’re just starting out. But with the right tools and techniques, you can make this process both simple and precise, ensuring your quilt blocks come together perfectly.
When I first began quilting, cutting was my least favorite part. It felt like everything was on the line with every snip. But over time, I gained confidence and found methods that made the process smoother. If you’re feeling nervous, you’re not alone. Let’s break down how to cut fabric for quilting the right way so you can jump into your quilting projects with ease!
Why Cutting Fabric Correctly is Crucial for Quilting?
Cutting fabric accurately directly affects the accuracy of your quilt blocks and the overall quilt quality. When you cut fabric precisely, your pieces align perfectly, creating a smooth, cohesive design. If you cut fabric unevenly or incorrectly, your quilt blocks can end up uneven, leading to gaps or mismatched seams. This can result in a quilt that looks sloppy and uneven, no matter how well you stitch it together.
Many beginners make common cutting mistakes, like cutting fabric too small or stretching it while measuring. These errors can cause pieces to become distorted, making it harder to sew them together neatly.
Mastering correct cutting techniques, you’ll ensure your fabric pieces fit together perfectly, creating clean lines and sharp corners. This precision is key for a polished, professional-looking quilt that’s both beautiful and durable.
Essential Tools for Precise Fabric Cutting
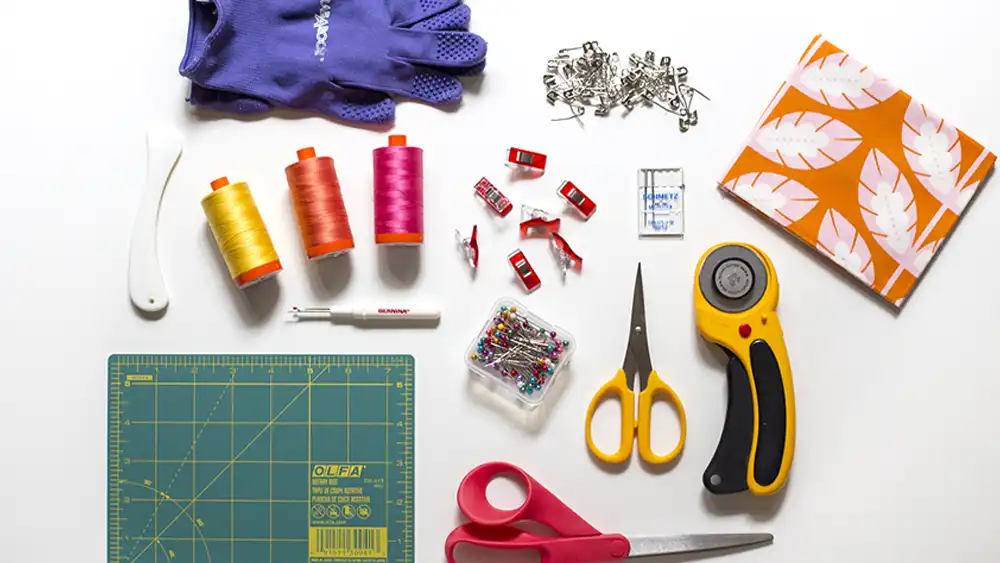
To get precise fabric cuts, having the right tools is essential. These three tools are must-haves for every quilter, whether you’re just starting or a seasoned pro. Let’s dive into what each one does and why they’re so important for your quilting projects.
Acrylic Rulers
Acrylic rulers are crucial for precise cutting. The most important sizes are a 24″ long ruler for cutting strips and a few square rulers for trimming blocks. Squares help with squaring up blocks, half-square triangles, and other precise shapes.
Start with one or two sizes, but as you get more comfortable, you’ll find that having a variety of square rulers will make trimming easier and more accurate. Keep your rulers organized and use them as needed for the specific block sizes you’re working with.
Rotary Cutter
A rotary cutter is a game-changer for quilters. Unlike scissors, it allows you to make straight, clean cuts quickly and accurately. You’ll find various sizes, but a 45mm rotary cutter is the most versatile for general cutting.
Smaller cutters are great for detailed work, like cutting intricate shapes or templates. Remember, rotary cutters come with replaceable blades, so be sure to swap them out when they get dull. A dull blade can leave threads behind, which will mess with your cuts. Keep a separate rotary cutter for paper piecing to protect your fabric cutter’s blade!
Self-Healing Cutting Mat
A self-healing cutting mat protects your work surface and keeps your rotary cutter blades from dulling too quickly. Mats come in different sizes, but having a large one (at least 24″ x 36″) for your main workspace is ideal.
A smaller mat is perfect for travel or classes. Always store your mat flat and avoid exposing it to high heat, as this can warp it and affect your cuts. Over time, you’ll notice grooves forming in the mat where you cut most often. When that happens, simply flip it over to get more use out of it, or replace it when the grooves get too deep.
Preparing Your Fabric for Cutting
Before you start cutting your fabric, it’s important to properly prepare it. This helps avoid issues like shrinkage and fabric distortion, ensuring accurate cuts. Here’s how to get your fabric ready for quilting:
Washing, Drying, and Ironing Fabric
Always wash and dry your fabric before cutting. Pre-washing removes any sizing or chemicals and prevents future shrinkage. Fabric can shrink after washing, which may affect the fit and alignment of your quilt. Iron the fabric after washing to smooth out wrinkles and ensure an even surface for cutting. Wrinkles can throw off your measurements, so pressing is essential for precise cuts.
Pre-Washing Your Quilting Fabric
Pre-washing fabric is a must for quilters. It helps avoid any surprises when your quilt is finished and washed. By washing the fabric before you cut it, you prevent any shrinkage or color bleeding from ruining your quilt after it’s all pieced together. Use cold water and mild detergent to keep the fabric’s colors intact and avoid any potential damage. Dry the fabric according to the fabric’s care instructions.
Understanding Fabric Grain
Understanding fabric grain is key to making accurate cuts. Fabric has three main types of grain: crossgrain, selvage, and bias. The selvage runs along the edges of the fabric, while the crossgrain runs perpendicular to it.
The bias is diagonal and is the stretchiest part of the fabric. Make sure to cut along the grain you need for your project, as cutting against the grain can distort the fabric and affect your quilt’s final look.
Common Folding Techniques for Different Cuts (Single, Double, and Bias Folds)
Folding your fabric correctly maximizes efficiency and reduces waste. A single fold is when the fabric is folded once, selvage to selvage. This is great for cutting strips. A double fold is when you fold the fabric in half, and then fold it again.
This technique works well for cutting larger pieces like blocks. Bias folds are used when you need to cut at an angle, typically for creating curves or angles in your quilt design. Choose the right fold depending on your cut needs.
How to Cut Fabric for Quilting: Step by Step Guide
Cutting fabric for quilting can be intimidating at first, but with the right steps, you’ll be making accurate cuts in no time. Here’s a step-by-step guide to help you navigate through the process like a pro.
1. Press Fabric
Pressing your fabric to get rid of any wrinkles. Wrinkled fabric can cause uneven cuts, leading to inaccurate pieces. Make sure your fabric is flat and smooth to ensure the cleanest cuts possible.
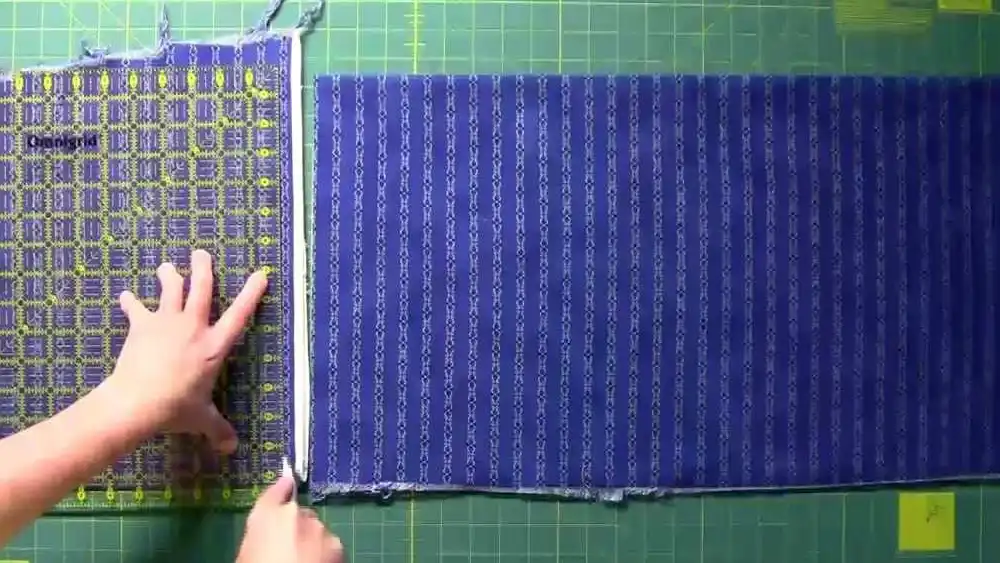
2. Square Up the Leading Edge
Folding your fabric selvage to selvage. Give it a little shake to even out the edges. Once the edges align, place it on your cutting mat. Squaring up the leading edge is crucial for straight cuts and getting perfect blocks.
3. Align Fabric Fold with Cutting Mat
Take a moment to make sure your fabric fold is aligned with the horizontal lines on your cutting mat. The cut needs to be perpendicular (90 degrees) to the fold, so double-check the alignment to avoid any mistakes.
4. Secure Ruler
Place your ruler on top of the fabric where you plan to cut. Press down firmly on the ruler to hold it in place while you cut. This prevents the ruler from shifting and ensures your cut is straight. Avoid letting your thumb or fingers hang off the edge of the ruler for better control.
5. Cut Fabric with Rotary Cutter
Holding your rotary cutter firmly and apply even pressure as you cut. Always cut away from your body, ensuring your wrist stays straight. This helps prevent strain on your wrist and gives you a clean, precise cut. Make sure you’re standing up to get the right angle.
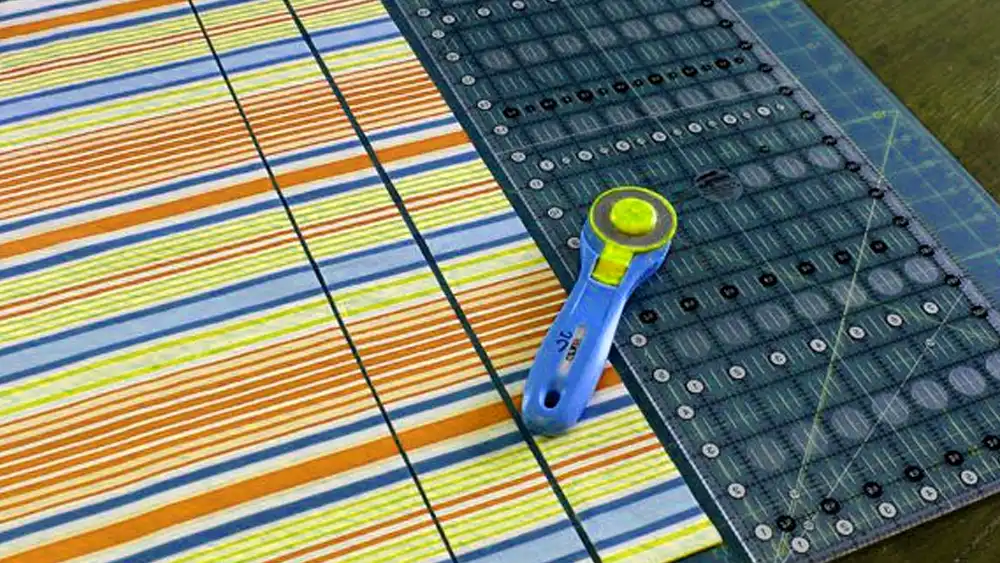
6. Measure and Cut Strips
To cut fabric strips, use the ruler’s grid to measure accurately. For example, if you’re cutting 2-1/2” strips, align the 2-1/2” mark on your ruler with the edge of the fabric. Use the grid on your cutting mat to ensure everything stays straight.
7. Repeat Cutting
Continue cutting strips until you have the required number for your quilt. Keep your ruler in place and make sure each strip is consistent in width. The more accurately you cut, the better your quilt will come together.
8. Close Rotary Cutter for Safety
Once you’re finished cutting, always close your rotary cutter. It’s an important safety step to ensure you don’t accidentally cut yourself when not in use. Keep it closed and out of reach to stay safe in your quilting workspace.
5 Tips to Cut Fabric Fast and Accurately
Cutting fabric efficiently and accurately is a key skill for quilters, especially when you need to speed up the process. Here are five tips to help you cut fabric quickly and with precision, so you can focus on enjoying your quilting projects.
1. Cross-Cut for Efficiency
When cutting strips, use cross-cutting to make the process faster. This involves cutting your fabric at a right angle to your initial cuts, which speeds up the creation of smaller pieces. Use your ruler’s grid to line everything up and make sure you’re cutting at the right angle. By cutting all your strips in one direction first, you save time and make your cuts more uniform.
2. Fold Fabric to Cut Multiple Layers
Folding your fabric can help you cut multiple layers at once, speeding up the process. To do this, align your fabric’s edges and fold it neatly. This method works best for shorter cuts, like cross-cutting strips, as you can stack several layers and cut them in one go. Just ensure the fabric is aligned properly to avoid shifting. A little preparation here makes the cutting process much faster.
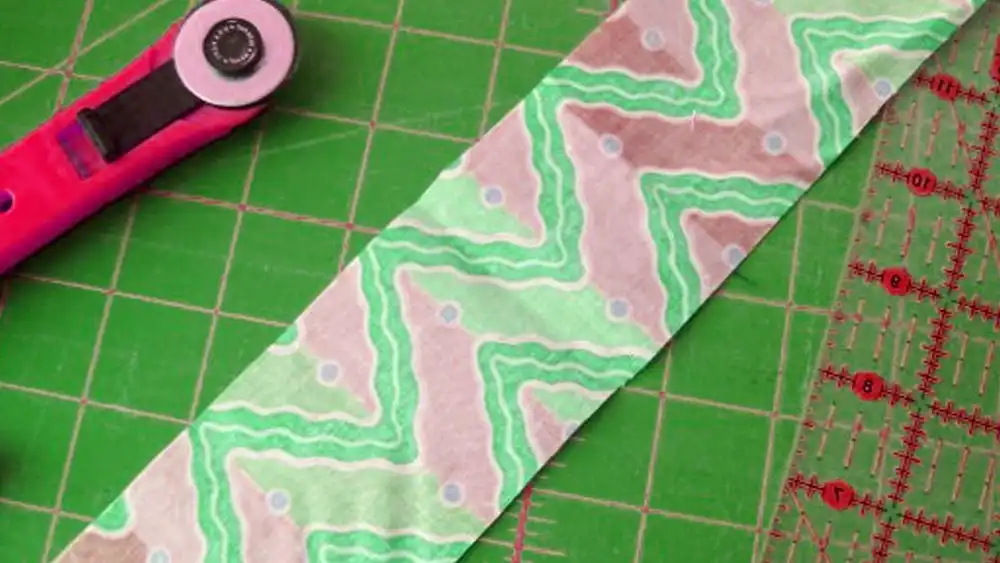
3. Cut Strips from Folded Fabric
When you cut strips, fold your fabric in half to avoid wasting time on multiple cuts. This way, you get long strips quickly and easily, all in one go. Make sure the fold is perpendicular to your cutting line to achieve straight, clean cuts. If you’re cutting a wider strip, consider folding the fabric in thirds or quarters for maximum efficiency, depending on the size of the strip you need.
4. Stack and Fold Strips for Squares
After cutting your strips, stack them and fold them again to cut squares or other shapes. This method saves you time and ensures that all your pieces are consistent. For example, if you need 4″ x 4″ squares, fold your strips into manageable layers and cut through them all at once. The more you can cut in a single pass, the faster your project will go.
5. Limit Layers for Accuracy
While cutting multiple layers at once is efficient, too many layers can lead to slippage and inaccurate cuts. Stick to a stack of 4-6 layers to keep your cuts clean and precise. If you go beyond that, the fabric stack may shift, causing your cuts to be uneven. Accuracy is key in quilting, so don’t sacrifice it for speed. Find the right balance to get both speed and precision.
Fabric Cutting Mistakes to Avoid
Cutting fabric is an essential part of quilting, but mistakes can happen! Whether you’re just starting or have some experience, it’s easy to make errors in your measurements or cuts. Here’s a guide on how to avoid common fabric cutting mistakes and handle them like a pro when they occur.
Fixing Inaccurate Measurements After Cutting
If your cut is off, don’t stress! To fix inaccurate measurements, simply trim the edges to match the correct size. Before making your next cut, double-check your measurements and make sure your ruler is aligned correctly. If the error is small, you can sometimes adjust the pattern slightly, especially if it’s a block or square. Just make sure your piece is still the right size before continuing.
Quick Fixes for Mistaken Cuts
Everyone makes mistakes, and that’s okay! If you’ve made an incorrect cut, turn it into something useful. For example, if you cut a strip too narrow, consider turning it into a binding or a patchwork accent. Even a miscut square can be used in smaller parts of your quilt or another project like a bag or pillow. Instead of discarding it, look at your mistake as an opportunity to get creative with your design!
Salvaging Mismatched Fabric and Using Scraps
Don’t throw away mismatched fabric or scraps—they can be a goldmine! Combine smaller pieces of fabric into patchwork, borders, or even a scrappy quilt design. Mismatched pieces can also be used for applique or as decorative details on a finished project. Keep a scrap bin handy and get creative; you’ll be amazed at how small pieces can fit into your next quilt or craft project.
Conclusion
Cutting fabric for quilting can feel intimidating at first, but with a little practice, you’ll get the hang of it! Remember to always prepare your fabric properly—wash, dry, iron, and fold with care.
Understanding fabric grain and using the right tools, like a rotary cutter and ruler, will make your cuts more precise. Take your time and focus on the details to ensure each cut is accurate, which will make piecing your quilt together much easier.
Now that you have the basics down, it’s time to start creating your quilt. Don’t forget to check out Fanda Quilting Fabric for high-quality, beautiful fabric options that will make your projects shine. Happy quilting!
FAQs
How to Cut Fabric for Quilting Squares?
Cutting fabric for quilting squares is simple if you follow these steps:
Press Fabric: Start by pressing your fabric to remove wrinkles. Wrinkles can cause uneven cuts.
Align Fabric: Fold your fabric in half, selvage to selvage, and line it up on the cutting mat.
Square the Edge: Use a ruler to square up the fabric’s edge, trimming any uneven parts.
Measure and Cut: Measure the desired square size (e.g., 4” x 4”) and use a rotary cutter to slice the fabric. Make sure to keep your cutting straight.
Stack and Cut Multiple Layers: If you need multiple squares, stack the fabric and cut through several layers at once for efficiency.
How to Cut Fabric Straight for Quilting?
Cutting fabric straight for quilting is crucial for accurate piecing. Here’s how to do it:
Press the Fabric: Always start with pressed fabric to ensure a smooth, flat surface for cutting.
Align the Fabric: Lay your fabric on the cutting mat with the selvage edges aligned. Fold it in half if you’re cutting multiple layers.
Use a Ruler: Place a long acrylic ruler along the fabric’s edge, ensuring it’s straight.
Check the Grain: Align the fabric’s lengthwise grain with the mat’s grid lines for accurate cuts.
Cut with a Rotary Cutter: Keep your cutter steady, and make sure your wrist stays straight. Apply even pressure for a clean, straight cut.
How to Cut Large Pieces of Fabric for Quilting?
Cutting large fabric pieces requires precision. Follow these steps for the best results:
Press the Fabric: Always start by pressing out wrinkles to ensure smooth cutting.
Fold the Fabric: Fold the fabric in half lengthwise, selvage to selvage, to make it easier to manage.
Square the Fabric: Use a ruler to square the fabric’s edge. Trim off any uneven parts to create a straight edge.
Measure and Cut: Use a rotary cutter to cut the desired width or length. Ensure the ruler stays in place while cutting.
Work in Sections: If the fabric is too large, break it into manageable sections. This allows for more control and accuracy.
How To Cut Fabric Strips For Quilting?
Cutting fabric strips is a quick and easy process. Follow these steps for even, accurate strips:
Press the Fabric: Start by pressing your fabric to remove any wrinkles.
Align the Fabric: Fold the fabric in half, selvage to selvage, and align it with the grid lines on your cutting mat.
Use a Ruler for Measurements: Measure the desired width for your strips (e.g., 2.5” wide) using a ruler and line it up with the fabric.
Cut with a Rotary Cutter: Hold the ruler firmly in place and use a rotary cutter to slice through the fabric. Apply even pressure to ensure a clean cut.
Stack Multiple Strips: To speed up the process, stack fabric layers and cut through them at once.
Best Rotary Cutter for Quilting Projects
When choosing a rotary cutter for quilting, it’s essential to pick one that’s comfortable and effective. Here’s what to look for:
Comfortable Grip: Choose a cutter with an ergonomic handle that fits comfortably in your hand. This will help reduce fatigue during long cutting sessions.
Blade Size: The 45mm rotary cutter is the most versatile for general cutting, while smaller sizes (28mm or 18mm) work well for detailed cuts.
Adjustable Blade Exposure: Look for a cutter that lets you adjust the blade’s exposure for better control.
Durable Blade: Choose a rotary cutter with a high-quality, sharp blade that stays durable for extended use.
Brand Recommendations: Popular brands like Olfa, Fiskars, and Martelli offer reliable rotary cutters designed specifically for quilting.
How to Prevent Fabric from Slipping While Cutting?
Preventing fabric from slipping while cutting is essential for accurate quilting. Here’s how to avoid slipping:
Use a Non-Slip Cutting Mat: Make sure you’re using a self-healing cutting mat with a non-slip surface to prevent fabric from moving.
Apply Fabric Weights: Place fabric weights or pins around the fabric to hold it down while cutting.
Use a Non-Slip Ruler: Invest in a non-slip acrylic ruler, or apply a grippy strip to your existing ruler to keep it in place.
Spray Adhesive: Consider using temporary fabric spray adhesive to hold the layers together and prevent slipping.
Maintain Steady Pressure: When cutting, apply firm, even pressure to keep the fabric from shifting.