Cutting a fat quarter is simple when you have the right steps and a little guidance. You just need to prep your fabric, measure, and use steady hands for accurate cutting. Many beginners make mistakes like skipping fabric prep or not double-checking their measurements, but you can avoid those with this tutorial.
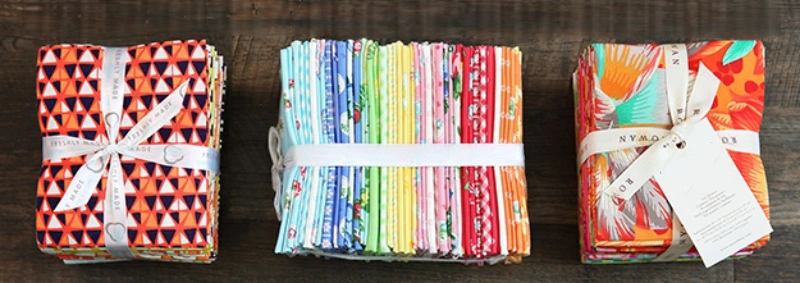
Fanda Fabrics offers fat quarters that make the process smooth, whether you want to cut a fat quarter for quilting or follow along with a video tutorial. Let’s get you started on how to cut a fat quarter with confidence!
Common beginner mistakes in cutting:
Skipping fabric prep like starching.
Not checking seam allowance accuracy.
Forgetting to pin or baste before cutting.
Cutting each piece individually instead of using time-saving techniques.
Key Takeaways
Prepare your fabric by washing, drying, and ironing to get smooth, flat pieces for accurate cutting.
Use essential tools like a rotary cutter, self-healing mat, and acrylic ruler to make clean, straight cuts safely and easily.
Measure carefully and follow a cutting plan to get the right sizes and shapes for your quilting or craft projects.
Keep your fabric steady on the cutting mat and cut along the grain to avoid stretching and get precise pieces.
Practice with small projects and stay organized to build confidence and enjoy the creative process.
What Is a Fat Quarter?
Fat Quarter Dimensions
If you’re new to quilting or sewing, you might wonder what a fat quarter is. A fat quarter is a special way of cutting fabric that gives you a piece measuring about 18 inches by 22 inches. You get this size by first cutting a half-yard of fabric (18 inches by the full width, usually 44 inches), then cutting that piece in half again.
This method gives you two fat quarters from one half-yard. The result is a squarer, more versatile piece than the long, skinny strip you get from a regular quarter-yard cut.
Here’s a quick look at how the two cuts compare:
Cut Type | Dimensions (inches) | Typical Use |
|---|---|---|
Regular Quarter Yard | 9 x 44 | Long strips, borders |
Fat Quarter | 18 x 22 | Patchwork, blocks, small projects |
You’ll find that fat quarters are easier to work with for most quilting and crafting projects. The shape lets you cut squares, rectangles, and strips without a lot of leftover scraps.
If you want to see a wide range of options, Fanda Fabrics offers a fat quarter collection in many colors and patterns. You can check them out at Fanda Fabrics Fat Quarters.
Why Choose Fat Quarters?
Fat quarters are a favorite for quilters and crafters because they make cutting simple and efficient. You can cut multiple shapes from one piece, which saves time and fabric.
The 18 x 22-inch size is perfect for cutting squares, triangles, or strips for patchwork. You don’t have to struggle with long, narrow pieces that limit your design choices.
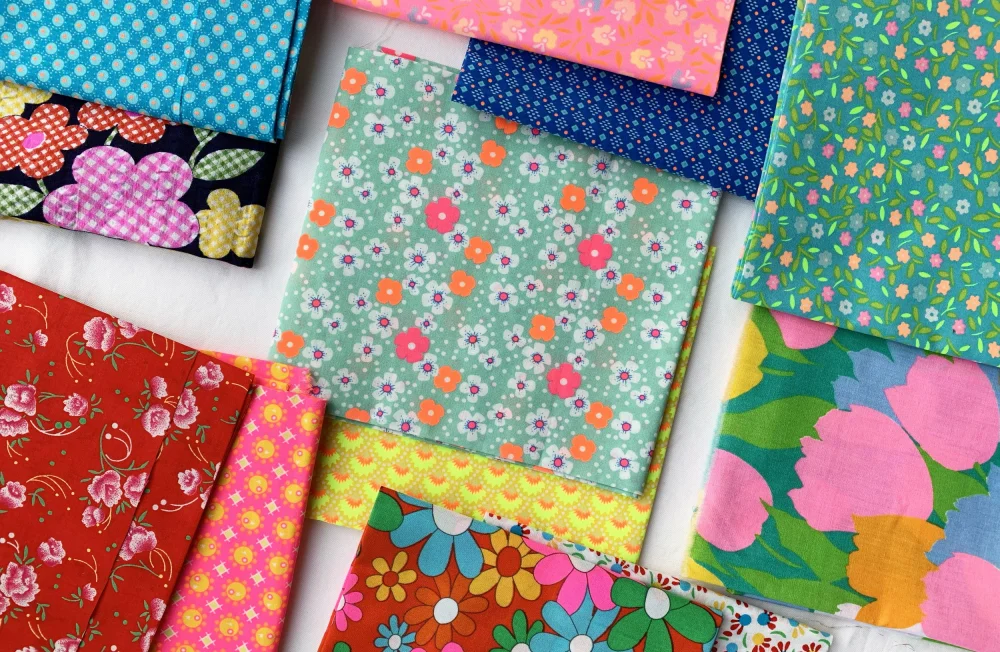
Fanda Fabrics’ fat quarters stand out for their quality and variety. You can pick from 100% cotton, solid colors, or fun prints. Their fat quarters feel soft, cut smoothly, and hold up well in your finished projects.
Whether you’re making a quilt, a bag, or a small craft, you’ll find the right fabric for your needs. Many crafters love the convenience of grabbing a bundle and getting started right away.
If you want to try something new or need a coordinated set, Fanda Fabrics’ fat quarter collection gives you plenty of choices. You’ll enjoy the process of cutting and creating with fabric that looks and feels great.
Tools to Cut a Fat Quarter
Before you start cutting, you need the right tools. The right setup makes cutting fat quarters easier, safer, and more accurate. Let’s break down what you’ll need.
Essential Tools
You’ll want three main tools for cutting fat quarters:
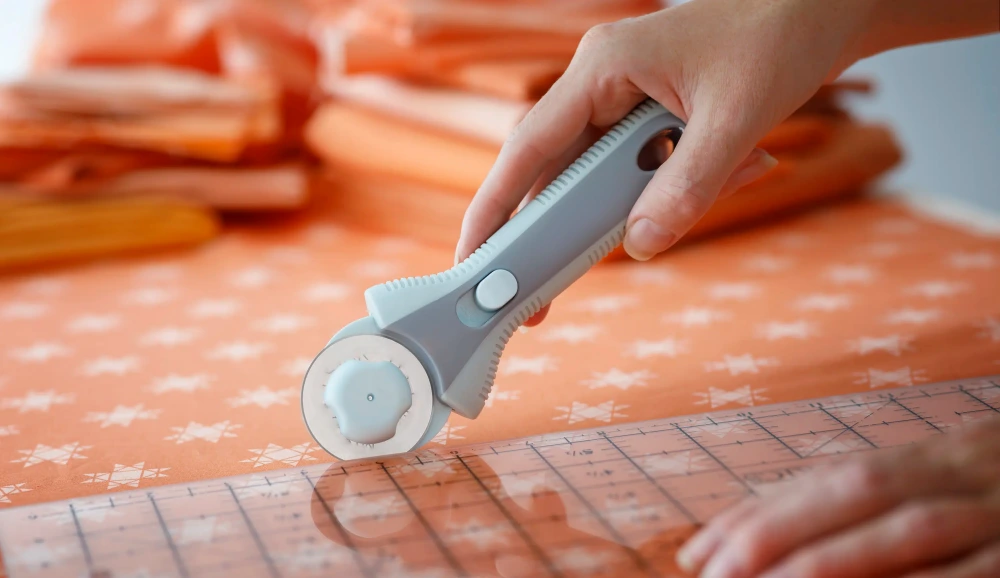
Rotary Cutter: This tool glides through fabric and gives you clean, straight cuts. A sharp rotary cutter works much better than scissors, especially when you want to cut several layers at once. You’ll notice less hand fatigue and more precise shapes for your projects. Keep extra blades handy so you always get smooth cuts.
Self-Healing Cutting Mat: Place your fabric on this mat before cutting. The mat protects your table and keeps your rotary blade sharp. Its grid lines help you line up your fabric and ruler, so you get straight, even cuts every time.
Acrylic Quilting Ruler: This clear ruler has grid lines and angle markings. It helps you measure and guide your rotary cutter for exact cuts. The non-slip backing keeps it steady, so your fabric doesn’t shift while cutting.
Tip: Always press your fabric before cutting. Smooth, flat fabric means more accurate cuts and less waste.
Optional Tools
Some extra tools can make cutting even easier:
Fabric-Safe Pen or Chalk: Mark your cutting lines for tricky shapes or custom sizes.
Fat Quarter Bundles: If you want coordinated fabrics for a project, grab a fat quarter bundle from Fanda Fabrics. These bundles save you time picking out matching fabrics and make cutting for patchwork or quilting a breeze.
Cut-Resistant Gloves: If you’re new to rotary cutters, gloves add a layer of safety.
Adhesive Grips for Rulers: These keep your ruler from slipping while you’re cutting.
Fanda Fabrics’ high-quality cotton makes cutting simple. The fabric stays flat, resists fraying, and cuts cleanly. Cotton is also a better choice for the environment than synthetic fabrics, since it’s biodegradable and doesn’t release microplastics when washed.
Remember, always use sharp blades and work in a well-lit area. Store your tools safely when you finish cutting. With the right tools and a little practice, you’ll find cutting fat quarters quick and enjoyable.
How to Cut a Fat Quarter?
Cutting fabric can feel intimidating at first, but this tutorial will walk you through every step. You’ll learn how to cut a fat quarter for quilting with confidence, whether you’re following along with a video or using written instructions. Let’s break down the process so you can get the best results from your Fanda Fabrics fat quarters.
Prepare the Fabric
Before you start cutting, you need to prep your fabric. This step is key for accuracy and helps you avoid common mistakes. Here’s how to get your fat quarters ready:
Sort by Color
Group your fat quarters by color. This helps prevent color bleeding and keeps your project organized.Wash and Dry
Wash your fat quarters in cold water with a mild detergent. Use a gentle cycle to protect the fabric. Air dry or tumble dry on low heat. This removes any dirt, reduces shrinkage, and helps you see how the fabric will behave in your finished project.Iron the Fabric
Ironing is different from pressing. For cutting, you want to iron your fat quarter by moving the iron smoothly across the fabric. This removes wrinkles and flattens the fabric, making it easier to measure and cut. If you skip this, your measurements might be off, and your pieces could end up the wrong size.Trim Edges
Use your rotary cutter and ruler to trim any uneven or frayed edges. Straight edges make it much easier to line up your ruler and get accurate cuts.
Tip: If you’re unsure about pre-washing, test a small piece first. Some crafters skip washing pre-cuts, but washing can help prevent surprises later.
Cutting Steps
Now you’re ready to cut a fat quarter for quilting. This tutorial will guide you through each move so you get sharp, accurate pieces every time.
Lay Out the Fabric
Place your fat quarter on your cutting mat. Smooth it out so there are no bumps or folds.Align the Fabric
Line up one straight edge of your fat quarter with the grid lines on your mat. This helps you keep everything square.Measure and Cut
Use your acrylic ruler to measure the size you need. For most quilt blocks, you’ll cut strips or squares. Hold the ruler firmly and run your rotary cutter along the edge. Always cut away from your body for safety.Follow a Cutting Plan
If you’re making a quilt, you might need several sizes. Here’s a simple plan you can follow:Cut Type
How to Cut from a Fat Quarter
What You Get
2″ Strips
Cut along the bottom edge
Great for sashing or borders
3.5″ Squares
Cut strips, then sub-cut into squares
Perfect for patchwork
6.5″ Squares
Cut larger strips, then cut into squares
Good for larger blocks
You can adjust the plan based on your project. The best way to cut a fat quarter is to plan your cuts, so you use as much of the fabric as possible and minimize waste.
Keep Fabric Steady
Don’t move the fabric between cuts. Just rotate your mat if you need a new angle. This keeps your pieces accurate and prevents stretching.
Note: Fanda Fabrics’ fat quarters are made from high-quality cotton, so they stay flat and resist fraying. This makes the cutting process much smoother, especially for beginners.
Tips for Accuracy
You want your pieces to fit together perfectly. Here are some tips from experienced quilters to help you cut a fat quarter for quilting with precision:
Press Before Cutting
Always press your fat quarters before you start. This removes wrinkles and helps the fabric lie flat.Use Starch
Lightly starch your fabric if you’re cutting small pieces. This keeps the fabric crisp and prevents stretching.Straighten Edges Often
After a few cuts, check your edges. Trim them if they start to look uneven.Rely on Your Ruler
Use the lines on your ruler for measuring, not just the mat. This gives you more precise cuts.Mark Repeated Measurements
If you need to cut the same size several times, put a piece of painter’s tape on your ruler at the right mark. This helps you avoid mistakes.Keep Your Blade Sharp
A dull rotary blade can snag or drag, making your cuts less accurate. Change blades regularly.Measure Twice, Cut Once
Double-check your measurements before you cut. This simple habit saves fabric and frustration.Mind the Grain
Cut along the fabric grain when possible. This prevents stretching and keeps your pieces from warping.Stay Organized
Store your cut pieces in labeled bags or containers. This keeps your workspace tidy and your project on track.
Pro Tip: Start with small, simple projects. As you practice, you’ll get faster and more confident with each tutorial.
If you follow these steps, you’ll find that learning how to cut a fat quarter is much easier than you thought. Fanda Fabrics’ fat quarters make the process even smoother, thanks to their quality and consistency.
Whether you’re following a video tutorial or written instructions, you’ll soon master how to cut a fat quarter for quilting and enjoy every step of your creative journey.
Cut Fat Quarters into Usable Precuts
Common Precut Sizes
When you cut fat quarters into usable precuts, you open up a world of options for your quilting projects. You might wonder how many squares or how many strips you can get from one fat quarter. The answer depends on the size you need.
For example, you can cut up to 99 two-inch squares, about 42 three-inch squares, or around 12 five-inch squares from a single fat quarter. If you prefer strips, you can get several 2.5-inch strips, which are perfect for borders or bindings.
Cutting smaller squares or strips helps you maximize every bit of fabric, so you waste less and have more pieces ready for patchwork.
You can also try the HST grid method if you want to make half-square triangles quickly. This technique lets you mark and sew grids on your fat quarter before cutting, so you get lots of blocks at once. It’s a great way to save time and keep your pieces accurate.
Tip: Planning your cuts before you start helps you get the most out of each fat quarter. Think about the number of squares or strips you need for your project.
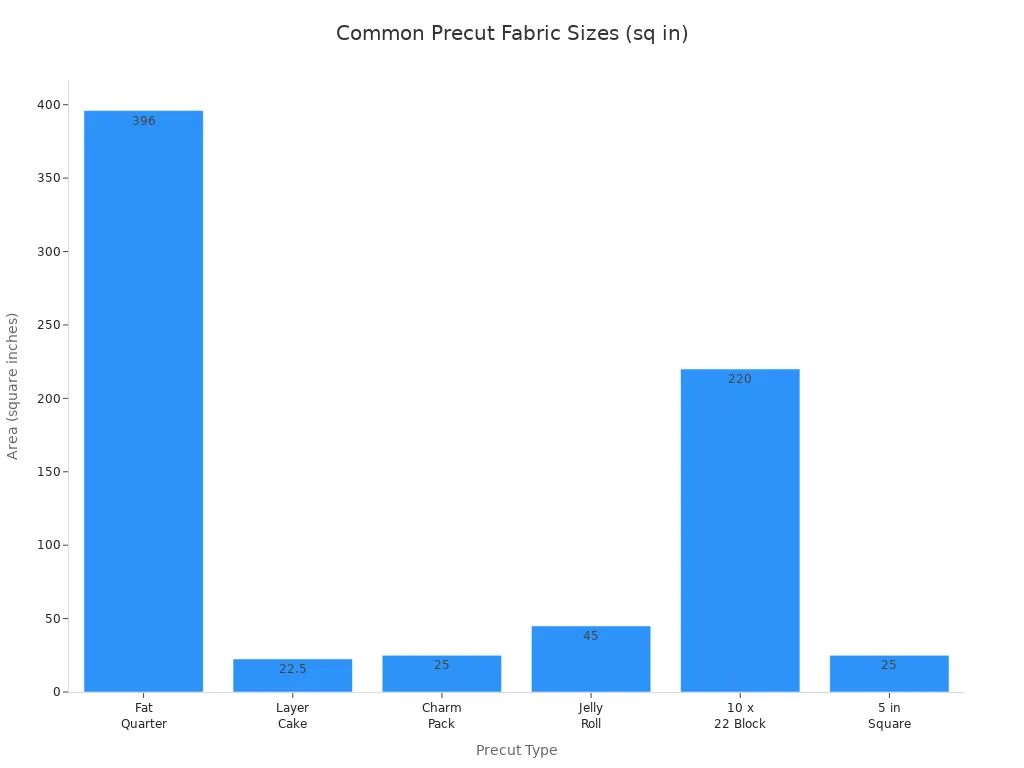
Cutting Chart
A fat quarter cutting chart makes it easy to see how many squares or strips you can cut from your fabric. Here’s a handy table to guide you:
Precut Type | Size (inches) | How Many from 1 Fat Quarter | Typical Use |
|---|---|---|---|
2″ Squares | 2 x 2 | 99 | Tiny patchwork, scrappy quilts |
3″ Squares | 3 x 3 | 42 | Small blocks, accents |
4″ Squares | 4 x 4 | 20 | Piecing, borders |
5″ Squares | 5 x 5 | 12 | Charm packs, patchwork |
2.5″ Strips | 2.5 x 22 | 7-8 strips | Jelly rolls, bindings |
10″ Squares | 10 x 10 | 2 | Layer cakes, large blocks |
You can see that smaller pieces give you a higher number of squares, while larger blocks use more fabric at once. If you want to visualize the area each precut uses, check out this chart:
Using a fat quarter cutting chart helps you plan your projects and decide how many squares or strips you need. If you want coordinated fabrics, Fanda Fabrics offers quilting fabric bundles that make cutting and matching even easier.
You’ll love how simple it is to get started with these bundles, especially when you want to cut fat quarters into usable precuts for your next quilt.
Conclusion
You’ve learned the basics of cutting fat quarters like a pro. Start by pressing and squaring your fabric, then use your rotary cutter and ruler for accurate cutting. Measure carefully and cut along the grain for best results. Each cutting step matches what professional quilters recommend.
If you’re new, try a simple fat quarter project to build skills. Practice makes you more confident and creative. For more tips, fabric options, and beginner guides, check out Fanda Fabrics’ website. You’ll find everything you need for your next cutting adventure!
FAQ
How do I keep my fat quarter from shifting while I cut?
Place your fabric on a self-healing mat. Hold your acrylic ruler firmly with one hand. Cut slowly with your rotary cutter. If you’re new, try using adhesive grips on your ruler for extra stability.
Can I cut fat quarters with scissors instead of a rotary cutter?
You can use scissors, but a rotary cutter gives you straighter, cleaner lines. Scissors work for simple shapes, but you might find it harder to get precise cuts for quilting blocks.
Do I need to pre-wash my fat quarters before cutting?
Pre-washing helps prevent shrinkage and color bleeding. If you want your finished project to stay true to size and color, wash your fat quarters first. Some quilters skip this step for pre-cuts, but testing a small piece first is smart.
What’s the best way to store leftover fat quarter pieces?
Keep your scraps in clear, labeled bags or boxes. Sort by color or size. This makes it easy to find what you need for your next project and keeps your workspace tidy.
Can I mix fat quarters from different bundles in one quilt?
Absolutely! Mixing fat quarters from different bundles adds variety and personality to your quilt. Just make sure the fabrics are similar in weight and feel for the best results.