Making a crazy quilt is a fun, creative adventure anyone can enjoy. You get to play with colors, patterns, and different textures. Fanda Fabrics makes it easy for beginners. You will find a great selection of quilting bundles, such as:
Fat quarters
Jelly rolls
Mini charm packs
Charm packs
Layer cakes
No need for experience—just bring your imagination. If you want to know how to make a crazy quilt, you are in the right place. The steps are simple, and you will love the results.
Key Takeaways
Choose a variety of fabrics from Fanda Fabrics to create a vibrant crazy quilt. Use bundles like fat quarters or charm packs for easy selection.
Start with simple techniques like foundation piecing or stitch and flip to make your quilt blocks. These methods allow for creativity and fun.
Embellish your quilt with decorative stitches, buttons, and beads to add personal flair. This step makes your quilt unique and showcases your style.
Assemble your quilt by ensuring all blocks are the same size. Use a cardboard template for accuracy and lay out your design before stitching.
Finish your quilt with binding using double-sided quilted fabric for a polished look. This fabric adds style and makes the edges tidy.
Materials for a Crazy Quilt
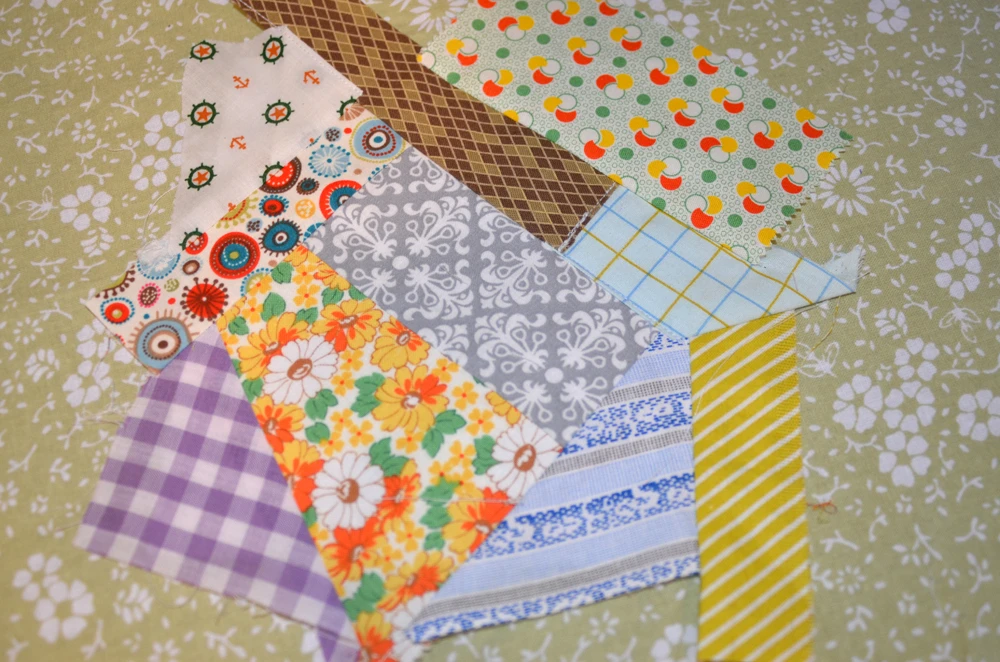
Choosing Fabrics from Fanda Fabrics
You get to choose from a huge variety of fabrics when you start your crazy quilt. Fanda Fabrics makes this step easy with their Quilting Fabric Bundles and Quilting Collection. You can pick fat quarters, charm packs, or layer cakes.
These bundles come in coordinated colors and patterns, so you don’t have to worry about matching everything yourself.
Here’s a quick look at fabric types experts recommend for crazy quilting:
Fabric Type | Description |
|---|---|
Muslin | Often used as a stabilizer in crazy quilts. |
Nonwoven Cotton | Adds stability, especially for bias edges. |
Brocade | Brings richness and luxury to your quilt. |
Dupioni | Offers texture and sheen for visual interest. |
Jacquard | Intricate patterns add depth to your design. |
Eyelash | Unique texture makes your quilt stand out. |
Want your quilt to pop? Mix matte and shiny textures. Try black and white stripes or dots to tie colors together. Use at least 15 different fabrics for a small project. Fanda Fabrics’ bundles make it easy to get this variety without hunting for each piece.
Tip: Start with a designer-curated bundle from Fanda Fabrics. You’ll get a coordinated palette that saves time and looks great.
Essential Tools and Supplies
You need a few basic tools to get started. Here’s a checklist:
Rotary cutter (for quick, accurate cuts)
Quilting ruler (helps you measure and cut straight lines)
Fabric scissors (for trimming and detail work)
Threads (choose colors that match or contrast)
Needles (hand and machine)
Sewing machine accessories (presser feet, bobbins)
Hand sewing supplies (thimbles, seam rippers)
Stabilizer (muslin, old sheets, or interfacing)
Tool | Function | Advantages |
|---|---|---|
Rotary Cutter | Rolling blade for precise cuts | Saves time, cuts multiple layers, and less fatigue |
Fabric Scissors | Traditional cutting tool | Good for detail work, but slower |
Quilting Ruler | Ensures accurate cuts and alignment | Essential for straight lines and measurements |
“Using a rotary cutter is a time saver for all sewing projects. The cuts you make are quick, clean, and accurate. You can cut multiple layers at the same time. Your hand doesn’t get as tired as with scissors.”
You’re ready to gather your supplies and start creating!
How to Make a Crazy Quilt Block?
Ready to dive into the heart of how to make a crazy quilt? This is where your creativity shines. You’ll learn three beginner-friendly ways to make a crazy quilt block. Each method lets you play with color, shape, and texture.
If you want to see these steps in action, look for a video tutorial online. Watching a video tutorial can help you visualize each step and boost your confidence.
Foundation Piecing Method
The foundation piecing method is a classic approach for anyone learning how to make a crazy quilt. You’ll love this method because it keeps your blocks stable and makes the process less intimidating. Here’s how you do it in easy steps:
Start with a square of muslin or another foundation fabric. This will be the base for your block.
Pick a center piece of fabric with five sides. Place it in the middle of your foundation and stitch it down.
Choose your next fabric. Place it right sides together with the center piece. Stitch along one edge using a 1/4-inch seam allowance.
Flip the new fabric out and press it flat.
Keep adding fabrics around the center, working in a counterclockwise direction. Each time, place the new piece right sides together, stitch, flip, and press.
Fill the entire square, letting extra fabric hang off the edges.
Once the block is covered, flip it over. Trim the excess fabric using a rotary cutter along the muslin’s edge.
Sew a zig-zag stitch around all four edges to secure the fabrics.
Now comes the fun part—embellish your block! Add embroidery, beads, buttons, or any other decorations you like.
Tip: Don’t worry about perfection. Crazy quilt patterns are all about creativity and happy accidents. If you want more guidance, search for a video tutorial that shows the foundation piecing method step by step.
Stitch and Flip Technique
The stitch and flip technique is another great way to make a crazy quilt block. This method is perfect if you want to improvise and create unique designs. Here’s what makes it special:
You don’t need to measure every piece. Just grab a fabric scrap, stitch it down, and flip it open.
Each block turns out different. You get free-style blooms and unexpected shapes.
This technique encourages you to experiment and have fun.
Aspect | Stitch and Flip Technique | Traditional Piecing Methods |
|---|---|---|
Design Approach | Improvisational and unique block designs | Requires precise measurements and uniformity |
Block Uniformity | Embraces variation and creativity | Often results in identical blocks |
Creativity | Encourages different blocks with each project | Limited creativity due to uniformity requirements |
Example | Used in crazy quilting for fun and unique designs | Common in traditional quilting styles |
To use the stitch and flip method, lay your first fabric piece on the foundation. Place the next piece right sides together, stitch, and flip it open. Keep going until you fill the block. This method is a favorite for easy crazy quilt block projects because it’s fast and forgiving.
Using Precut Bundles for Easy Crazy Quilt Blocks
If you want to know how to make a crazy quilt the easy way, Fanda Fabrics precut bundles are your best friend. Fat quarters, charm packs, and layer cakes save you time and give you a beautiful mix of colors and patterns. You don’t have to stress about cutting or matching fabrics.
Here’s how to use precut bundles for an easy crazy quilt block:
Pick a bundle with at least 15 different fabrics. This gives your quilt lots of variety.
Lay out your fabrics before you start sewing. This helps you see how the colors and patterns work together.
Use the foundation piecing or stitch and flip method with your precuts. The pieces are already the right size for most blocks.
If you want to make a diamond block crazy quilt, cut your precuts into diamond shapes before you start piecing. This adds a modern twist to your quilt.
Don’t forget to lay the quilt blocks out before joining them. This step helps you balance colors and avoid putting similar fabrics next to each other.
Note: When you make a crazy quilt, pay attention to fabric weight. Mixing heavy and light fabrics can cause puckering. Use a stabilizer that matches the size of your block. If you want to try a diamond block crazy quilt, sketch your design first. Planning ahead helps you avoid overthinking and keeps the process fun.
Common Mistakes and How to Avoid Them
Many beginners wonder how to make a crazy quilt without frustration. Here are some common mistakes and tips to help you succeed:
Overthinking designs: Don’t get stuck trying to make everything perfect. Sketch your ideas or just start sewing. Crazy quilt patterns look best when you let your creativity flow.
Inadequate basting: If you don’t baste your layers well, you might get puckers. Try spray basting or use more pins to keep everything smooth.
Not learning new techniques: Keep exploring new crazy quilt stitches and patterns. Watch tutorials, read blogs, and practice different styles. This will help you grow as a quilter.
Try adding new crazy quilt stitches to your blocks. Embroidery, feather stitches, and decorative seams make your quilt unique.
If you want to make a diamond block crazy quilt, use Fanda Fabrics’ charm packs or layer cakes. Cut them into diamonds and piece them together using the stitch and flip method. This creates a stunning, modern look that’s easy to achieve.
You now know how to make a crazy quilt block using easy steps. Whether you choose foundation piecing, stitch and flip, or precut bundles, you’ll end up with beautiful, one-of-a-kind blocks. Don’t forget to experiment with crazy quilt stitches and embellishments. Your quilt will reflect your personality and creativity!
Assemble a Crazy Quilt Top
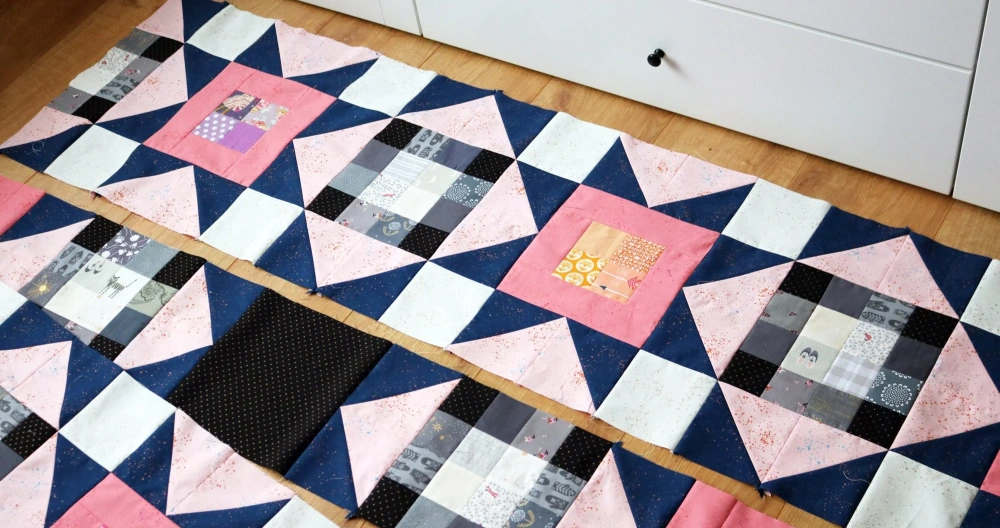
Now comes the exciting part—it’s time to assemble a crazy quilt top! You get to see all your unique blocks come together into a beautiful, one-of-a-kind creation.
Join Blocks Together
When you assemble a crazy quilt, start by making sure all your blocks are the same size. You can use a cardboard template to help with this. Mark the edges of each block with a quilter’s pencil, then trim carefully with your ruler just outside the lines. This step keeps your blocks even and makes the next steps easier.
Lay out your blocks on a flat surface. Move them around until you find a layout you love. Pin the blocks together, matching up the edges. If you have embellishments like beads, use a zipper foot on your sewing machine so you don’t damage them.
Stitch the blocks together, then gently press the seams open with a cool iron. This helps reduce bulk and keeps your quilt top flat.
Tip: Press your seams open and use a clapper if you have one. This makes your blocks lie even flatter and gives your quilt a polished look.
After you join the blocks, use a Herringbone stitch to keep the seams flat. Catch only the foundation fabric, not the whole block. Keep assembling your crazy quilt by joining blocks into larger sections, pressing and stitching as you go. Repeat these steps until you finish the quilt top.
Add Borders with Fanda Fabrics
Borders add the perfect finishing touch when you assemble a crazy quilt. Fanda Fabrics offers Bright Quilt Fabric and Batik Patchwork Fabric that make your borders pop. Try using batik charm packs to create fun designs—think hearts, stars, or simple stripes. Mix and match different charm packs for a cohesive look.
Bright Quilt Fabric brings energy and color to your quilt’s edge. Batik Patchwork Fabric adds unique patterns and a touch of tradition. Arrange your border pieces, then sew them to the edges of your quilt top. Press the seams open to keep everything smooth.
When you assemble a crazy quilt, borders help frame your work and tie all your creative blocks together. You’ll love how your finished quilt looks with these vibrant fabrics!
Embellish Your Crazy Quilt
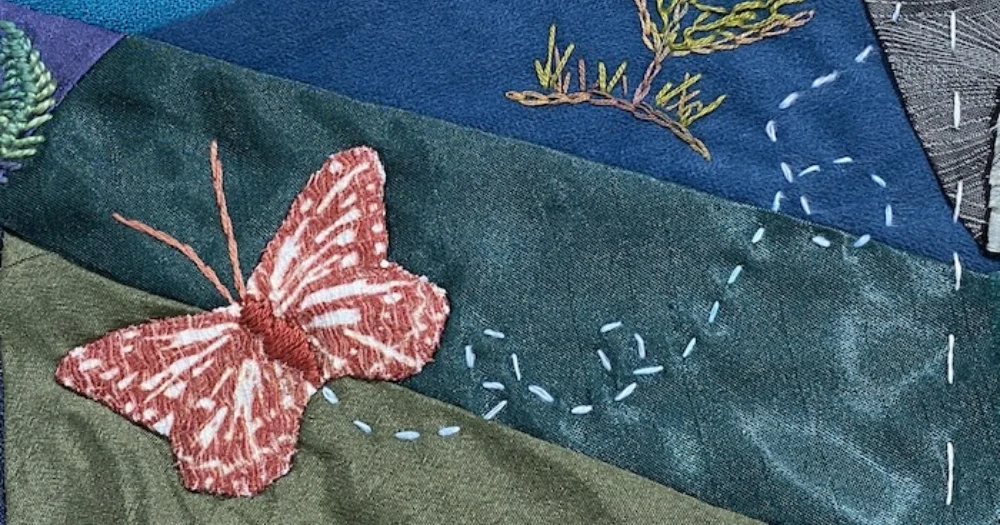
Crazy quilts are all about showing off your creativity. You can turn every seam and patch into a work of art. Embellishing crazy quilts lets you add personal touches that make your project stand out. You get to decide how much sparkle, texture, and color you want.
Embroidery and Decorative Stitches
You can decorate seams and patches with embroidery. Try classic stitches like herringbone, featherstitch, and French knots. These stitches not only look beautiful but also help secure your seams.
You might enjoy using a stem or outline stitch for gentle curves. Crewel-stitch and Kensington stitch add extra flair. Chenille yarn works well for embroidered borders, while ribbon embroidery creates soft, colorful motifs.
Here’s a quick list of popular stitches for crazy quilts:
Herringbone stitch
Featherstitch
French knots
Stem or outline stitch
Crewel-stitch
Kensington stitch
Chenille yarn borders
Ribbon embroidery motifs
Decorative stitches do more than just look pretty. They help keep your patches in place. You can use a running stitch or a standard machine stitch to fasten patches before you start embellishing.
Tip: You can add embroidery before or after you assemble the quilt top. If you want to work on small sections, decorate each block first. If you prefer a unified look, embellish after joining the blocks.
Adding Lace, Buttons, and Beads
Lace, buttons, and beads bring texture and shine to your quilt. You can overlay lace with decorative trim and secure it with stitches. Try weaving metallic yarn through lace for extra sparkle.
When you attach buttons, use shank buttons or tuck the edge of a flat button under to keep it upright. For vintage buttons, sew from the back and use fray check if needed. Felt circles under buttons add stability.
Beaded embroidery is a favorite for crazy quilts. Choose small seed beads for subtle accents or larger beads for bold statements. Create trails of beads to highlight special areas. Combine buttons and beads in clusters for rich texture.
Note: Embellishments like lace, buttons, and beads make your quilt unique, but they need gentle care. These materials can affect durability, so handle your quilt with care and avoid harsh washing.
You can add embellishments before or after assembling the quilt top. If you want more control, decorate each block first. If you want a cohesive design, embellish after joining the blocks.
Finish and Bind the Quilt
You’re almost done with your crazy quilting project! This part of the tutorial will guide you through making the quilt sandwich, hand-tying, and binding your quilt for a professional finish.
Make the Quilt Sandwich
Start by layering your quilt. Lay the backing fabric flat on a clean surface. Place the batting on top, then position your crazy quilting top over the batting. Cut each layer with about four extra inches on all sides. This margin helps keep everything secure as you work. Use spray basting to hold the layers together.
You can also use quilter’s pins at regular intervals, especially along seam lines. If your quilt has delicate fabrics, iron a fusible backing onto the pieces to prevent puckering. For extra stability, secure the sandwich in an embroidery hoop and use a medium-weight cutaway stabilizer.
Tip: Choose sturdy fabrics like denim or quilter’s cotton for your backing. They add durability and help your crazy quilting last for years.
Hand-Tying and Quilting
Hand-tying is a great crazy quilting method, especially if you’ve added lots of embellishments. Machine quilting can sometimes hide or damage beads and buttons. With hand-tying, you keep the front clean and let your decorations shine. Tie the quilt every two inches, working across the top.
You can use buttons or beads to hide the knots. If you want a super neat look, add a false back by pressing fabric and pinning it over the quilt.
Hand-tying keeps your quilt soft and flexible.
It protects your embellishments.
You get a classic, cozy finish.
Binding with Double-Sided Quilted Fabric
Ready to bind your quilt? Fanda Fabrics Double Sided Quilted Fabric makes this step easy and stylish. You get two patterns in one, so your binding or backing stands out. Double-sided quilted fabric gives you a tidy edge with no stitch line showing on the front. You finish quickly and get a unique look.
Pros of Double-Sided Quilted Fabric | Cons of Double-Sided Quilted Fabric |
|---|---|
No stitch line showing on the front | Fatter binding on the front of the quilt |
Tidy | Loss of points on blocks |
Quickly completed | Inconsistencies in the binding area |
Try this tutorial tip: Use double-sided quilted fabric for both binding and backing. Your crazy quilting will look polished and professional, and you’ll love the reversible effect!
Conclusion
You just learned how to make a crazy quilt from start to finish. Here’s a quick recap to help you get started:
Gather your tools and pick your favorite fabrics.
Plan your design or dive in with scraps.
Piece your blocks, starting from the center.
Add fun stitches and embellishments.
Join your blocks and finish with binding.
Don’t stress about perfection—let your creativity shine! Fanda Fabrics has everything you need to inspire your next crazy quilt adventure.
FAQ
How do I wash a crazy quilt with lots of embellishments?
Hand-wash your quilt in cold water with mild detergent. Lay it flat to dry. Avoid wringing or twisting. If you use a washing machine, place the quilt in a mesh bag and use the gentle cycle.
Can I use scraps from old clothes for my crazy quilt?
Absolutely! Old shirts, dresses, or even ties work great. Just make sure the fabrics are clean and not too stretchy. Mixing different textures adds character to your quilt.
What size should I make my crazy quilt blocks?
Most beginners start with 8″ or 10″ squares. This size is easy to handle and lets you add lots of detail. You can go bigger or smaller if you want a different look.
Do I need a sewing machine to make a crazy quilt?
No, you can sew everything by hand if you like. A sewing machine makes things faster, but hand stitching gives your quilt a personal touch. Choose what feels best for you.
Where can I find high-quality fabrics for crazy quilting?
You can shop at Fanda Fabrics. They offer quilting bundles, bright fabrics, and unique prints. You’ll find everything you need for your next crazy quilt project.