If you love layer cake sewing, you know how much fun it is to dive into a fresh stack of fabric squares. Fanda Fabrics Layer Cakes and Quilting Fabric Bundles make your projects even better. Many quilters trust these bundles for their high quality, vibrant colors, and easy-to-use precuts.
Fanda Fabrics stands with top brands, showing up at major quilting events and in stores like Walmart and JOANN.
Their layer cake sewing supplies give you the confidence to try new patterns and enjoy every stitch.
Get ready to discover how layer cake sewing can be simple, creative, and rewarding!
Key Takeaways
Choose high-quality cotton fabrics with coordinated colors and patterns to make your quilt durable and beautiful.
Organize your layer cake squares by color or size before sewing to save time and reduce stress during your project.
Cut fabric pieces accurately using proper tools, and pay attention to fabric grain to keep your quilt blocks neat and stable.
Use consistent 1/4 inch seam allowances and try chain piecing to sew faster and keep your seams even.
Press seams carefully by lifting the iron and nesting seams to give your quilt a polished, professional finish.
Layer Cake Sewing Basics
Fanda Fabrics Layer Cakes and Quilting Fabric Bundles make layer cake sewing a breeze for both beginners and experienced quilters. You get 10″x10″ precut squares in every bundle, so you can skip the measuring and jump right into your project.
Each pack comes with a mix of coordinated colors and patterns, all made from high-quality cotton. These features help you create a quilt that looks polished and feels soft, whether you’re making beginner quilts or tackling a more advanced design.
Choose Quality Fabrics
When you start a layer cake quilt, the fabric you pick matters a lot. You want your quilt to last, look great, and feel good. Here’s what you should look for in layer cake fabric:
High-quality cotton fabric gives you durability and makes sewing easier.
Coordinated colors help your quilt design come together beautifully.
Patterns that fit your style and the scale of your quilt add personality.
A tight, fine weave with a medium to high thread count (60-75 threads per inch) keeps your fabric smooth and strong.
Soft, pliable fabric with no gaps in the weave means your quilt will resist fraying and shrinking.
Precut fabric squares, like those from Fanda Fabrics, save you time and make sure every piece matches in size.
You’ll notice that Fanda Fabrics Layer Cakes and Quilting Fabric Bundles check all these boxes. The vibrant colors and soft cotton make every stitch enjoyable. You can trust that your quilt fabric will hold up, even after many washes.
Tip: Using a curated selection of prints in a layer cake bundle lets you mix and match easily, creating a dynamic quilt without worrying about color clashes.
Pre-Wash Considerations
You might wonder if you should pre-wash your layer cake fabric before you start sewing. This is a common question for quilters, especially when working with precut squares. Here’s a quick look at the pros and cons:
Advantages of Pre-washing Layer Cake Fabric Squares | Disadvantages of Pre-washing Layer Cake Fabric Squares |
|---|---|
Prevents shrinkage, so your quilt stays flat and smooth. | It can cause fraying and make it hard to keep the squares the same size. |
Stops dye from bleeding, protecting your finished quilt. | Removes sizing, which can make fabric less crisp and harder to piece. |
Gets rid of chemicals, making fabric softer and safer for sensitive skin. | Precuts may shrink unevenly, leading to size differences. |
Layer cakes are large enough to handle washing better than smaller precuts. | Some quilters like the crinkled look that comes from washing after quilting. |
Most quilters skip pre-washing when working with precut fabric like layer cakes. Washing can cause shrinkage and size changes, which defeats the purpose of using precuts.
If you’re worried about dye bleeding, you can test a small piece first. Fanda Fabrics uses high-quality cotton, so you can feel confident about colorfastness and durability.
Organize Squares
Getting organized before you start sewing makes the whole process smoother. You don’t want to waste time searching for the right square or lose track of your favorite patterns. Here’s how you can keep your layer cake sewing project on track:
Store all your layer cake squares for a project in one container. This keeps everything together and easy to find.
Decide if you want to keep leftover squares grouped by color or mix them into your scrap bin for future projects.
Cut scraps into common sizes, like 2½” or 5″ squares, so you can use them later.
Use a container that’s big enough for your fabric and leaves room for extras.
Label your containers clearly. You’ll save time and avoid confusion.
When you organize your layer cake fabric by color, size, or type, you can quickly grab what you need. Some quilters like to use clear bins or zip bags so they can see all their options at a glance. You might also want to use a project board or design wall to lay out your quilt and plan your next steps.
Note: Bundling your squares with rubber bands or adding labeled swatches helps you keep track of patterns and colors. This makes planning your quilt design much easier and less stressful.
With Fanda Fabrics Layer Cakes and Quilting Fabric Bundles, you get a beautiful, coordinated set of squares that are easy to organize and use. Whether you’re a beginner or a seasoned quilter, staying organized helps you enjoy the creative process and finish your quilt with confidence.
Cutting and Piecing Tips

When you start working with layer cake squares, a few smart cutting and piecing habits can make your quilt look sharp and professional. Let’s break down some essential tips to help you get the most out of your Fanda Fabrics Quilting Collection.
Accurate Cutting
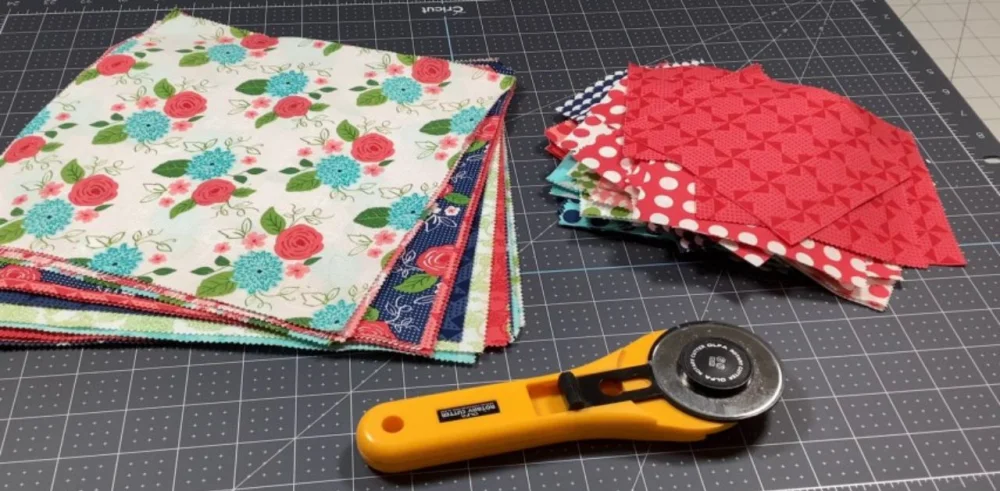
Accurate cutting is the foundation of a great quilt. Even though Fanda Fabrics Layer Cakes come precut, sometimes you want to trim or cut them into smaller pieces for your design. Here’s how you can get perfect cuts every time:
Use a 4″ x 36″ double-sided healing mat to protect your table and keep your fabric steady.
Grab a 60mm rotary cutter for smooth, clean edges.
Choose a large quilting ruler, like an 8½” x 24½”, to measure and guide your cuts.
Lay your fabric with the folded edge facing you and the selvage away.
Align your ruler and trim one edge to straighten it.
Cut off the selvage edges, making sure you’re comfortable whether you’re right- or left-handed.
Place your fabric along the zero line on your mat.
Move your ruler to the 10″ line, align it with the folded edge, and cut.
Repeat at the 20″ mark for another 10″ strip.
Turn your strips so the 10″ width faces you, then cut into 10″ squares.
Tip: Consistent measuring and cutting help your pieces fit together perfectly, so your quilt blocks line up just right.
Mind the Grain
Fabric grain matters more than you might think. Every piece of fabric has threads running lengthwise (warp), crosswise (weft), and on the bias (diagonal). The lengthwise grain is the strongest and doesn’t stretch, while the crosswise grain has a little give.
The bias stretches the most and can easily distort your quilt blocks, especially if you’re making triangles or diagonal cuts.
If you ignore the grain, your blocks might end up wonky or hard to sew together. Always check the grain before you cut or sew. Handle bias edges gently, pin carefully, and avoid pulling the fabric as you sew. Press your seams instead of ironing back and forth to keep everything stable.
Needle and Thread Choice
Choosing the right needle and thread keeps your stitches neat and your fabric safe. For most quilting cotton, a Universal 80/12 needle works well with both cotton and polyester threads.
You don’t need to switch needles for every project, but you should replace your needle regularly—about every 8 hours of sewing or when you notice skipped stitches.
If your needle is too small for your thread, you’ll get breakage and skipped stitches.
If it’s too big, you might see holes in your fabric.
Match your needle size to your thread weight. Thicker threads need bigger needles, and finer threads need smaller, sharper ones.
For thicker fabrics or multiple layers, try a quilting needle or a topstitch needle.
Always test your needle and thread on a scrap before you start your quilt.
Note: A sharp, fresh needle makes a huge difference in stitch quality and helps your quilt last longer.
Seam Allowance Consistency
A consistent seam allowance is the secret to quilt blocks that fit together perfectly. Most quilters use a 1/4 inch seam allowance. For larger blocks, you might use a generous 1/4 inch, while smaller blocks benefit from a scant 1/4 inch (just a hair less). This helps your blocks stay the right size after pressing.
You can keep your seams even by using a 1/4 inch presser foot, a magnetic seam guide, or even a strip of tape on your sewing machine. Chain piecing also helps keep your seams uniform. Press your seams before joining rows to improve alignment.
Inconsistent seams can make your quilt rows uneven.
Pieces might not fit together, and your quilt could end up too big or too small.
Using guides and pressing seams as you go keeps everything neat.
Chain Piecing
Chain piecing is a game-changer for speed and accuracy. Instead of sewing one block at a time, you feed pairs of fabric through your machine one after another, without cutting the thread between them. This assembly-line method saves time and keeps your pieces organized.
Chain piecing helps you keep a steady 1/4 inch seam allowance.
You waste less thread and avoid tangles.
Using leaders and enders (small scraps at the start and end of your chain) helps guide your fabric and keeps your stitches smooth.
You’ll finish your quilt top faster and with more accurate seams.
Tip: Try chain piecing with your Fanda Fabrics Layer Cakes for a fast, fun way to assemble your quilt blocks.
Fanda Fabrics Quilting Collection gives you reliable, easy-to-cut cotton fabrics that make all these steps easier. When you use high-quality materials and smart techniques, you’ll see professional results in every quilt you make.
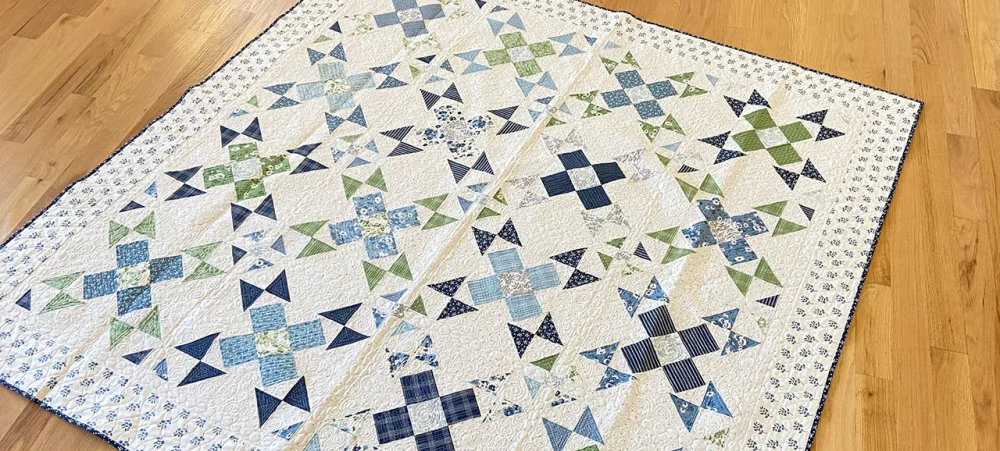
Layer Cake Quilt Design
Pressing Techniques
Pressing makes a huge difference in how your quilt turns out. You want your seams flat and crisp, not bulky or wavy. Here are some pressing tips to help you get that professional look:
Always press, don’t iron. Lift and place your iron instead of dragging it. This keeps your fabric from stretching, especially on diagonal seams.
Set your seams by pressing them flat before you open them. This helps the stitches sink into the fabric.
Decide if you want to press seams to one side or open. Pressing to one side reduces bulk, while pressing open helps seams lay flatter when many seams meet.
Use a little pressing spray or starch for extra crispness, but don’t overdo it.
Try a wool pressing mat or a wooden presser for even better results.
Nest your seams by pressing them in opposite directions. This helps your points match up and keeps your quilt top smooth.
Careful pressing gives your layer cake quilt a neat, polished finish. It also helps your quilt last longer and keeps the structure strong.
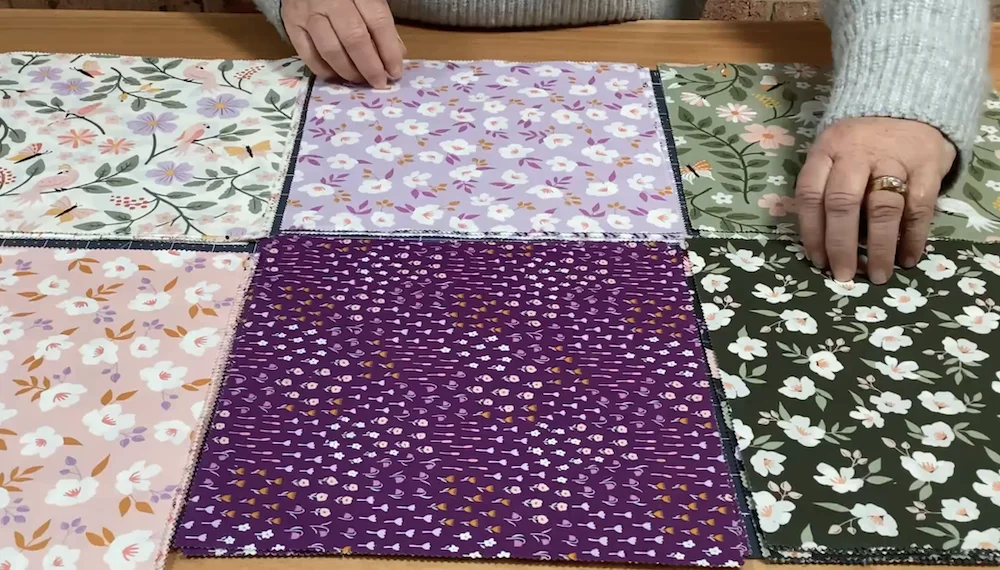
Mix and Match
Mixing and matching is where your creativity shines. Fanda Fabrics Layer Cakes come with a wide variety of patterns and colors, so you can create a unique design every time. Here’s how you can make the most of your fabric:
Use a single fabric line for easy color harmony.
Arrange your blocks in a rainbow order for a gradient effect, or go random for a playful look.
Try a layer cake pattern that uses only the squares, or add a background fabric for more contrast.
Pick a background that hides stains but still lets your prints pop.
Play with block layouts on a design wall before sewing.
With so many options, you can create layer cake quilt patterns that fit your style and mood.
Prevent Stretching
You want your quilt blocks to stay square and true. Stretching can throw off your whole design. Here are some ways to keep your fabric in shape:
Always pay attention to the grain of your fabric when cutting and sewing.
Use templates with grainline arrows to keep everything stable.
Pin your squares to a flat surface and press from the center out to set the shape.
Let blocks cool before moving them.
Use a wool pressing mat or a tailor’s clapper to keep seams flat and prevent stretching.
High-quality cotton from Fanda Fabrics helps too. The tight weave and stable finish mean your blocks hold their shape from start to finish.
Finishing and Trimming
Finishing touches make your quilt look polished. After sewing your blocks and rows, trim any overhanging fabric to square up your quilt top. Here’s a simple way to finish strong:
Measure your quilt top in three places—center and both ends. Average the numbers for accurate borders.
Cut border strips to size and sew them on with a 1/4″ seam.
Press seams outward for neat edges.
Add a second border if you want extra flair.
Careful trimming and finishing prevent crooked edges and give your quilt a professional look. Every step, from pressing to trimming, helps your layer cake quilt stand out.
Conclusion
You now have 12 practical tips to make your layer cake sewing smoother and more enjoyable. When you use Fanda Fabrics Layer Cakes and Quilting Fabric Bundles, you set yourself up for success. These tips help you create a quilt that looks great and lasts.
Try out new ideas, mix patterns, and enjoy the creative process. Ready to start your next project? Grab your favorite fabrics and let your imagination lead the way!
FAQ
How do I store leftover layer cake squares?
You can keep extra squares in a clear bin or zip bag. Label each bag by color or pattern. This way, you find what you need fast for your next project.
Can I mix different brands of layer cakes in one quilt?
Yes, you can! Just check that all squares measure 10″ x 10″ and use similar fabric weights. Mixing brands gives your quilt a unique look.
What’s the best way to keep my quilt blocks from shifting?
Pin your blocks before sewing. Use a flat surface for layout. Press seams as you go. These steps help your blocks stay straight and even.
Do I need special tools for layer cake sewing?
You don’t need fancy tools. A rotary cutter, quilting ruler, and a good iron work well. These basics help you cut, sew, and press with ease.
How do I wash a finished layer cake quilt?
Wash your quilt in cold water on a gentle cycle. Use mild detergent. Air dry or tumble dry on low. This keeps your quilt soft and bright.