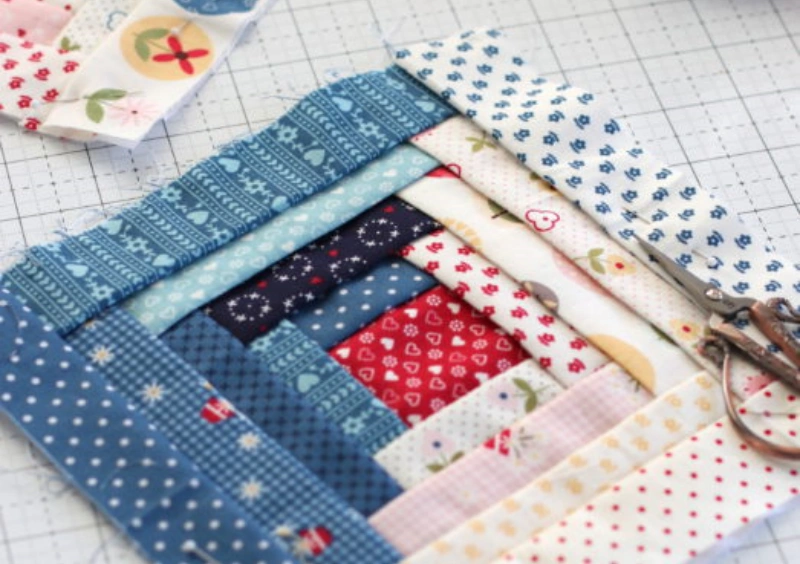
You can create a log cabin quilt block by sewing strips of fabric around a center square, building each round outward. This classic log cabin quilt technique lets you play with color and layout, making every block unique.
The log cabin quilt block works for any skill level—whether you’re a beginner or looking for fresh inspiration. Many quilters love how the log cabin quilt blends tradition with bold, modern styles. Fanda Fabrics offers beginner-friendly quilt block tutorials and beautiful fabrics to help you start your next quilt.
Key Takeaways
Choose high-quality 100% cotton fabrics with a mix of light and dark colors to make your log cabin quilt blocks durable and visually striking.
Use essential quilting tools like a sewing machine, rotary cutter, quilting rulers, and pins to cut and sew your strips accurately for neat blocks.
Build your log cabin block by sewing strips around a center square, pressing seams toward the newest strip, and trimming edges to keep blocks square.
Try different log cabin styles like traditional, courthouse steps, or modern improv to create unique quilts that match your style.
Practice precision by cutting strips carefully, sewing with a consistent seam allowance, and squaring up blocks often to ensure a professional finish.
Materials for Log Cabin Quilt Block
Fabric Choices
When you start a log cabin quilt, fabric selection sets the stage for your whole project. Fanda Fabrics makes this step easy with their Quilting Fabric Bundles, Quilting Collection, Jelly Rolls, and Layer Cakes. These options give you a wide range of colors and patterns, so you can mix and match or keep things coordinated.
High-quality fabrics like 100% cotton make your quilt blocks last longer and look better. Many quilters notice that good fabric matches the photos, arrives well-packaged, and holds up after washing. You want your quilt to stay beautiful for years, so fabric quality matters.
Choose 100% cotton quilting fabrics, linen, or cotton/linen blends for durability.
Recycled cotton, like vintage shirts or sheets, works if it’s sturdy and can handle frequent washing.
Avoid fabrics with synthetic fibers, since they may not last as long.
Bright prints and a balance of light and dark colors make your quilt blocks pop.
Cut strips straight for a neat finish and a professional look.
You can find all these fabric types and more in Fanda Fabrics’ collections, making it simple to get started on your next quilt.
Tools and Supplies
Having the right tools makes building a log cabin quilt block much easier. Here’s a quick look at the must-have quilting tools and their roles:
Essential Tool | Role and Effect on Process |
|---|---|
Fabric (fat quarters or scrap strips) | Gives you the material for your block. Contrasting fabrics add visual interest to your quilt. |
Sewing Machine | Helps you stitch quickly and keeps seams straight. |
Thread | Holds your quilt together. Good thread improves durability and looks. |
Rotary Cutter or Fabric Scissors | Lets you cut clean, straight strips for precise piecing. |
Cutting Mat | Protects your table and helps you measure accurately. |
Quilting Rulers (e.g., square rulers) | Keeps your strip widths and block sizes consistent. |
Stiletto | Guides fabric through the machine and keeps your fingers safe. |
Foundation Paper (for FPP) | Adds structure and makes paper piecing easier, especially for beginners. |
Add-A-Quarter Ruler (for FPP) | Helps you get perfect seam allowances. |
Pins and Seam Roller (for FPP) | Hold pieces in place and press seams flat for accuracy. |
You don’t need every tool to start, but a few basics make your quilt blocks come together smoothly.
Cutting Guide
Cutting your fabric strips to the right size is key to a neat, square log cabin quilt block. Here’s a standard cutting chart for a classic block using 2.5-inch-wide strips:
Fabric Type | Piece Description | Width (inches) | Length (inches) |
|---|---|---|---|
Dark | Center square | 2.5 | 2.5 |
Dark | Strip 3 | 2.5 | 4.5 |
Dark | Strip 4 | 2.5 | 6.5 |
Dark | Strip 7 | 2.5 | 8.5 |
Dark | Strip 8 | 2.5 | 10.5 |
Dark | Strip 11 | 2.5 | 12.5 |
Light | Center square | 2.5 | 2.5 |
Light | Strip 2 | 2.5 | 4.5 |
Light | Strip 5 | 2.5 | 6.5 |
Light | Strip 6 | 2.5 | 8.5 |
Light | Strip 9 | 2.5 | 10.5 |
Light | Strip 10 | 2.5 | 12.5 |
Tip: Cut your strips at least half an inch longer than needed. This gives you a little extra room for trimming and helps avoid running short.
With the right fabric, must-have quilting tools, and a clear cutting guide, you’re ready to start piecing your log cabin quilt block. Fanda Fabrics’ pre-cut Jelly Rolls and Layer Cakes make this step even easier, so you can focus on the fun part—sewing and designing your quilt.
Log Cabin Quilt Block Construction
Building a log cabin quilt block is a fun and rewarding process. You’ll see your quilt come together one strip at a time. Let’s break down each step so you can create crisp, beautiful blocks with ease.
Center and First Strips
Start with your center square. Many traditional log cabin quilt blocks use a 2½-inch square, often in red or another bold color to represent the hearth of the home. You can choose any color that fits your quilt’s theme.
Before you sew, fold the center square in half both ways and finger-press to make light creases. These lines help you line up your first strips perfectly. Place your first strip (usually a light fabric) right sides together with the center square. Sew along the edge using a ¼-inch seam allowance.
After sewing, press the seam toward the strip. Trim any extra fabric that sticks out past the square. Rotate your block 90 degrees and add the next strip, again right sides together. Keep pressing and trimming after each addition to keep your block neat.
Tip: Sew a test block first to check your seam allowance. Even a small difference can add up as you build your log cabin block.
If you use Fanda Fabrics’ Jelly Rolls, you’ll love how the pre-cut 2½-inch strips save you time. You don’t have to cut the pieces yourself, and the colors are already coordinated for you.
Adding Rounds
Now you’ll start building out from the center. Lay out your strips in the order you want to add them. Most quilters add strips in a counter-clockwise or clockwise direction, always placing the new strip on the same side each time. This keeps your log cabin quilt block looking sharp and consistent.
Here’s a simple order to follow:
Add the first strip to one side of the center square.
Rotate the block and add the next strip to the adjacent side.
Continue rotating and adding strips, alternating light and dark fabrics if you want the classic log cabin quilt look.
After each round, press the seams toward the newest strip and trim any overhang.
Keep adding rounds until your block reaches the size you want. For a 12-inch block, you’ll usually add six rounds of strips.
If you use Layer Cakes from Fanda Fabrics, you can cut the 10-inch squares into strips for larger blocks. This method reduces fabric waste and makes it easy to create big, bold log cabin quilt blocks.
Note: Use slightly wider strips for your final round. This gives you extra room to trim and square up your block at the end.
Pressing Tips
Pressing is key to a flat, professional-looking quilt. After you sew each strip, press the seam toward the newest strip. This helps your block lay flat and keeps the layers from getting bulky.
Press seams before using an iron to set them in place.
Avoid steam if your fabric isn’t pre-washed. Steam can shrink or distort the fabric.
Always press, don’t iron back and forth. Lifting and setting the iron prevents stretching.
Tip: Square up your block after every couple of rounds. This keeps your log cabin quilt block accurate and makes assembly easier later.
Chain Piecing
If you want to make several log cabin blocks at once, chain piecing is your best friend. This technique lets you sew multiple pieces in a continuous line without stopping to cut the thread between each one.
Lay out all your center squares and first strips.
Sew the first strip to each center square, one after another, without cutting the thread.
Snip the blocks apart, press, and repeat with the next strip.
Chain piecing saves time, reduces thread waste, and keeps your pieces organized. It’s especially helpful for a log cabin quilt, where you repeat the same steps for each block. You’ll find your sewing rhythm and finish your quilt blocks much faster.
Tip: Keep your chain-pieced blocks in order. This makes pressing and trimming easier and helps you avoid mixing up your strips.
With these steps, you can confidently build a log cabin quilt block that’s neat, square, and ready for your next quilting project. Fanda Fabrics’ Jelly Rolls and Layer Cakes make the process even smoother, letting you focus on the creative part—designing your quilt.
Log Cabin Quilt Block Variations
You can make a log cabin quilt in many different ways. Each style gives your quilt a unique look and feel. Let’s explore some popular variations and see how you can use Fanda Fabrics products to make each one stand out.
Traditional Style
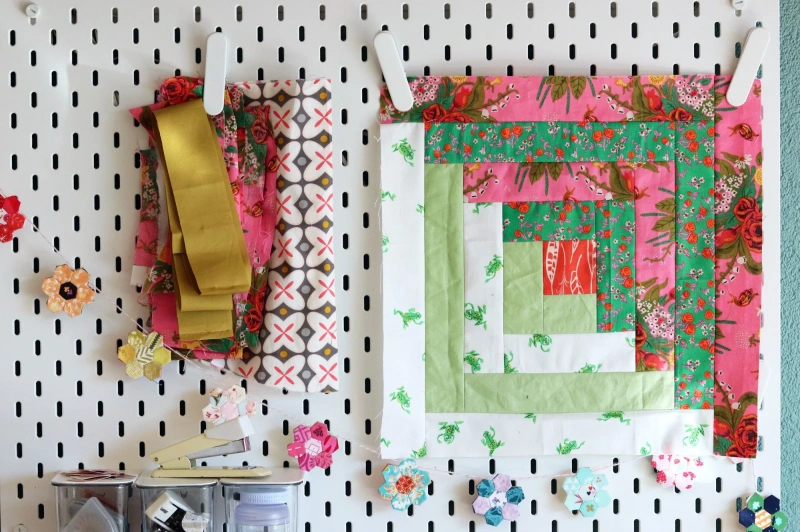
The traditional log cabin quilt uses a center square with strips added in light and dark fabrics. You build each block by sewing strips around the center, creating a strong contrast.
This style looks great with classic colors or bold prints. If you want a timeless look, try Fanda Fabrics’ Quilting Fabric Bundles or Jelly Rolls. These pre-cut strips help you keep your blocks neat and save you time.
Tip: Use red or yellow for the center square to give your quilt a warm, classic touch.
Courthouse Steps
Courthouse Steps is a fun variation of the log cabin quilt. Instead of building strips around all four sides, you add strips to opposite sides in pairs. This creates a stepped effect. You can use Layer Cakes from Fanda Fabrics to cut perfect strips for this style. Mix solids and prints for a playful look.
Start with a center square.
Add strips to the top and bottom.
Then add strips to the left and right.
Repeat until your block reaches the size you want.
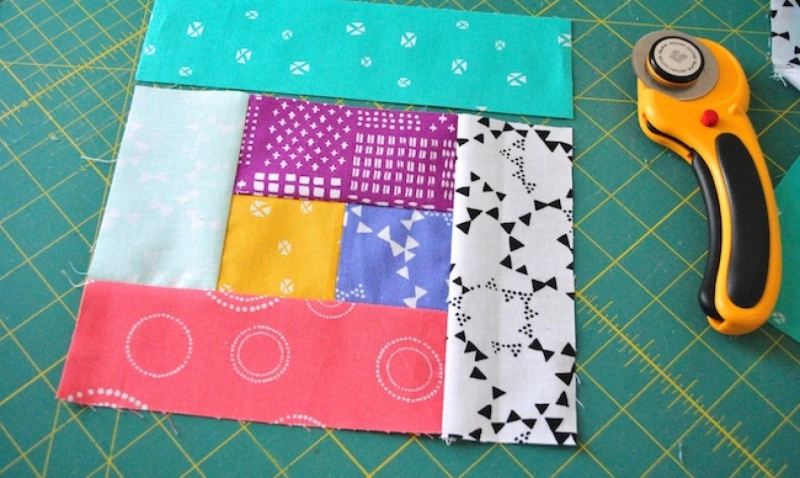
Modern and Improv
If you like creative freedom, modern and improv log cabin quilt blocks let you break the rules. You can use uneven strips, bold colors, or mix up the order. Fanda Fabrics’ Quilting Collection gives you lots of choices for colors and patterns. Try mixing scraps or using unexpected fabrics for a fresh, artistic quilt.
You don’t have to follow a pattern. Just sew strips as you like and see where your creativity takes you.
Manx and Hand-Pieced
Manx log cabin quilt blocks come from the Isle of Man. You make these blocks by folding and hand-sewing strips, often without batting. This style feels cozy and traditional. If you want to try hand-piecing, use soft cotton from Fanda Fabrics’ Quilting Collection. Layer Cakes work well for cutting strips by hand.
Fold strips over the center square.
Sew each strip by hand.
Build up layers for a textured, vintage quilt.
With these variations, you can create a quilt that matches your style. Fanda Fabrics offers everything you need, whether you want a classic, modern, or hand-sewn log cabin quilt.
Log Cabin Quilt Size Options
Choosing the right size for your log cabin quilt blocks can make a big difference in your finished quilt. You get to decide how big or small you want each block, and that choice affects the overall look and feel of your project. Let’s break down your options so you can pick what works best for you.
Cutting Charts
You’ll find that log cabin quilt blocks come in several popular sizes. Here are some common choices:
6″ blocks: Use 1.25″ center squares and strips for a detailed, mini quilt.
12″ blocks: Try 2.5″ strips and a 2.5″ center square for a classic look.
18″ blocks: Go with 2.5″ or 3″ strips for a bold, fast finish.
The block grows as you add rounds of strips. Wider strips mean bigger blocks and fewer seams. Narrow strips give you crisp details and more intricate designs. You can adjust the number of rounds and the strip width to customize your quilt.
If you want a free cutting chart, many patterns offer downloadable PDFs for scrappy log cabin quilts. You can also sketch your chart based on your chosen block size.
Block Size | Strip Width | Center Square | Number of Rounds |
|---|---|---|---|
6″ | 1.25″ | 1.25″ | 4 |
12″ | 2.5″ | 2.5″ | 6 |
18″ | 2.5″-3″ | 2.5″-3″ | 8 |
Fanda Fabrics’ Jelly Rolls and Layer Cakes make it easy to cut strips for any block size. You get pre-cut pieces that fit the most popular log cabin quilt patterns.
Foundation Paper Piecing
If you want perfect accuracy, foundation paper piecing is a great technique for log cabin quilt blocks. You sew fabric directly onto a paper template with printed lines. This method helps you keep your seams straight and your block size exact. You don’t have to worry about measuring a perfect 1/4″ seam allowance.
The paper stabilizes your fabric, so you avoid distortion, even with tiny pieces or tricky angles. You can trim your block using the guides on the template, which means every block comes out uniform. This technique works well for both small and large log cabin quilt blocks.
Tip: Try foundation paper piecing if you want crisp points and even edges, especially for mini quilts or blocks with lots of rounds.
Templates and Kits
You can make your log cabin quilt project easier by using templates and kits. There are patchwork kits, applique kits, laser-cut kits, wall hanging kits, and table runner kits. These kits come with pre-cut materials, curated color palettes, and easy-to-follow instructions.
You save time and get high-quality fabrics from trusted sources. Templates help you cut strips and squares quickly, so you spend less time prepping and more time sewing.
Kits work for all skill levels and let you focus on creativity. Fanda Fabrics offers coordinated bundles and pre-cuts that fit many templates and kits, making your quilting experience smooth and enjoyable.
If you’re looking for a free template, many quilting websites share downloadable patterns for log cabin quilt blocks. You can print these at home and start sewing right away.
Log Cabin Quilt Layouts
When you finish your blocks, the real fun begins—arranging them into a stunning quilt. The layout you choose can completely change the look and mood of your log cabin quilt. Let’s explore some classic and creative ways to put your blocks together.
Classic Arrangements
You’ll find that some layouts never go out of style. The Barn Raising layout stands out as one of the most popular and recognizable patterns for a log cabin quilt.
In this design, you place blocks so the light and dark strips form concentric diamonds or a radiating pattern. Many quilters love this look because it draws your eye to the center and creates a sense of movement.
Other classic layouts include:
Straight Furrows: Arrange blocks in rows so the light and dark strips create zigzag lines across your quilt.
Fields and Furrows: Place blocks to form diagonal lines, giving your quilt a sense of direction.
Off-centered Barn Raising: Try shifting the center for a modern twist on the traditional favorite.
Tip: If you want a cohesive look, use Fanda Fabrics’ coordinated Jelly Rolls or fabric bundles. The pre-cut strips and matching colors make it easy to achieve a harmonious design.
Creative Designs
You don’t have to stick with tradition. Modern quilters often experiment with layouts to make their log cabin quilt unique. You might try:
Asymmetrical Barn Raising: Mix up the placement for a bold, unexpected effect.
Scrappy Layouts: Use a variety of strips from Fanda Fabrics’ bundles for a playful, colorful quilt.
Improv Arrangements: Rotate blocks randomly or combine different block sizes for an artistic, one-of-a-kind quilt.
Fanda Fabrics’ coordinated bundles help you create both cohesive and scrappy looks. The pre-cut strips save you time, so you can focus on arranging your blocks and letting your creativity shine. Whether you love classic patterns or want to try something new, you’ll find endless possibilities for your next quilt.
Tips and Troubleshooting
Precision and Accuracy
Getting your log cabin quilt blocks to line up perfectly can feel tricky, but you can avoid most problems with a few simple habits:
Stick to one pattern or set of instructions. Mixing patterns can get confusing, especially if color or labeling changes.
Cut your fabric strips as accurately as possible. Some methods, like “sew and whack,” skip measuring, but that can make your blocks uneven.
Always cut more strips than you think you’ll need. It’s easy to underestimate, especially when you want a certain color or design.
Square up your block after each round. This keeps your quilt blocks neat, even if it means trimming a little extra fabric.
If your rows don’t line up, check your seam allowance and cutting. Using a 1/4″ presser foot or seam guide helps keep things consistent.
Beginner Advice
If you’re a beginner, start simple and build your skills step by step:
Use light and dark fabric strips, cut to a manageable size like 2 1/2 inches.
Choose a red center square for tradition, or pick a color you love.
Mark the wrong side of your fabric 1/4″ from the edge to guide your seams.
Sew with a consistent 1/4″ seam allowance.
Press seams flat to one side after each addition.
Alternate light and dark strips around the center, growing your block.
Add strips in pairs to keep your block balanced.
You can try adding small embellishments or using scraps for a creative touch. The log cabin block is perfect for using up leftover fabric.
Advanced Tips
Ready to take your quilt to the next level? Try these advanced techniques:
Make quarter log cabin blocks by adding strips to just two sides. Arrange them on point for a modern look.
Experiment with pineapple or wonky log cabin blocks. Add strips at angles and trim for a playful, dynamic design.
Use a controlled, scrappy palette. Pick a few colors or vintage fabrics for a cohesive but lively quilt.
Try chain piecing and a scant 1/4″ seam for efficiency and accuracy.
Use foundation paper piecing templates for perfect results, especially with small or complex blocks.
Don’t be afraid to experiment. Every quilt you make teaches you something new.
Community and Inspiration
Quilting is more fun when you share it with others. Joining a quilting group, online forum, or local guild gives you a place to swap ideas, get advice, and stay motivated. Many quilters find that being part of a community helps them finish projects and learn new skills. You might even make new friends along the way!
Fanda Fabrics encourages you to share your finished log cabin quilt blocks and join their community for support and inspiration. You’ll find that quilting together brings joy, purpose, and a sense of accomplishment.
Conclusion
You can try new layouts, sizes, and styles every time you make a log cabin quilt block. Fanda Fabrics gives you high-quality fabrics and pre-cuts, so you can focus on having fun with your quilt.
Want more ideas? Check out online tutorials, free patterns, and quilting communities. When you finish a project, share it with others—you might inspire someone else to start quilting!
Keep learning, keep sewing, and let your creativity shine.
FAQ
How do I keep my log cabin blocks from getting wonky?
Press each seam after you sew it. Use a quilting ruler to check your block size after every round. Trim any extra fabric as you go. This helps your blocks stay square and neat.
Can I use scraps for a log cabin quilt?
Absolutely! Scraps work great for log cabin blocks. Mix colors and prints for a fun, scrappy look. Just make sure your strips are straight and wide enough for your chosen block size.
What’s the best fabric for log cabin quilts?
You’ll get the best results with 100% cotton quilting fabric. Cotton holds its shape, presses well, and lasts a long time. Fanda Fabrics offers high-quality cotton in bundles, Jelly Rolls, and Layer Cakes.
Do I need a sewing machine to make a log cabin block?
No, you don’t! You can sew log cabin blocks by hand. Hand-piecing works well for traditional or Manx styles. It takes more time, but you get a cozy, handmade feel.