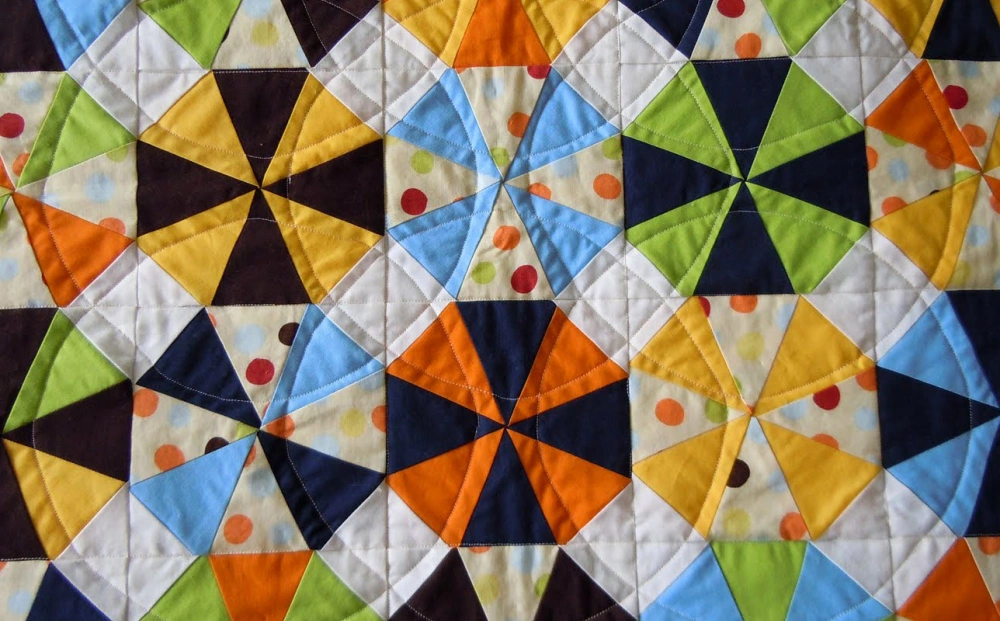
If you want to know how to make a kaleidoscope quilt, you just need the right fabric, a bit of patience, and some step-by-step guidance. You can start with vibrant patterns from Fanda Fabrics, making it easy to cut and piece together beautiful shapes.
Wondering how to make a kaleidoscope quilt that stands out? Choose bold prints, follow a simple layout, and you’ll see your quilt come to life. Anyone can make a quilt like this with quality materials and a few helpful tips.
Key Takeaways
Gather all essential tools and choose bold, medium to large print fabrics for the best kaleidoscope quilt results.
Cut 12 precise wedges per block using templates or specialty rulers, adding seam allowances for a perfect fit.
Sew wedges carefully in pairs and halves, pinning at center points to keep sharp, even blocks.
Arrange blocks creatively by mixing prints and solids, balancing colors and patterns for a striking quilt.
Finish by sewing blocks together, adding borders, quilting, and binding to complete your beautiful kaleidoscope quilt.
Materials for a Kaleidoscope Quilt
Essential Supplies
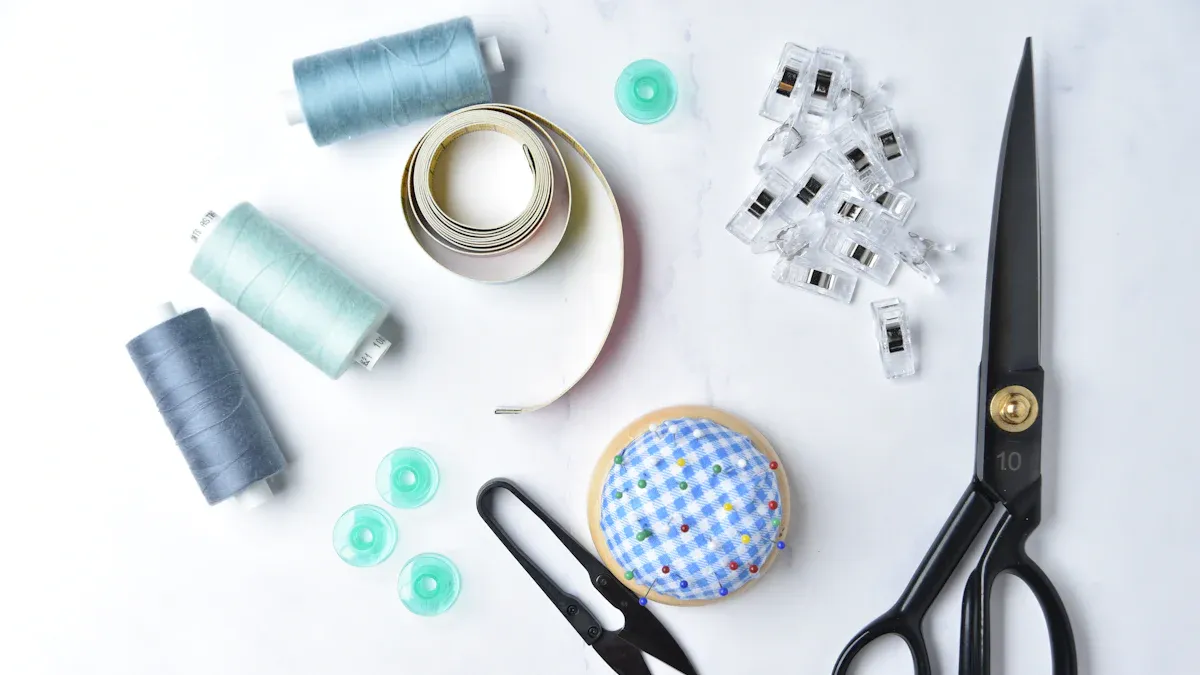
Before you start your kaleidoscope quilt, gather all the tools and materials you’ll need. Having everything ready makes the process smoother and more enjoyable. Here’s a handy list to get you started:
Rotary cutter (like the Olfa Rotary Cutter)
Cutting mat
Quilting rulers (6½” x 12″, 12″ square ruler, or specialty kaleidoscope rulers)
Fabric scissors (Gingher Double-Curved Embroidery Scissors work great)
Seam ripper (Clover Seam Ripper)
Pins or clips
Neutral cotton thread (50 wt. is a solid choice)
Sewing machine with a standard sewing foot
Marking tools
Spray starch
Transparent tape
Optional: Magic Mirrors templates, basting spray, heavy template plastic, or an awl
Tip: Specialty rulers or templates make cutting kaleidoscope pieces much easier. They help you cut precise wedges and reduce mistakes, so you spend less time measuring and more time sewing.
Fanda Fabrics Recommendations
You want your quilt to pop, so choosing the right fabric is key. Fanda Fabrics offers several options that make your project shine:
Product Line | Why It’s Great for Kaleidoscope Quilts |
|---|---|
Intricate, symmetrical patterns with bold colors and a smooth, crisp texture. Holds shape beautifully. | |
Pre-cut, coordinated fabrics in vibrant palettes. Perfect for mixing and matching with ease. | |
Wide variety of 100% cotton prints and solids. Durable, soft, and easy to sew. |
You can find these fabrics in different sizes and styles, so you’ll always have the right amount for your quilt. Fanda Fabrics even lets you customize colors and cuts to fit your vision.
Choosing the Right Prints
Picking the right print makes all the difference in a kaleidoscope quilt. Look for:
Medium to large prints with repeats between 8″ and 24″
Bold designs or novelty prints with strong lines and contrasting colors
About 20%-30% background in the fabric for clear, crisp blocks
Fabrics with movement and strong imagery for more striking patterns
Avoid stripes or strong grids, as they don’t create varied blocks. If you love the fabric, you’ll love the quilt even more. Fanda Fabrics’ kaleidoscope prints offer the perfect mix of color, contrast, and pattern, making your quilt blocks truly unique.
Note: Planning your fabric usage helps you avoid waste. Use leftover pieces for smaller projects or quilt backs, and you’ll get the most out of every yard.
How to Make a Kaleidoscope Quilt: Step-by-Step
Ready to dive in? This step-by-step tutorial will walk you through how to make a kaleidoscope quilt from start to finish. You’ll learn how to cut your triangles, assemble the blocks, lay out your quilt, and add those final touches that make your project shine. Let’s get started!
1. Cutting the Wedges
Preparing your fabric. Press and starch it so you get crisp, smooth cuts. For a traditional kaleidoscope quilt block, you’ll need to cut 12 wedges per block. These wedges come together to form the signature kaleidoscope look.
Here’s how to cut your triangles:
Choose Your Template or Ruler:
If you have a specialty kaleidoscope ruler, use it for accuracy. No ruler? No problem. You can make a template from heavy plastic or cardboard. Just remember, you want to cut 60-degree triangles for some designs, but for a classic kaleidoscope quilt, you’ll usually cut wedges that add up to 360 degrees—so 12 wedges at 30 degrees each.Align and Cut:
Place your template on the fabric, making sure the grain lines up. Use a rotary cutter and a self-healing mat. Always cut away from your body and close the blade when you’re done. Limit yourself to four layers at a time for better control.Mind the Repeats:
For the best effect, use medium to large prints with repeats between 8 and 24 inches. This helps your triangles show off the fabric’s unique motifs.Add Seam Allowance:
Don’t forget to add a scant 1/4 inch seam allowance to each wedge. This helps your blocks fit together perfectly after sewing.
Tip: Mark the center tip of each wedge before moving your template. This keeps your points sharp and your triangles even.
Common mistakes during this step include misaligned wedges, uneven points, and forgetting to add extra seam allowance. Always double-check your cuts and use a consistent seam allowance to avoid these issues.
2. Assembling the Blocks
Now it’s time to sew your triangles into blocks. Here’s how to make a kaleidoscope quilt block that’s crisp and precise:
Arrange the Wedges:
Lay out 12 triangles in a circle, alternating prints if you want a more dynamic look. Make sure the pattern flows from one wedge to the next.Sew in Paris:
Start by sewing two triangles together, right sides facing. Use a 1/4 inch presser foot for even seams. Press the seam toward the darker fabric.Join Pairs into Halves:
Sew the pairs together to make half-block units. Again, press toward the dark triangle. When you join the halves, press the final seam open. This reduces bulk and helps your block lay flat.Pin Carefully:
When you join the halves, pin at the center point where all the triangles meet. This keeps your points sharp and your block looking professional.Trim and Square:
After sewing, trim the block to square it up. This step helps your quilt come together smoothly later.
Note: If you notice your points aren’t matching, check your seam allowance and pin placement. Take your time—precision here pays off!
3. Laying Out the Quilt
This is where your creativity shines. Laying out your quilt lets you play with color, pattern, and movement.
Mix Solids and Prints:
Pair kaleidoscope fabrics with solids from Fanda Fabrics to make the patterns pop. Try featuring different parts of the print in each block for extra interest.No Sashing Needed:
Most quilters skip sashing between blocks. Instead, use a unifying border to bring everything together.Balance Your Design:
Spread out bold colors and large motifs so they don’t compete. Step back and look at the whole quilt before sewing the blocks together.Embrace Contrast:
Don’t be afraid to mix high-contrast triangles. This adds depth and makes your kaleidoscope quilt more dynamic.
Tip: Commit to your design, even if it feels bold at first. As you add more blocks, the quilt will come together beautifully.
4. Finishing Touches
You’re almost done! Here’s how to finish your kaleidoscope quilt like a pro:
Sew the Blocks Together:
Join your blocks row by row. Use pins to match seam intersections and remove them just before sewing over them.Press Seams Open:
Pressing seams open at this stage helps reduce bulk and keeps your quilt top flat.Add Borders:
Choose a border fabric from Fanda Fabrics’ Quilting Collection to frame your quilt. This step pulls the whole design together.Layer and Quilt:
Make your quilt sandwich with backing and batting. Baste, then quilt as desired. Straight lines or echo quilting work well with kaleidoscope designs.Bind and Finish:
Add your binding, then give your quilt a final press. Stand back and admire your work!
Safety Reminder: Always cut away from your body, keep your rotary cutter sharp, and use a ruler with a lip to prevent slipping.
This tutorial shows you how to make a kaleidoscope quilt from start to finish. With the right triangles, careful assembly, and a creative layout, you’ll create a quilt that’s both striking and unique. Fanda Fabrics’ vibrant prints and bundles make the process even more enjoyable, giving you endless options for your next project.
Tips for a Stunning Kaleidoscope Quilt
Aligning Patterns
Getting your patterns to line up just right can make your quilt look amazing. Start by drafting a precise template with the correct angle for your wedges. Mark seam lines on each piece so you know exactly where to sew. Handle the fabric gently, especially along the bias edges, to avoid stretching.
Before you cut all your pieces, audition your fabric placement. Lay out a few wedges and see how the colors and motifs interact. This step helps you spot any issues before you commit.
Pinning ribbons or using a design wall can help keep your wedges in order as you work. Take your time with cutting and sewing. Accuracy here pays off with a crisp, symmetrical design.
Color placement is just as important as pattern alignment. Try alternating light and dark fabrics within each block. This trick creates the illusion of curves and movement, making your quilt pop. Arrange your blocks on a design wall and snap a photo.
Sometimes, seeing your work from a distance helps you spot areas that need adjustment. Don’t be afraid to step back and view your quilt from across the room. You’ll notice how the colors play together and where you might want to make changes.
Troubleshooting Common Issues
Even experienced quilters run into problems. Here are some common issues and how you can fix them:
Sewn blocks facing the wrong way? If you can’t take them apart, quilt over the mistake to mimic the correct orientation, especially if it’s near the edge.
Skipped stitches? Double-check your stitch length dial and make sure it’s set correctly.
Cut your binding strips the wrong way? Sew them together with straight seams instead of diagonal ones to save fabric.
Feeling tired or sore? Use a padded mat and take breaks. Watch your favorite show while hand sewing to make the process more enjoyable.
Remember, small mistakes often disappear once the quilt is finished. Stay patient and keep going!
Using Fanda Fabrics for Best Results
You want your kaleidoscope quilt to stand out. Fanda Fabrics offers vibrant, symmetrical prints that make pattern alignment easier and more striking. Their pre-cut bundles save you time and help you mix colors with confidence. Try using a limited color palette from their collections to focus on value and texture.
This approach follows modern quilting trends and lets the kaleidoscopic effect shine without overwhelming the design. Whether you love bold magentas, deep blues, or soft pastels, Fanda Fabrics has options that fit your style.
With high-quality materials and coordinated bundles, you’ll find it easier to achieve sharp points, smooth seams, and a quilt that truly dazzles.
Conclusion
You’ve learned how to cut, sew, and finish a kaleidoscope quilt with confidence. Using quality fabrics from Fanda Fabrics makes every step easier and your results more vibrant. If you want extra help, check out beginner guides like Electric Quilt’s software or Bethany S. Reynolds’ Stack-n-Whack® method.
For more ideas, fabric bundles, or downloadable guides, visit Fanda Fabrics. Trust yourself—your next quilt can be a true showstopper!
FAQ
How do I keep my kaleidoscope quilt blocks from shifting while sewing?
You can use pins or fabric clips to hold your wedges in place. Sew slowly and check your alignment after each seam. If you need extra help, watch a video for step-by-step visuals.
Can I find a video tutorial for making a kaleidoscope quilt?
Yes! Many quilters share their process online. Search for a video tutorial that matches your skill level. Watching someone sew the blocks can make the steps much clearer.
What if I don’t have specialty rulers for cutting wedges?
No worries! You can make your template from cardboard or plastic. Some video guides show how to do this. Check out tutorial resources for printable templates and tips.
How do I choose the best fabric for a kaleidoscope quilt?
Pick fabrics with bold, repeating patterns and strong colors. Fanda Fabrics offers great options. Look for prints that create interesting shapes when cut into wedges.
Where can I find more tutorial resources for kaleidoscope quilts?
You can find extra tutorial resources on quilting blogs, YouTube, or fabric shop websites. Many include a helpful video or downloadable guides to walk you through each step.